
Here is the SEO-optimized article tailored for the Nissan Leaf 24kWh installation market, designed to attract DIY enthusiasts and drive conversions.
Top DIY Tools & Tips for Installing Your Nissan Leaf 24kWh Battery
If you are reading this, you likely own a first-generation Nissan Leaf (2011-2015) and are considering a battery upgrade. The original 24kWh pack is notorious for degradation, often leaving drivers with a range of less than 60 miles. While this can feel like the end of the road, we are here to tell you it is just a pit stop.
As a professional in the EV battery industry, I have seen thousands of Leaf owners breathe new life into their cars. Replacing the 24kWh battery is not just about restoring range; it is about reviving a reliable vehicle at a fraction of the cost of a new EV. However, before you dive under the hood, you need the right gear. This guide details the essential DIY tools and preparation steps for a safe and successful Nissan Leaf 24kWh battery installation.
Why Upgrade Your 24kWh Leaf?
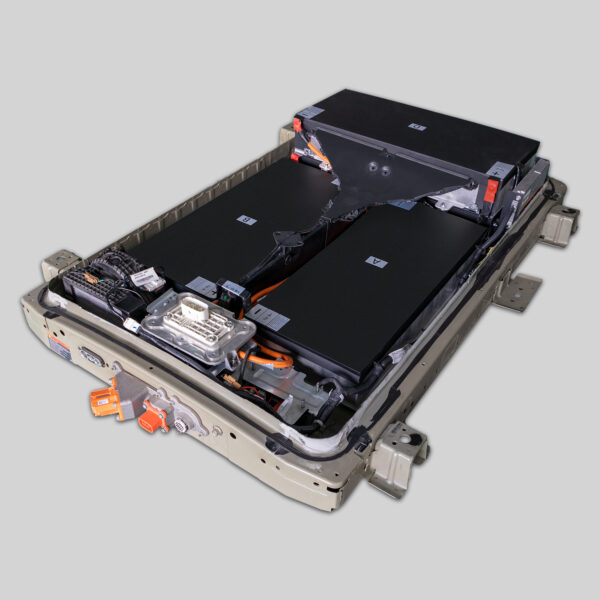
Before we get to the wrenches and sockets, let us address the “why.” The Nissan Leaf ZE0 (24kWh models) is a mechanically robust car. Instead of scrapping a perfectly good chassis because the battery died, upgrading allows you to continue driving a zero-emission vehicle.
At CNS BATTERY, we specialize in OEM-compatible solutions for Nissan and BMW. Our replacement packs utilize brand-new CATL cells, ensuring you get a range far superior to the original, often restoring the car to 100% of its former glory (or better, if you opt for a capacity upgrade).
Essential Safety Gear: Non-Negotiable
Working on an EV battery is not like changing oil. High voltage is dangerous. Before you touch a single bolt, ensure you have the following safety equipment:
- Class 0 Insulated Rubber Gloves: These must be rated for at least 1000V. Always inspect them for pinholes or tears before use.
- Dielectric (Non-Conductive) Tools: While standard mechanics tools work for chassis work, having insulated screwdrivers and pliers for electrical connections is highly recommended.
- Safety Glasses: Protect your eyes from debris and potential sparks.
- Rubber Matting: Place this on the floor where you are working to insulate yourself from ground contact.
The Core Toolkit: What You Will Need
Assuming you have sourced a high-quality replacement pack (like those engineered by CNS BATTERY, designed for a perfect OEM fit), here is the specific hardware you need for the job.
1. The Socket Set (The Heavy Lifting)
The battery is held in by numerous bolts. You will need a comprehensive socket set ranging from 10mm to 19mm.
- Crucial Tool: A breaker bar or a high-torque impact wrench. The bolts securing the battery tray to the chassis can be extremely tight due to rust and torque specs. A standard ratchet might not cut it.
- Extensions: You will need long extensions to reach the bolts in tight spaces.
2. The Torque Wrench (Precision Matters)
While you use the breaker bar to remove the old bolts, you must use a torque wrench to reinstall the new battery. Over-tightening can crack the battery casing or strip the threads in the chassis. Under-tightening risks the battery vibrating loose. Refer to the Nissan service manual specs (usually around 80-100 Nm for chassis bolts).
3. Electrical Contact Cleaner & Dielectric Grease
When you disconnect the old battery, the terminals may be corroded.
- Contact Cleaner: Spray this on the HV connectors and low-voltage connectors to ensure a clean connection.
- Dielectric Grease: Apply this to the clean terminals before connecting the new battery. This prevents future oxidation and ensures optimal conductivity.
4. OBD2 Scanner (The Digital Key)
This is often the step DIYers forget until the car won’t start. After installing the new battery, the car’s Body Control Module (BCM) needs to recognize it.
- You will need an OBD2 scanner capable of advanced functions (or a specific Leaf tool like a Leaf Spy or Consult-III interface) to reset the battery management system (BMS) codes and confirm the “Ready” signal.
5. Hydraulic Jack & Jack Stands
You cannot access the Leaf battery from inside the cabin; it is underneath the car.
- You will need to lift the car safely. Never work under a car supported only by a jack. You will need at least two jack stands rated for the Leaf’s weight (approximately 3,300 lbs).
The Installation Process: A Professional Overview
Based on our extensive experience supporting thousands of installations, here is a high-level view of the process to help you scope the job.
Step 1: Preparation and Isolation
Disconnect the 12V auxiliary battery first. This kills the car’s main power relays. Wait at least 10 minutes to allow capacitors to discharge.
Step 2: Undercarriage Access
Using your jack and stands, lift the vehicle. Remove the plastic undertray to expose the battery casing.
Step 3: Disconnection
Disconnect the high-voltage (HV) orange connector. Wear your gloves. Then, disconnect the low-voltage communication cables.
Step 4: Removal and Installation
Remove the chassis bolts (there are many – typically over 30). Carefully lower the old pack and slide in the new CNS BATTERY pack. Thanks to our OEM-standard design, the bolt holes and connectors should align perfectly without modification.
Step 5: Reassembly and Testing
Reconnect the cables, reinstall the undertray, and lower the car. Reconnect the 12V battery. Use your OBD2 scanner to verify the system voltage and clear any error codes.
Why Choose a Professional-Grade Replacement?
When replacing a 24kWh Leaf battery, the quality of the pack dictates the difficulty of the installation.
- Perfect Fit: Our batteries are engineered to match the original dimensions exactly. You should not need to cut brackets or modify wiring.
- Plug-and-Play: The connectors (both HV and LV) are OEM-spec. If your tools are ready, the physical swap can often be completed in 1-2 hours by a competent mechanic.
- Peace of Mind: Unlike used or refurbished packs, CNS BATTERY offers a 2-year / 80,000 km warranty. If you encounter any issues during installation, our technical experts are available to guide you.
Frequently Asked Questions (FAQ)
Q1: Can I really install a Nissan Leaf battery myself?
Yes, many of our customers are DIY enthusiasts. If you have basic mechanical skills, the right tools (especially a hydraulic jack and torque wrench), and strictly follow safety protocols, it is achievable. However, if you are uncomfortable working with high voltage, we strongly recommend hiring a certified mechanic. The process is generally plug-and-play, but safety is paramount.
Q2: How long does it take to replace a Leaf battery?
For a professional technician, the replacement typically takes 1-2 hours. For a DIY user doing it for the first time, it may take 3-4 hours, depending on how rusted the chassis bolts are and your familiarity with the undercarriage.
Q3: What is the benefit of using a new CATL cell pack vs. a refurbished one?
Refurbished packs often use degraded cells from other dead batteries. They are prone to swelling, rapid capacity loss, and safety hazards. Our packs use brand-new CATL lithium cells, guaranteeing superior durability, safety, and a range that matches the original factory specifications (or exceeds them if you upgrade to a higher kWh option).
Q4: Do I need special programming tools after installation?
Yes. After the physical swap, you need to reset the car’s communication with the Battery Management System (BMS). You will need an OBD2 scanner capable of handling EV protocols. Our customer service team can provide specific guidance on the reset procedure if you encounter errors.
Q5: What is the warranty on your replacement batteries?
We stand by the quality of our engineering. All CNS Automotive Batteries come with a minimum 2-year / 80,000 km warranty (whichever comes first). This covers defects in materials and workmanship, as well as performance degradation, ensuring your investment is protected.
Ready to revive your Nissan Leaf? Don’t let a dead battery end your EV journey. Get a free custom quote for a high-performance, OEM-compatible replacement pack today.


