
Ultimate Nissan e-NV200 24kWh to 68kWh Replacement Tutorial
If you own a Nissan e-NV200, you likely rely on it for daily commercial deliveries, family transport, or specialized conversions. However, the original 24kWh battery often leaves drivers struggling with range anxiety, barely managing 100-120km on a good day. As a battery expert at CNS BATTERY, I’ve seen countless e-NV200 owners trapped by this limitation. The good news is that a complete transformation is possible. By upgrading to a modern 68kWh lithium-ion battery pack, you can effectively double—or even triple—your vehicle’s capabilities, turning it into a long-range electric workhorse.
This guide serves as your comprehensive roadmap for this specific upgrade. We will cover the technical compatibility, the step-by-step physical replacement process, and the critical programming steps required to bring your vehicle back to life with significantly enhanced performance.
🚚 Why Upgrade from 24kWh to 68kWh?
The Nissan e-NV200 originally launched with modest battery capacity. While it served as a good entry point for electric logistics, the 24kWh pack is simply insufficient for modern usage demands.
- The Range Reality: A degraded or even brand-new 24kWh pack offers roughly 100-130km of real-world range. This restricts you to very short urban loops.
- The 68kWh Solution: By installing a 68kWh pack (often utilizing high-density NMC chemistry), you unlock a potential range of 380km to 420km.
- Economic Impact: For commercial users, this means completing full-day routes without the stress of finding a charger mid-shift. For conversion enthusiasts (campervans, mobile offices), it means powering auxiliary systems without sacrificing driveability.
Expert Note: At CNS BATTERY, we specialize in OEM-compatible packs for Nissan. Our 68kWh solution is engineered to fit the e-NV200 chassis without major structural modifications, utilizing the existing mounting points.
🛠️ Pre-Installation: Tools and Safety
Before you begin the physical swap, ensure you have the right environment and equipment. Lithium-ion batteries are powerful but require respect.
Safety First:
- Disconnect: Always disconnect the 12V auxiliary battery first to cut power to the vehicle’s systems.
- PPE: Wear insulated gloves and safety glasses.
- Environment: Work in a dry, well-ventilated area. Avoid metal tools contacting both the positive and negative terminals simultaneously.
Tools Checklist:
- Hydraulic jack and axle stands (rated for the vehicle weight)
- Torque wrench (critical for final bolt tightening)
- Insulated socket set
- Battery lifting crane or transmission jack (recommended due to weight)
- Diagnostic scanner (compatible with Nissan Consult-3 protocols)
⚙️ Step-by-Step Replacement Process
This section details the physical transformation from the old 24kWh unit to the new 68kWh powerhouse.
1. Removal of the 24kWh Pack
- Lift and Secure: Raise the vehicle using the hydraulic jack and secure it on axle stands.
- Undertray Removal: Remove the plastic undertray to access the battery bolts.
- Connector Disconnection: Locate the main service disconnect (usually a bright orange lever) and pull it to isolate the high voltage. Disconnect the high-voltage (HV) interlock loop and the main HV cables. Label these wires if they are not keyed.
- Unbolting: Remove the retaining bolts securing the battery to the chassis. The 24kWh pack is relatively light, but use proper lifting technique to avoid back injury.
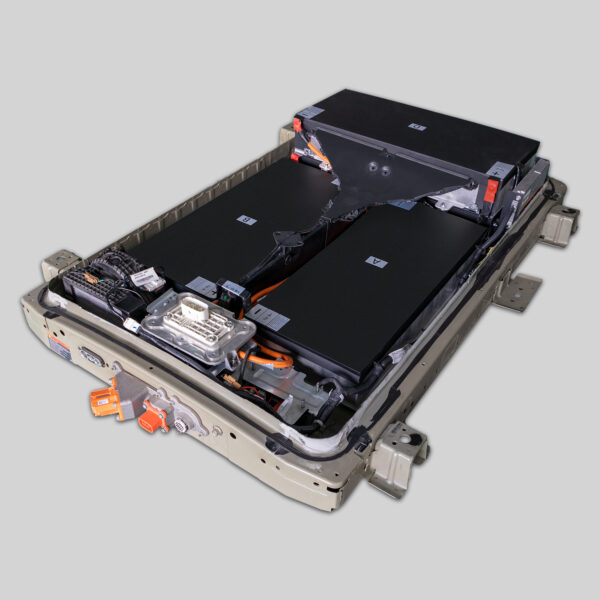
2. Preparing the 68kWh Pack
Our CNS 68kWh packs are designed as Plug-and-Play solutions. However, you must verify:
- The Battery Management System (BMS) harness matches the vehicle’s original configuration.
- The HV cable routing matches the path from the battery to the motor controller.
3. Installation of the 68kWh Pack
- Positioning: Carefully lift the 68kWh pack into place using the jack. Due to the increased capacity, this pack is larger and heavier than the original 24kWh unit. Ensure it sits flush on the mounting brackets.
- Bolting: Reinstall the retaining bolts. Crucially, torque these bolts to the manufacturer’s specification (typically 80-100 Nm, but verify with your specific pack manual) to ensure a secure, vibration-free fit.
- Reconnection: Reconnect the HV cables and interlock loop. Reinsert the main service disconnect.
💻 Programming and Calibration
Physically installing the battery is only half the battle. The vehicle’s Electronic Control Unit (ECU) needs to recognize the new chemistry and capacity.
The BMS Handshake:
Modern EVs use a complex communication protocol between the battery and the car. Simply plugging in the new battery will likely result in error codes or a “Limp Mode.”
- Initial Power-Up: Reconnect the 12V battery. Turn the ignition to “ON” (do not start the motor). Observe the dashboard for error lights.
- Diagnostic Session: Connect your Nissan Consult-3 scanner (or equivalent).
- VIN Matching: Input the vehicle’s VIN into the new battery’s BMS module. This ensures the battery knows the specific history and requirements of your chassis.
- SOC Calibration: Perform a “State of Charge” reset. This involves fully charging the new battery and then performing a forced discharge cycle (if required by the software) to allow the ECU to map the new voltage curve accurately.
Troubleshooting Tip: If the car displays “Battery Error” or “Check Charging System,” the BMS likely needs a firmware update. Contact your supplier (like CNS BATTERY) for the latest software version.
🏁 Post-Installation Testing
Before hitting the road, conduct a rigorous test:
- Leakage Test: Use a multimeter to check for any ground faults or leakage current before closing the undertray.
- Range Test: Drive the vehicle in a safe area, monitoring the voltage sag under acceleration.
- Thermal Check: Ensure the cooling fans (if active) are functioning correctly, especially if your new pack has a liquid cooling system.
📝 Conclusion
Upgrading your Nissan e-NV200 from a 24kWh to a 68kWh battery is not just a repair; it is a performance rebirth. You are effectively turning a short-range urban delivery van into a capable long-distance electric vehicle. By following this guide and prioritizing safety and calibration, you can achieve a seamless integration that feels factory-original.
If you encounter any technical hurdles during the BMS programming or need a specific compatibility check for your VIN, our team of experts is ready to assist.
Ready to transform your e-NV200? Contact our technical team for a free compatibility assessment and get your custom quote today.
Contact Our Technical Experts Now
❓ Frequently Asked Questions (FAQ)
1. Is the 68kWh upgrade a direct fit for the e-NV200?
Yes, our CNS 68kWh packs are engineered to utilize the existing chassis rails and mounting points of the Nissan e-NV200. While the physical dimensions are larger than the original 24kWh pack, the design conforms to the underbody profile without interfering with suspension or ground clearance.
2. Do I need to modify the car’s software after the swap?
Yes. The vehicle’s ECU must be programmed to recognize the new battery’s capacity and chemistry (NMC). This typically involves VIN coding and a State of Charge (SOC) reset using a professional diagnostic tool like Consult-3.
3. What is the expected range after upgrading to 68kWh?
With a brand-new 68kWh pack, you can expect a real-world range of approximately 380km to 420km under mixed driving conditions. This is a massive improvement over the original 100-120km range.
4. How long does the installation take?
For a professional technician, the physical installation (removal of the old pack and installation of the new one) usually takes about 1.5 to 2 hours. However, you should allocate additional time (approximately 1 hour) for the BMS programming, calibration, and safety testing.
5. Does this upgrade affect the vehicle’s warranty?
Any modification to the high-voltage system may affect the original manufacturer’s warranty. However, our CNS batteries come with their own comprehensive warranty (typically 2 years or 80,000km) covering defects in materials and workmanship.


