DIY Guide to New Nissan Leaf 24kWh Installation
Is your Nissan Leaf’s range dropping below 60 miles? If you drive a first-generation Nissan Leaf (ZE0, 2011-2015), the 24kWh battery might be the original heart of your car. While these batteries were revolutionary, they degrade over time. Replacing them doesn’t mean you have to buy a new car. With the right preparation and safety mindset, upgrading your 24kWh battery can be a rewarding DIY project that saves you thousands compared to dealership prices.
Note: While the 24kWh is a classic spec, many owners are now upgrading to higher capacities (like 40kWh or 62kWh) for better range. If you are looking for a Brand New 24kWh Replacement or considering an Upgrade, CNS Battery offers OEM-compatible solutions built with new CATL cells. Get a Free Compatibility Check & Quote Here.
⚡ Why Replace Your Old 24kWh Pack?
The original 24kWh Leaf battery used laminated Lithium Manganese Oxide (LMO) cells. After a decade, these often suffer from capacity fade, dropping from 84 miles (EPA) to sometimes less than 40 miles.
Key Benefits of a New 24kWh (or Upgrade):
- Restored Range: Go from “range anxiety” to reliable daily commuting.
- New Battery Management System (BMS): Modern replacements include smarter BMS for better thermal management.
- Cost Efficiency: A DIY replacement costs a fraction of a new EV.
🛠️ Pre-Installation: Tools & Safety Gear
Before you touch a wrench, ensure you have the right equipment. Safety is paramount when dealing with high-voltage EV components.
| Category | Items Needed |
|---|---|
| Mechanical Tools | Floor jack, Jack stands, Socket set (10mm, 14mm), Torx bits (T45/T50), Flathead screwdriver. |
| Electrical Tools | Multimeter, Insulated gloves (Class 00, 1000V rated), Safety glasses. |
| Consumables | Dielectric grease, Fresh coolant (Nissan P/N or equivalent), Zip ties. |
Safety First: Always disconnect the 12V auxiliary battery first to kill the vehicle’s main computer before touching the HV connectors.
📝 Step-by-Step Installation Guide
Step 1: Vehicle Preparation
- Park the Leaf on a flat, hard surface.
- Engage the parking brake and chock the rear wheels.
- Open the hood and disconnect the negative terminal of the 12V battery. Wait 10 minutes for capacitors to discharge.
Step 2: Removing the Undertray & Skid Plate
- Jack up the front of the car and place it securely on jack stands.
- Remove the plastic undertray screws (approximately 30-40 screws).
- Remove the metal skid plate bolts (14mm). Carefully lower the skid plate.
Step 3: Disconnecting the High Voltage (HV) System
- Locate the orange HV service plug (usually near the driver’s side B-pillar inside the cabin or on the battery pack).
- Remove the service plug to physically cut power to the pack.
- Disconnect the main positive and negative HV cables from the contactors. Mark them if necessary to ensure correct reconnection.
Step 4: Detaching Ancillaries
- Coolant Lines: The 24kWh pack has two coolant lines. Place a drain pan underneath, disconnect the lines, and cap them immediately to prevent spillage and air intake.
- Signal/Communication Harness: Unclip the communication harness connector from the Battery Management System (BMS) on top of the pack.
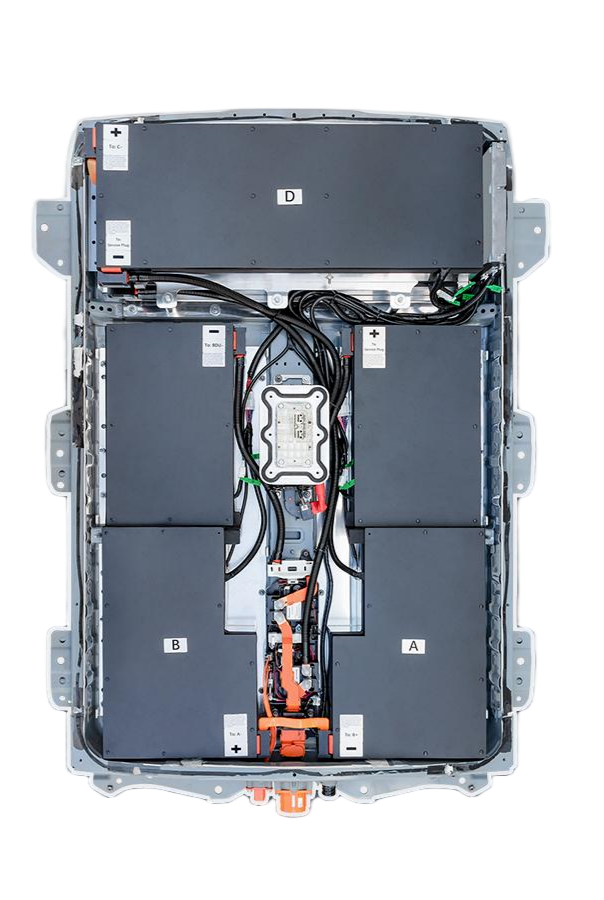
Step 5: Removing the Battery Pack
- The 24kWh pack is held by 8-10 through-bolts (Torx T45/T50).
- Use your floor jack (with a piece of wood on top) to support the center of the battery.
- Remove the bolts and slowly lower the jack to remove the pack. Warning: The 24kWh weighs approximately 300kg (660 lbs). Ensure your jack is rated for this weight.
Step 6: Installing the New Pack
- Inspection: Before lifting, inspect the new CNS Battery pack. Ensure the HV terminals are clean and the casing is undamaged.
- Lifting: Carefully jack the new pack into position. Align the bolt holes.
- Torquing: Tighten the through-bolts to Nissan specification (typically 40-50 Nm). Do not over-tighten.
Step 7: Reconnecting & Refilling
- Reconnect the coolant lines and top up the coolant reservoir.
- Reconnect the signal harness and HV cables.
- Reinstall the service plug.
- Reconnect the 12V battery.
💡 Pro Tips for a Smooth DIY
- BMS Programming: Most modern aftermarket packs (including CNS) come pre-programmed. However, if your dashboard shows “Battery Error,” you may need to reset the BMS via OBD2 or contact the supplier for a VIN-specific unlock code.
- Coolant Type: Use Nissan-specific coolant (or a high-quality organic acid coolant). Using the wrong type can corrode the battery cooling plates.
- The “First Boot”: After installation, do not drive immediately. Turn the key to “ON” and wait for the pre-charge cycle (you might hear relays clicking). Check for error messages.
🔄 Upgrade vs. Replace: Is 24kWh Still Enough?
While replacing the 24kWh is cost-effective, technology has moved on. Many Leaf owners are opting to “Remap and Swap” to larger packs.
Why consider a 40kWh or 62kWh upgrade?
- Double the Fun: A 40kWh pack can offer up to 150 miles of range.
- Better Chemistry: Newer packs use NMC (Nickel Manganese Cobalt) cells, which degrade slower than the old LMO cells.
- Future Proofing: If you are doing the work anyway, upgrading the hardware makes sense.
CNS Battery Advantage: We manufacture packs using Brand New CATL cells, not recycled junk. This means your “new” 24kWh (or upgraded pack) will have a lifespan far exceeding the original factory battery, backed by a 2-Year / 80,000 km warranty.
📞 Ready to Revive Your Leaf?
Replacing your Nissan Leaf’s battery is a significant step toward sustainable motoring. Whether you stick with the classic 24kWh or upgrade to a high-capacity modern pack, doing it yourself saves you money and gives you a deep understanding of your vehicle.
If you have questions about compatibility with your specific Leaf model (ZE0, AZE0, or ZE1) or need guidance on the installation process, our technical team is here to help.
Don’t gamble with your car’s powertrain. Get a Free Custom Quote and Technical Support Today.
Contact Our Technical Experts Now
❓ Frequently Asked Questions (FAQ)
Q1: Can I really install a Nissan Leaf battery myself?
A: Absolutely. While the 24kWh pack is heavy (~300kg), the process is largely mechanical (bolts and bolts). If you can change your own oil or tires, you have the mechanical aptitude. The key is having a strong floor jack and following the safety steps (disconnect 12V first).
Q2: What is the difference between a “New” 24kWh and a “Refurbished” one?
A: This is critical. Many sellers sell “refurbished” packs made from used cells. CNS Battery sells packs built with 100% Brand New CATL cells. A refurbished pack might save you money now but will likely fail in 6-12 months due to cell imbalance. A new pack from CNS lasts for years.
Q3: Will a new battery fix the “Battery Capacity Reduced” error?
A: Yes. This error is usually caused by degraded cells or a faulty BMS. A new CNS Battery pack comes with a brand new BMS and fresh cells, resetting your capacity to 100%.
Q4: How long does the installation take?
A: For a DIYer with the right tools, expect 2 to 3 hours. This includes draining and refilling coolant. A professional shop can often do it in under an hour.
Q5: What if my car doesn’t recognize the new battery?
A: This is rare with CNS packs as they are designed for OEM compatibility. However, if a communication error occurs, our customer service provides remote video guidance to reset the BMS or check connections. We stand by our 24/7 technical support.