Here is the SEO-optimized article tailored for your requirements.
Top DIY Tools for New Nissan Leaf Plus Install
Are you ready to double your range? If you are reading this, you are likely a Nissan Leaf owner (ZE0, AZE0, or ZE1) looking to upgrade to a Nissan Leaf Plus (or a larger capacity pack like 62kWh or 68kWh). You are not alone. The stock battery degradation or limited range is a common pain point, but the solution—installing a brand-new aftermarket pack—can be surprisingly accessible.
As a CNS BATTERY expert with over a decade of experience in EV powertrain R&D, I am here to guide you through the essential DIY tools you need for a safe and successful Nissan Leaf battery replacement. While the internet is full of “plug-and-play” promises, having the right toolkit is what separates a smooth weekend project from a costly mistake.
Why Upgrade to a Nissan Leaf Plus Battery?
Before we dive into the wrenches and gloves, let’s talk about why you are doing this.
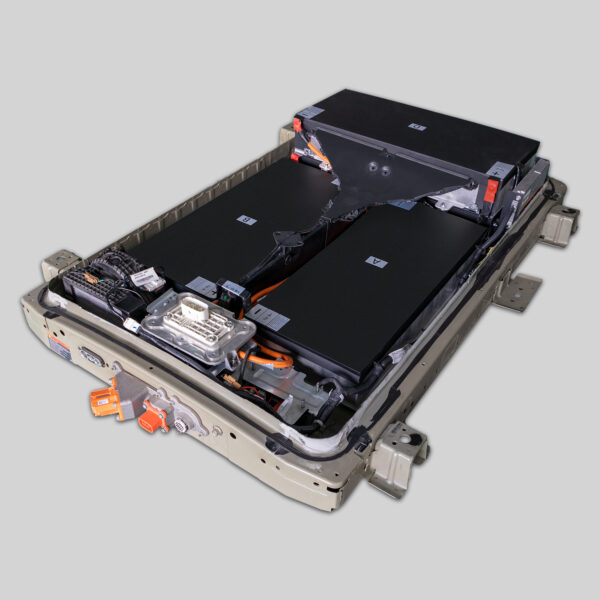
The Nissan Leaf Plus (specifically models like the ZE1) originally came with larger capacity packs (62kWh or even 68kWh). Upgrading your older ZE0 or AZE0 model to this Plus specification isn’t just about vanity; it is about practicality.
- Range Anxiety Cure: Jump from ~170km (105 miles) to over 400km (250 miles) on a single charge.
- Cost Efficiency: Buying a brand-new Leaf Plus costs tens of thousands of dollars. Replacing the battery with a brand-new CATL cell pack from CNS BATTERY costs roughly 50% less than OEM prices, and a fraction of a new car.
- Zero-Failure Reliability: Unlike refurbished batteries, a new Plus-spec battery ensures you aren’t inheriting someone else’s degradation.
The CNS BATTERY Advantage
At CNS, we don’t just sell batteries; we provide OEM-compatible powertrains. When you purchase a Nissan Leaf Plus battery, you receive:
- Brand-New CATL Cells: The gold standard in lithium-ion technology.
- Plug-and-Play Design: Precise OEM-standard dimensions and connectors.
- Comprehensive Warranty: 2 years or 80,000 km, covering manufacturing defects and performance degradation.
However, even the best battery needs the right tools for installation. Here is our professional checklist.
Essential DIY Toolkit for Nissan Leaf Plus Installation
Installing a high-voltage battery is serious work. While the process is designed to be user-friendly, cutting corners on safety gear is never an option. Here are the top tools you must have in your garage.
1. High-Voltage Insulated Safety Gear (The Non-Negotiables)
Never touch the battery terminals without these.
- Insulated Rubber Gloves (Class 00, 500V+): This is your primary defense against lethal electric shocks. CNS BATTERY provides these in our free installation kits, but if you are sourcing your own, ensure they are rated for at least 1000V and are ARC-rated.
- Arc-Flash Face Shield & Safety Glasses: High-voltage shorts can cause explosive arcs. Protect your eyes.
- Insulated Tools: Standard wrenches can conduct electricity. If they slip and bridge the terminals, it will cause a catastrophic short circuit.
2. The “Big 3” Hand Tools
Most Leaf Plus battery installations require removing the undercarriage and disconnecting the old pack. You don’t need a mechanic’s full toolbox, but these three are essential:
- Torque Wrench (1/2″ Drive): The bolts securing the battery to the chassis require specific torque settings (usually around 100-120 Nm). Over-tightening can strip the threads; under-tightening risks the battery falling out. A torque wrench is mandatory.
- Impact Wrench (Air or Electric): The bolts on the old battery are often rusted or over-tightened by the factory. A standard breaker bar might not cut it. An impact wrench saves your back and your time.
- Hydraulic Floor Jack & Stands: The Leaf Plus battery weighs approximately 300kg (660 lbs). You need a heavy-duty jack to lift the car safely and sturdy jack stands to hold it while you work underneath.
3. Diagnostic & Programming Equipment
A new battery is “bricked” without proper communication with the car’s BMS (Battery Management System).
- Consultant-Pro (Or Compatible Nissan Scanner): You will need this to reset the BMS and program the new battery’s VIN and capacity.
- Laptop with CAN-Adapter: For more advanced programming, especially when upgrading from a 24kWh/30kWh to a 62kWh Plus spec, you may need software calibration.
4. The “Comfort” Tools
- Camera: Take photos of the wiring harnesses and bolt locations before you disconnect anything. It is easy to forget where the grounding strap goes.
- Magnetic Tray: Those little sensor connectors and bolts are small. A magnetic tray keeps them organized and off the dirty floor.
Step-by-Step: Installing Your Plus Battery
Once you have the tools, the process is straightforward, but it requires patience.
- Disconnect the 12V: Always start here. Disconnect the negative terminal of the 12V auxiliary battery. This cuts power to the BMS and prevents accidental activation.
- Drain the Coolant: The Leaf Plus battery uses a liquid cooling system. You must drain the old battery’s coolant before disconnecting the lines to avoid spills.
- Disconnect the HV Cables: This is where your insulated gloves are vital. Disconnect the main positive and negative cables. Note: The connectors are usually color-coded (Red/Black) for easy identification.
- Remove the Old Pack: Using your torque wrench, remove the chassis bolts. Lower the old battery with the jack.
- Install the New Plus Pack: Lift the new CNS BATTERY into place. Connect the coolant lines first, then the HV cables.
- Torque to Spec: Reinstall the chassis bolts and torque them to the factory specification. Do not guess.
- BMS Programming: This is the final hurdle. Use your diagnostic tool to “wake up” the new battery and sync it with the car.
Why Choose CNS BATTERY for Your Plus Upgrade?
You might be wondering, “Why should I trust CNS with my car?”
- OEM Precision: We don’t guess the dimensions. Our Nissan Leaf Plus batteries are engineered to fit the ZE0/AZE0/ZE1 chassis perfectly.
- Lifetime Technical Support: If you get stuck on the programming step, our engineers offer remote video guidance. We don’t leave you hanging with a half-installed battery.
- Safety First: We use the same CATL cells found in brand-new European EVs, ensuring thermal stability and zero swelling risk.
Frequently Asked Questions (FAQ)
Q1: Is it really possible to upgrade my old Nissan Leaf (ZE0) to a Leaf Plus (62kWh) spec?
A: Absolutely. This is one of the most popular modifications in the EV community. By installing a 62kWh or 68kWh pack from CNS BATTERY, you effectively turn your old Leaf into a “Leaf Plus.” You will need to ensure your car’s software and charging port support the higher capacity, but our technical team can confirm compatibility based on your VIN.
Q2: How long does the installation take?
A: For a professional technician, it usually takes 1-2 hours. If you are a DIY enthusiast doing it for the first time, budget 3-4 hours. This includes draining/refilling coolant and the BMS programming. Remember, rushing high-voltage work is dangerous.
Q3: What if I don’t have all the diagnostic tools?
A: This is a common concern. While the physical installation is mechanical, the software handshake is crucial. CNS BATTERY offers remote support. If you don’t have the hardware, you can take your car to a local mechanic, and our engineer will guide them through the programming via video call. We also provide detailed video tutorials covering the entire process.
Q4: Is it safe to buy a battery online and install it myself?
A: With CNS BATTERY, yes. We provide a comprehensive safety manual and the necessary insulated gloves. However, if you are not comfortable working with high voltage (over 300V), we strongly recommend hiring a certified electrician. Safety is our top priority.
Ready to transform your Nissan Leaf into a long-range machine? Don’t let range anxiety limit your adventures.


