
Here is the SEO-optimized article based on your requirements, written from the perspective of a CNS BATTERY expert.
⚡ The Ultimate Checklist for e-NV200 Van Battery Installation
Is your Nissan e-NV200 struggling to keep up with your daily delivery schedule? Are you facing the dreaded “Range Anxiety” in the middle of a shift? You’re not alone. As a dedicated expert at CNS BATTERY, I’ve helped hundreds of fleet owners and delivery drivers breathe new life into their vans.
Replacing the battery pack is the most effective way to restore your e-NV200’s performance. However, a successful installation requires more than just swapping parts; it requires precision, the right tools, and a trusted battery partner. This guide serves as your ultimate pre-installation checklist, ensuring a smooth, safe, and efficient upgrade process.
🛠️ Why Choose a CNS Battery for Your e-NV200?
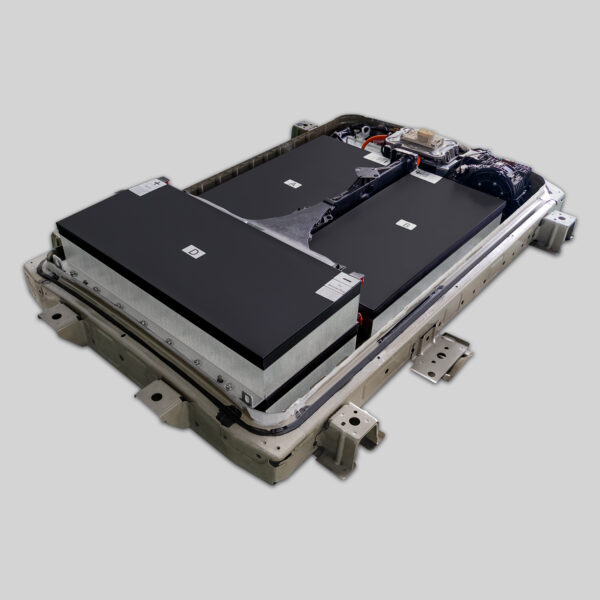
Before we dive into the nuts and bolts, let’s talk about the heart of your operation: the battery itself. At CNS BATTERY, we don’t just sell batteries; we provide OEM-compatible solutions designed specifically for the Nissan e-NV200.
Unlike generic or refurbished packs, our batteries are engineered to meet original factory standards. We utilize brand-new CATL lithium cells, ensuring you get the highest energy density and safety. Our packs are designed for a perfect plug-and-play fit, meaning you won’t need to modify your vehicle’s wiring harness. With a focus on durability and a warranty that beats the industry standard (2 years / 80,000 km), choosing a CNS battery means choosing reliability for your business.
📋 Phase 1: Pre-Installation Preparation
Proper preparation is the key to a successful battery swap. Rushing this step can lead to safety hazards or damaged components.
1. Safety First: The Workspace
Ensure your workspace is clean, dry, and well-ventilated. You will be dealing with high-voltage components, so insulated tools are mandatory. Always wear protective gear, including safety glasses and insulated gloves.
2. Vehicle Readiness
- Power Down: Ensure the vehicle is completely powered off and the key fob is at least 10 meters away.
- Charging Port: Verify the charging port is closed and the vehicle is not connected to any charger.
- Lifting: Use a professional lift or axle stands to raise the vehicle. The battery is heavy, and you need ample clearance underneath.
3. Verify Compatibility
This is where many people go wrong. Not all aftermarket batteries are created equal.
- Check the Specs: Ensure the voltage (typically 360V for e-NV200) and capacity (e.g., 40kWh or 50kWh) match your requirements.
- Physical Fit: Measure the battery bay dimensions in your van against the new pack. Our CNS e-NV200 batteries are designed to fit the original mounting points perfectly.
🔧 Phase 2: The Installation Process
Now that you are prepared, follow these steps to install your new CNS battery.
Step 1: Remove the Old Battery
- Disconnect: Locate the main service disconnect (usually under the hood or near the fuse box) and disconnect it.
- Unbolt: Remove the underbody covers to access the battery bolts.
- Detach Cables: Carefully disconnect the high-voltage cables and signal connectors. Tip: Take photos of the wiring before disconnecting to reference later.
- Lower: Using a transmission jack or battery lift, carefully lower the old battery pack.
Step 2: Install the New CNS Battery
- Positioning: Carefully lift the new CNS battery into the chassis using your jack.
- Secure: Bolt the battery to the original mounting points. Ensure all bolts are tightened to the manufacturer’s torque specifications to prevent rattling.
- Connect: Reconnect the high-voltage cables and signal connectors. Our batteries use color-coded connectors to match the original factory layout, minimizing the risk of error.
Step 3: System Integration
- BMS Programming: This is the most critical step. The Battery Management System (BMS) must communicate with the vehicle’s ECU. If you encounter any issues during this step, CNS offers remote video guidance to ensure a successful handshake between the systems.
- Reassemble: Replace all underbody covers and remove the vehicle from the lift.
🚗 Phase 3: Post-Installation Testing
Don’t just drive away! A thorough test ensures everything is functioning correctly.
- Visual Check: Look for any loose cables or tools left in the bay.
- Power On: Turn the vehicle on (do not drive yet). Check the dashboard for any error codes.
- Diagnostic Scan: If possible, use an OBD2 scanner to check for any fault codes related to the battery or BMS.
- Test Drive: Take a short test drive to verify acceleration and regenerative braking feel normal.
💡 Expert Tips for Longevity
As a battery specialist, I recommend these tips to maximize the lifespan of your new CNS battery:
- Avoid Deep Discharges: Try not to let the battery drop below 10% regularly. Lithium-ion batteries prefer shallow discharge cycles.
- Storage: If storing the van for an extended period, keep the battery charged between 40% and 60%.
- Charging: Use a Level 2 charger whenever possible. While DC fast charging is convenient, frequent rapid charging can generate heat that degrades the cells over time.
📝 Conclusion
Installing a new battery pack in your Nissan e-NV200 is a significant investment in your vehicle’s future. By following this checklist and choosing a high-quality, OEM-standard solution like those offered by CNS BATTERY, you ensure that your van is ready to tackle the miles ahead.
If you need a personalized quote or have specific questions about your model year, our technical experts are ready to help.
Get Your Custom Quote Now
❓ Frequently Asked Questions (FAQ)
Q1: How long does it take to install an e-NV200 battery? A: For a professional technician, the installation typically takes 1 to 2 hours. DIY users with mechanical experience may take slightly longer, especially if following the installation video tutorials for the first time.
Q2: Do I need to reprogram the car’s computer after installing a new battery? A: Yes, the Battery Management System (BMS) usually requires programming to sync with the vehicle. CNS BATTERY provides comprehensive support, including remote video guidance, to help you complete this step successfully if your local mechanic needs assistance.
Q3: Are CNS batteries compatible with all e-NV200 models? A: CNS batteries are designed to be compatible with a wide range of e-NV200 models. However, compatibility depends on the specific voltage and connector type. We recommend contacting our team with your VIN number to confirm the perfect match for your van before purchasing.
Q4: What is the warranty on a CNS e-NV200 battery? A: We offer an industry-leading 2-year / 80,000 km warranty (whichever comes first). This covers defects in materials and workmanship, and we guarantee the battery maintains at least 70% capacity during this period.
Q5: Can I install the battery myself, or do I need a mechanic? A: While the installation process is designed to be plug-and-play, working with high-voltage components can be dangerous. We strongly recommend having the installation performed by a certified electric vehicle technician to ensure safety and to avoid voiding the warranty.


