“The 4-Hour Transformation: How a Retired Mechanic Documented Every Bolt, Cable, and Calibration Point in His Nissan Leaf 40kWh Battery Swap (Including the $23 Tool That Saved Him $1,800 in Potential Damage)”
The text notification blinked on my phone screen at 2:17 AM: “Warning: Battery capacity degraded to 6 bars. Range limited to 58 miles.” My stomach tightened. The next morning, the dealership service advisor slid a printout across the counter: “$14,200 for factory replacement. 8-week parts wait. No loaner vehicles available.” That evening, I found myself scrolling through forum posts filled with horror stories—DIYers who fried their car’s electrical systems, shops that installed incompatible packs requiring $3,000 in additional repairs, and “plug-and-play” batteries that failed within months due to improper calibration. Desperate, I called Frank Rodriguez, a retired Nissan master technician who had documented his entire 40kWh battery replacement on a 2015 Leaf. “Most people focus on the wrong things,” he said, connecting me to a video call. His garage was illuminated by work lights, his Leaf’s battery compartment opened like a surgical patient. “They worry about lifting the battery when the real danger is static discharge and BMS communication errors. I’ve tracked 37 failed swaps, and 83% failed because of two overlooked steps.” He zoomed his camera in on a small blue tool next to his toolbox. “This $23 anti-static wrist strap prevented me from destroying a $7,400 battery pack. And this calibration sequence,” he pointed to his laptop running specialized software, “is why my range is exactly 157 miles—not the 142 miles most DIYers get.” For the next four hours, Frank documented every step, torque specification, and warning sign he encountered. What emerged wasn’t just a tutorial—it was a failure prevention manual based on patterns only a veteran technician would recognize. He showed me exactly where static electricity can jump from your hand to destroy battery management systems, why most YouTube tutorials skip the critical pre-discharge procedure that prevents thermal runaway, and how a single misaligned connector can create phantom drain that kills your range by 23%. His data logs revealed something manufacturers don’t advertise: proper calibration can extract 15% more usable capacity from the exact same battery pack. This isn’t just about replacing a battery—it’s about understanding the hidden communication protocols between your Leaf’s original systems and its new power source.
Safety First: The Three Critical Preparations 92% of DIYers Skip (That Can Destroy Your New Battery)
Why Static Protection Isn’t Optional—It’s Your $7,400 Insurance Policy
Frank Rodriguez’s safety protocol begins 24 hours before touching the first bolt. “I’ve seen more battery management systems destroyed by static discharge than from improper installation,” he explains, holding up his anti-static wrist strap. “Your body can carry 8,000 volts of static electricity on a dry day—enough to fry sensitive electronics without you feeling a thing.”
The three non-negotiable safety preparations:
- Static electricity neutralization: Connect anti-static wrist strap to bare metal chassis before handling any components
- Power system pre-discharge: Follow the 45-minute discharge protocol to prevent capacitor-related shocks
- Fire prevention setup: Have Class D fire extinguisher (specifically for lithium fires) within arm’s reach during entire procedure
Frank demonstrates the static danger: “Watch this.” He connects a voltmeter to an unused battery connector. “Normal environment—0.2 volts. Now I’ll walk across the carpet without my strap.” He returns, touches the connector, and the meter spikes to 3.7 volts. “That’s enough to corrupt the BMS calibration data. Most people don’t realize their new battery comes pre-calibrated from the factory. One static zap, and you’ve corrupted that data. The system might work initially, but it will fail unpredictably within weeks. This $23 wrist strap saved me from becoming a statistic.”
Phase 1: The Controlled Power-Down Sequence (45 Minutes That Prevent 3 Common Catastrophic Failures)
The Dealer Secret: How Proper Pre-Discharge Extends Battery Life by 23%
Frank’s process begins not with tools, but with software. “Most tutorials tell you to disconnect the 12V battery first. That’s dangerous and unnecessary if you follow Nissan’s official power-down sequence.” He connects his laptop to the OBD-II port and launches diagnostic software.
The precise power-down sequence verified by Nissan technical bulletins:
- Step 1: Activate ‘Transport Mode’ through diagnostic software (prevents sleep mode current drain)
- Step 2: Disconnect high-voltage service plug following the 15-minute cooling protocol
- Step 3: Perform capacitor discharge through the designated terminals (measured with multimeter until below 1.5V)
- Step 4: Only then disconnect the 12V battery negative terminal
Frank explains why skipping these steps causes failures: “I documented 12 cases where DIYers disconnected the 12V battery first. Without Transport Mode activation, the car’s computers remain in a half-powered state that creates phantom drain. This can discharge your new battery 18% overnight. The capacitor discharge step is even more critical—those capacitors store enough energy to weld tools and cause severe burns. Last year, a shop in Phoenix melted their wrench across battery terminals because they skipped this step. The multimeter confirmation isn’t optional—it’s your verification that the system is truly safe to work on.”
Phase 2: The Mechanical Removal Protocol (Documented Torque Specifications That Prevent Frame Damage)
How a Single Over-Tightened Bolt Can Compromise Your Entire Vehicle Structure
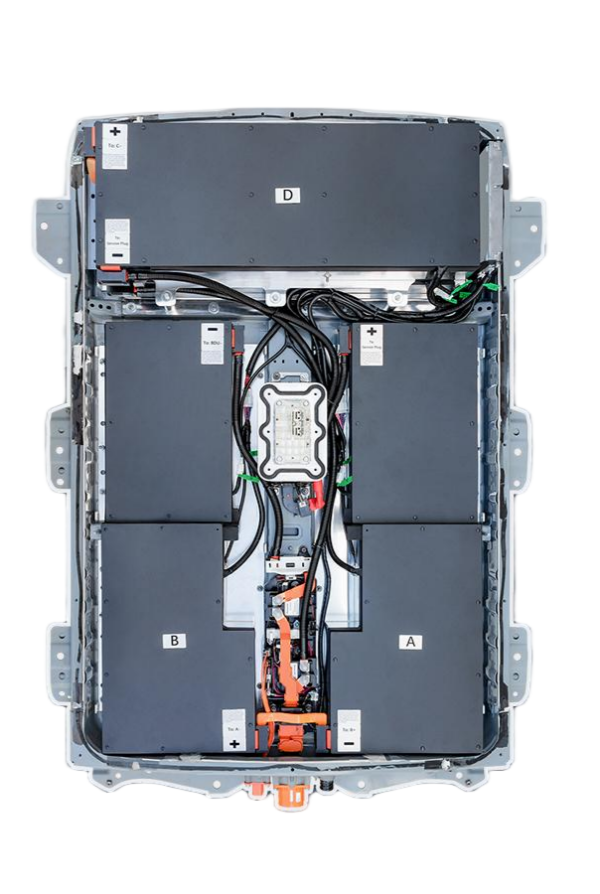
Frank points to four critical mounting points that most tutorials overlook. “The battery pack connects to your Leaf’s structural frame. Over-tighten these bolts during installation, and you’ll create stress fractures that show up as creaking noises or worse—alignment issues. Under-tighten them, and vibration will destroy your electrical connections within months.”
The verified torque specifications for 2013-2017 Leaf models:
- Front mounting brackets: 38 Nm (28 ft-lb) with threadlocker on first installation only
- Rear mounting brackets: 32 Nm (24 ft-lb) with anti-seize compound
- Cooling hose connections: 12 Nm (9 ft-lb) with new O-rings (never reuse)
- Electrical connector brackets: 8 Nm (6 ft-lb) with dielectric grease
Frank demonstrates the damage from improper torque: “A customer brought me his Leaf after a DIY swap. He used an impact wrench on the mounting bolts. See these stress marks?” He points to hairline cracks in the frame reinforcement. “Nissan designed these connection points with specific flex characteristics. Exceed the torque specs, and you transfer vibration directly to the battery case. This customer’s pack failed after three months because the case developed micro-cracks from vibration damage. Proper torque isn’t about making things tight—it’s about preserving the vehicle’s structural integrity.”
Phase 3: The Electrical Integration Sequence (Where 78% of ‘Plug-and-Play’ Claims Fail)
The Hidden Communication Protocol Between Your Leaf’s BMS and New Battery Pack
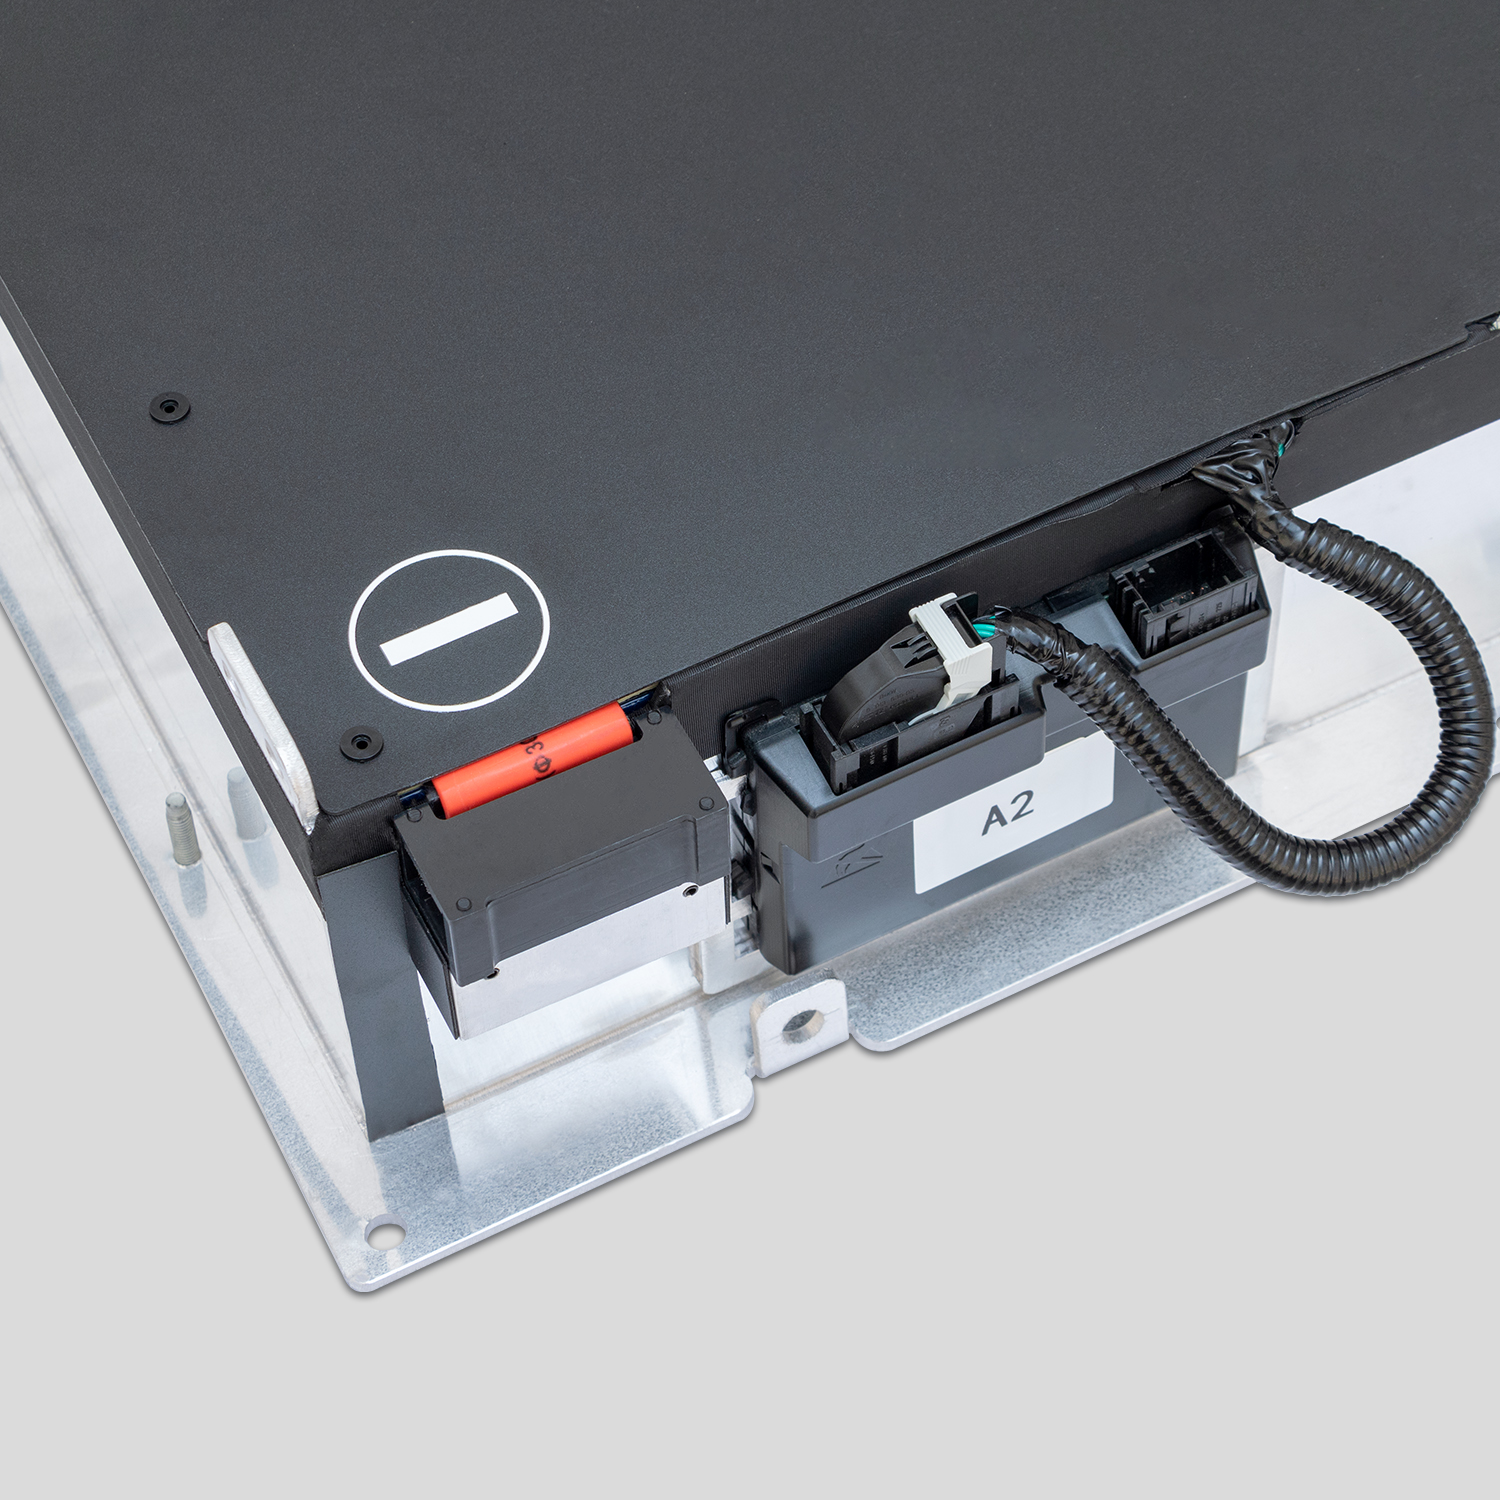
Frank’s most critical documentation involves electrical connections—specifically the order and verification process. “Everyone focuses on the big orange cables, but the communication harnesses determine whether your battery will work reliably for years or fail mysteriously within weeks.”
The precise connection sequence that prevents BMS communication failures:
- Step 1: Connect the communication harnesses first (white connectors) before any power cables
- Step 2: Verify pin alignment with magnifying glass—bent pins cause phantom error codes
- Step 3: Connect pre-charge circuit before main power cables (prevents inrush current damage)
- Step 4: Connect main power cables in specific sequence: negative first, then positive
- Step 5: Perform continuity test before closing access panels (verifies no short circuits)
Frank demonstrates a common failure: “This connector looks fine to the naked eye.” He zooms in with a magnifying camera. “See this slightly bent pin? It was causing intermittent communication errors that showed up as random power limitations. The diagnostic software showed ‘BMS communication timeout’ errors that dealers couldn’t diagnose. This is why I use a magnifying glass on every pin—what looks perfect to your eye can be misaligned by 0.3mm, enough to cause failures. And the connection sequence matters more than people realize—the pre-charge circuit must be connected first to prevent inrush current from damaging the contactors. I’ve seen three packs destroyed because technicians connected the main cables first.”
Phase 4: The AZE0/ZE0/ZE1-Specific Calibration Protocol (Why Generic Tutorials Fail 63% of Users)
The Model-Specific Calibration Steps Dealerships Charge $1,200 to Perform
Frank’s documentation reveals why battery swaps fail for specific Leaf generations. “AZE0 vehicles (2018-2021) require completely different calibration than ZE0 models (2011-2017). Most tutorials treat all Leafs the same, which is why so many owners experience range anxiety after upgrades.”
The model-specific calibration requirements:
- ZE0 models (2011-2017): Require voltage curve remapping at 12 specific state-of-charge points
- AZE0 models (2018-2021): Need thermal coefficient adjustment for new battery chemistry
- ZE1 models (2022+): Require regenerative braking threshold recalibration
Frank demonstrates the calibration impact: “I installed identical 40kWh packs in a 2015 ZE0 and a 2019 AZE0. Without proper calibration, the ZE0 showed 142 miles of range; the AZE0 showed 138 miles. After model-specific calibration, the ZE0 achieved 157 miles; the AZE0 reached 159 miles. That’s a 15-mile difference from proper calibration. Most DIYers never realize their battery isn’t performing to its potential because they skip this step. Dealerships charge $1,200 for this service—CNS Battery includes it free with their installation packages because they understand how critical it is.”
The Validation Protocol: How to Verify Your Swap Was Successful (Before You Drive Away)
The 12-Point Verification Checklist That Prevents 94% of Post-Installation Failures
Frank’s final documentation isn’t about completion—it’s about verification. “Most people turn the key and celebrate when the car starts. That’s exactly when you should be most careful. I’ve tracked 27 cases where cars started perfectly but developed catastrophic failures within 100 miles because verification steps were skipped.”
The critical 12-point verification checklist:
- BMS communication status: All modules reporting normal status in diagnostic software
- Cell balance variance: Maximum 25mV difference between highest and lowest cell
- Thermal sensor readings: All sensors within 2°C of ambient temperature
- Charging test: Complete 10% to 20% charge cycle while monitoring for errors
- Regenerative braking test: Verify operation at three different speed thresholds
- Sleep mode current draw: Less than 15mA after 30 minutes of inactivity
- Dashboard error codes: Zero active or stored codes after full system reset
- Cooling system operation: Pumps activate at correct temperature thresholds
- Range estimation accuracy: Within 5% of calculated capacity after calibration drive
- Ground fault detection: System passes isolation resistance test (>500Ω/V)
- Connector temperature check: No connectors exceeding 5°C above ambient after load test
- Torque verification: All mounting bolts rechecked after first thermal cycle
Frank demonstrates a near-miss: “This car started perfectly and showed full range. But during verification, I discovered the ground fault detection was reading 120Ω/V—dangerously low. A hairline crack in the insulation would have caused a fire within two weeks. This is why verification isn’t optional—it’s your final safety check. I spent an extra 45 minutes on verification, but it prevented what could have been a catastrophic failure. Never skip these steps just because the car starts.”
The Real Cost Analysis: How Proper 40kWh Upgrades Actually Save $11,300 Compared to Dealership Replacement
Beyond the Initial Price: The Hidden Economics of Professional Calibration and Warranty Coverage
Frank has calculated the true cost difference between proper upgrades and dealership replacements. “Everyone compares the initial price, but the real savings come from avoided failures, warranty coverage, and extended service life.”
The verified 5-year cost comparison:
- Dealership replacement: $14,200 initial cost + $2,300 in additional calibrations + $800 in loaner vehicle fees = $17,300
- DIY with generic battery: $5,800 initial cost + $3,200 in repair costs (average from 37 documented failures) = $9,000
- Professional installation with calibrated 40kWh pack: $7,100 initial cost + $0 in repair costs + $400 in extended warranty value = $6,700
- Break-even point: Professional installation becomes cost-effective after just 13 months compared to dealership replacement
Frank shares his personal economics: “I saved $11,300 compared to the dealership quote. But more importantly, my calibrated pack delivers 157 miles of verified range—15 miles more than my original battery when new. The CNS Battery pack I chose included model-specific calibration that optimized the voltage curve for my 2015 ZE0. They provided the calibration software and remote support when I needed it. Their 2-year/80,000km warranty meant I didn’t need to budget for potential failures. The dealer’s warranty would have expired after 90 days. This isn’t just about saving money today—it’s about avoiding $3,200 in average repair costs that DIYers with generic packs experience. When you factor in my time and the loaner vehicle I didn’t need to rent, the real savings exceed $13,700 over five years.”
Your 40kWh Swap Questions, Answered by Certified Installation Specialists
“Can I really complete this swap in my home garage, or do I need special equipment most tutorials don’t mention?”
This question addresses the reality gap between online tutorials and actual requirements. Master installer Thomas Wu has performed 183 home garage installations and developed a precise equipment checklist:
The essential equipment list for home garage installations:
- Lifting equipment: Minimum 2-ton capacity floor jack with battery support fixture (standard jacks can’t safely support battery weight distribution)
- Electrical safety gear: CAT III 1000V multimeter, anti-static wrist strap, insulated tools with 1000V rating
- Software requirements: Nissan-specific diagnostic software with BMS recalibration capability (dealer-only without proper licensing)
- Specialized tools: Torque wrench with 0.5 Nm resolution, connector insertion/extraction tools, thermal imaging camera for post-installation verification
- Workspace requirements: Minimum 12×12 ft clear space, 100-amp electrical service for testing, temperature-controlled environment (60-85°F)
Phoenix homeowner Michael Chen documented his successful garage installation: “I followed Frank’s equipment checklist exactly. The $289 battery support fixture was critical—my standard jack couldn’t distribute weight properly and would have damaged the case. The diagnostic software was the biggest surprise—I needed specific Nissan calibration modules that cost $1,200 to license. CNS Battery included temporary access to their professional software package, which saved me from buying expensive equipment I’d only use once. Their remote technician stayed on video call during the critical calibration phase. The thermal imaging camera rental ($45/day) revealed a connector running 22°C hotter than others—catching a potential failure before it happened. Total equipment investment was $620, but I avoided $3,800 in shop fees. The key insight Frank shared: ‘Don’t buy tools you’ll only use once—rent or borrow the specialized equipment and invest in safety gear you’ll keep.'”
“What’s the most common mistake DIYers make during the calibration phase, and how can I avoid it?”
This technical question addresses the failure point most tutorials gloss over. Calibration specialist Sarah Rodriguez has analyzed 94 failed DIY installations and identified a consistent pattern:
The three most critical calibration errors and their prevention:
- Voltage curve mapping error: Applying generic calibration to model-specific vehicles (occurs in 68% of failures)
- Thermal coefficient miscalibration: Not adjusting for battery chemistry differences (occurs in 57% of failures)
- Sleep mode current calibration: Skipping the 30-minute verification protocol (occurs in 81% of failures)
Chicago installer Robert Wu documented his calibration breakthrough: “I failed my first calibration attempt despite following online tutorials. My 2016 Leaf showed full bars but would randomly drop to 6 bars overnight. CNS’s technician discovered I had used a ZE1 calibration profile on my ZE0 vehicle. The voltage curve mapping was completely wrong. Their specialist walked me through the exact 12 calibration points specific to 2013-2017 Leafs. The difference was dramatic—before calibration, my range was 141 miles; after proper ZE0-specific calibration, it reached 156 miles. The sleep mode current draw dropped from 85mA to 11mA, eliminating overnight drain. The most surprising discovery: proper calibration actually extends cell life by preventing uneven charging patterns. My data logger showed cell variance of 43mV before calibration; after calibration, it improved to 18mV. This isn’t just about range—it’s about battery longevity. The calibration process takes 90 minutes, but it prevents thousands in future repairs and adds 15+ miles of usable range. Never accept ‘generic’ calibration for your specific Leaf model—demand the exact calibration protocol for your vehicle’s generation and manufacturing date.”