
⚡️ Nissan e-NV200 50kWh to 40kWh Battery Swap: A Professional Step-by-Step Guide
Upgrading or replacing your Nissan e-NV200 battery? Whether you’re looking to swap a 50kWh pack for a 40kWh unit for specific range needs or due to availability, this comprehensive guide is designed to ensure a smooth, safe, and successful installation.
At CNS BATTERY, we specialize in OEM-compatible lithium-ion solutions for Nissan and BMW vehicles. We understand that a battery swap is a significant investment, and our goal is to empower you with the knowledge to execute it flawlessly. This guide is based on our decade of R&D experience and feedback from thousands of successful installations.
🛠️ Pre-Installation: Safety & Preparation
Before you touch a wrench, safety is paramount. High-voltage batteries require strict protocols to protect both the technician and the vehicle’s electronics.
1. Essential Safety Gear Never attempt this job without the proper equipment. You must have:
- Insulated Safety Gloves: Rated for high-voltage work (Class 00 or higher).
- Protective Goggles: To shield your eyes from potential sparks or debris.
- Insulated Tools: Ensure all your wrenches and screwdrivers have insulated handles to prevent accidental short circuits.
2. Vehicle Preparation
- Park on a Level Surface: Engage the parking brake and place wheel chocks.
- Disconnect the 12V Power: This is the most critical step. Locate the 12V battery under the hood and disconnect the negative terminal first. This cuts power to the BMS (Battery Management System) and prevents electrical hazards during the swap.
- Wait 10 Minutes: After disconnecting, wait for at least 10 minutes to allow any residual charge in the capacitors to dissipate.
🔧 The Removal Process: Taking Out the Old Pack
Now that the vehicle is safe to work on, let’s remove the existing battery.
Step 1: Access the Battery Compartment
- Open the rear cargo area of the e-NV200.
- Remove the floor coverings and protective mats to expose the battery mounting bolts.
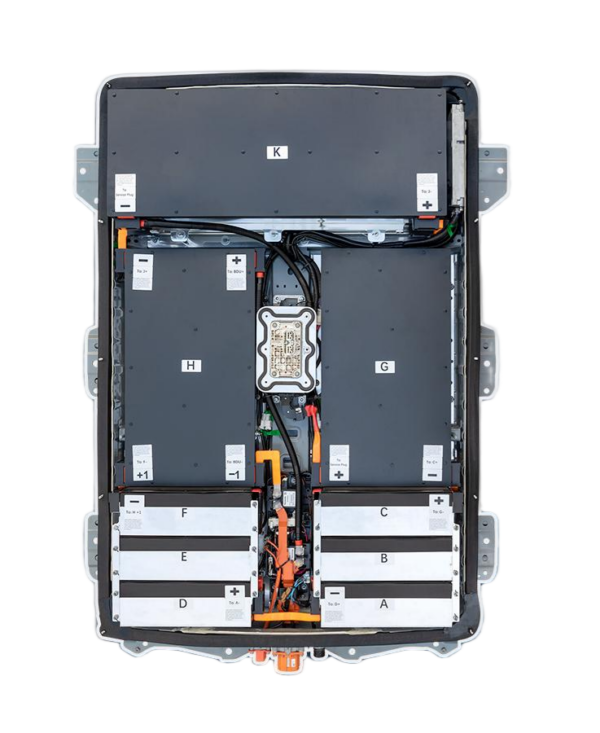
Step 2: Disconnect High Voltage (HV) Cables
- Locate the main HV connectors. These are usually large, colored (often orange) connectors.
- Caution: Do not force the connectors. Press the release tabs and pull the connectors straight out. Do not pull on the wires.
- Secure the disconnected cables away from the work area to prevent them from accidentally touching anything.
Step 3: Disconnect Signal/Communication Cables
- Find the smaller signal harness connected to the BMS.
- Disconnect these plugs carefully. Note their orientation for reinstallation.
Step 4: Remove Mounting Bolts
- Using the appropriate socket set, remove the bolts securing the battery pack to the chassis.
- Tip: There are typically 8-10 main mounting bolts. Keep them organized.
Step 5: Lift Out the Old Battery
- Using a transmission jack or a specialized EV battery lift, carefully lift the old pack out of the chassis.
- Weight Note: A 50kWh lithium pack weighs approximately 300-350kg. Ensure your lifting equipment is rated for this weight.
✨ Installing the New 40kWh Pack
With the old unit out, it’s time to install the new CNS 40kWh battery.
Step 1: Positioning the New Battery
- Carefully maneuver the new 40kWh pack into position using the jack.
- Compatibility Check: The 40kWh pack shares the same physical dimensions and mounting points as the 50kWh/62kWh variants in the e-NV200. Ensure the mounting feet align perfectly with the chassis holes.
Step 2: Secure the Mounting Bolts
- Insert the mounting bolts and tighten them to the manufacturer’s specified torque (usually around 100-120 Nm). Do not over-tighten, as this can strip the threads in the chassis.
Step 3: Reconnect Signal Cables
- Plug in the BMS communication harness. Ensure the connectors click securely into place.
Step 4: Reconnect High Voltage (HV) Cables
- Reconnect the main HV cables. Ensure the connectors are fully seated and locked. You should hear a distinct click.
Step 5: Reinstall Floor Coverings
- Replace the floor mats and protective covers in the cargo area.
⚡️ Post-Installation: Testing & Activation
The physical swap is done, but the job isn’t complete until the system is verified.
1. Reconnect the 12V Power
- Reconnect the negative terminal on the 12V battery. Tighten the nut securely.
2. System Diagnostics
- Turn on the ignition (do not start the vehicle yet).
- Observe the dashboard. The “Brake” light or “Battery” warning light may stay on for a few seconds while the BMS initializes.
- Check Voltage: Use a multimeter to check the 12V auxiliary battery. It should read between 13.5V – 14V, indicating the DC-DC converter is functioning and charging the 12V system from the main pack.
3. Test Drive & Calibration
- Take the vehicle for a short test drive.
- BMS Calibration: For the first few charge cycles, we recommend charging the new 40kWh battery to 100% and driving it down to 10-15% to allow the BMS to learn the new pack’s capacity curve.
💡 Why Choose a CNS 40kWh Battery?
When performing a swap like this, choosing the right supplier is critical for compatibility and peace of mind.
1. OEM-Level Compatibility Our 40kWh battery packs for the Nissan e-NV200 are engineered to meet original factory standards. We use brand-new CATL lithium-ion cells, ensuring superior performance, safety, and longevity compared to refurbished or recycled units.
2. Unbeatable Warranty We back our confidence in quality with a comprehensive 2-year / 80,000 km warranty. This covers defects in materials and workmanship, as well as performance degradation (ensuring the battery maintains at least 70% capacity).
3. Technical Expertise Unlike generic suppliers, we offer personalized pre-sales consultation. Before you buy, our experts can verify compatibility with your specific e-NV200 model year and VIN, ensuring a perfect plug-and-play fit.
❓ Frequently Asked Questions (FAQ)
Q1: Is the 40kWh battery a direct fit for my e-NV200? Yes, absolutely. The Nissan e-NV200 uses a standardized battery chassis design. Whether it’s a 40kWh, 50kWh, or 62kWh unit, the physical dimensions, mounting points, and connector interfaces are identical. It is a true plug-and-play replacement.
Q2: Will I need to reprogram the car’s computer after the swap? In most cases, no. The BMS in the new CNS battery pack will communicate automatically with the vehicle’s motor controller. However, the car’s dashboard may initially display the previous battery’s capacity until the BMS recalibrates over the first few charge cycles. Our team provides full technical support if you encounter any dashboard errors.
Q3: What is the expected range with the new 40kWh CNS battery? The CNS 40kWh battery provides a realistic full-charge range of approximately 240km – 270km under mixed driving conditions. This is perfect for urban delivery routes and daily commutes.
Q4: How long does the installation take? For a professional technician, the physical swap typically takes 1 to 2 hours. If you are a DIY enthusiast following our video guides, please allow up to 3 hours to ensure you work safely and methodically.
Ready to upgrade your fleet or vehicle? Get a free, no-obligation quote for a high-performance Nissan e-NV200 40kWh battery today.


