Nissan Leaf e+ New Battery Installation Guide: The Ultimate DIY & Professional Manual
Is your Nissan Leaf e+ (or standard Leaf) showing signs of battery degradation? Are you tired of the “Turtle Mode” warnings and drastically reduced range? You don’t need to buy a new car. Replacing your Leaf’s battery pack is a viable, cost-effective solution that can breathe new life into your EV.
At CNS BATTERY, we specialize in OEM-compatible Nissan Leaf battery solutions. We understand that the thought of replacing a high-voltage battery pack can be intimidating. That’s why we’ve created this comprehensive guide to walk you through every step of the process, ensuring you have the knowledge and confidence to proceed, whether you’re a professional technician or a seasoned DIYer.
Why Replace Your Nissan Leaf Battery?
Before diving into the installation, let’s address the “why.” The Nissan Leaf has been a pioneer in the electric vehicle market, but like all lithium-ion batteries, its capacity fades over time.
The Problem: A degraded battery means shorter commutes, frequent charging, and the anxiety of running out of power.
The Solution: A complete battery pack replacement.
Unlike expensive dealership replacements, aftermarket solutions like those from CNS BATTERY offer brand-new CATL cells at a fraction of the cost. This guide is designed to help you understand the process of installing a new battery pack, specifically focusing on the hardware replacement. (Note: This guide covers the physical installation. Programming and BMS configuration may require specific tools or professional assistance).
Step 1: Pre-Installation Safety & Preparation
Safety is non-negotiable when working with high-voltage EV systems. Before you touch a single wrench, ensure you follow these protocols.
⚡ Essential Safety Gear
You must treat the Leaf’s battery with the respect it demands. High-voltage electricity can be lethal.
- Insulated Rubber Gloves: Class 00 (rated for 1,000 V AC) or higher. These are mandatory.
- Insulated Tools: Use tools specifically designed for electrical work to prevent short circuits.
- Protective Clothing: Wear long sleeves and safety glasses to protect against potential sparks or chemical exposure.
- Workspace: Ensure the area is dry, well-ventilated, and free of flammable materials.
🧰 Tools Required
Gather the following tools to ensure a smooth workflow:
- Torque Wrench: Essential for re-tightening bolts to factory specifications.
- Socket Set: Various sizes (commonly 10mm, 13mm, 14mm).
- Insulated Screwdrivers.
- Jack Stands & Hydraulic Jack: The Leaf requires significant lifting.
- Batteries & Terminal Cleaner: For cleaning contact points.
Expert Tip from CNS: Always disconnect the 12V auxiliary battery first to cut power to the vehicle’s control systems before starting any work on the traction battery.
Step 2: Accessing the Battery Pack
The Nissan Leaf’s battery is located under the floor of the vehicle. To access it, you need to lift the car.
- Lift the Vehicle: Use a hydraulic jack to lift the Leaf and secure it firmly on jack stands. Never work under a car supported only by a jack.
- Remove the Under Cover: The battery is protected by a plastic undertray. Remove the bolts securing this cover to expose the battery housing.
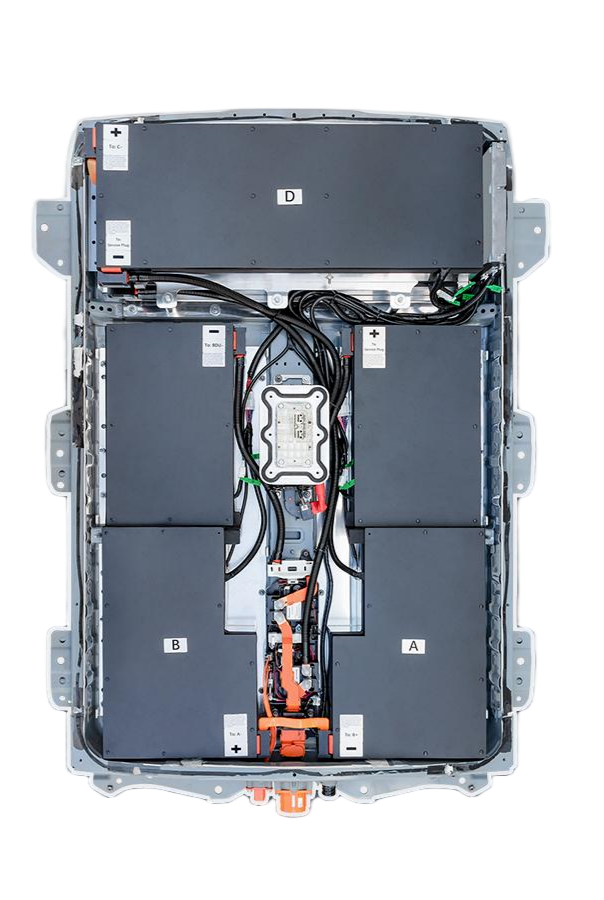
- Locate the Service Disconnect: On the top of the battery pack, you will find the main service disconnect (also known as the MSD – Manual Service Disconnect). This is your primary safety cutoff.
Step 3: Disconnecting the Old Battery
This step requires precision. The battery connects to the car via high-voltage (HV) cables and low-voltage signal wires.
- Remove the MSD Cover: Open the cover of the Manual Service Disconnect.
- Pull the Handle: Pull the MSD handle to disconnect the internal contacts. Wait at least 10 minutes to allow capacitors in the inverter and BMS to discharge.
- Disconnect Cables:
- Disconnect the high-voltage orange cables (Positive and Negative) from the battery output terminals.
- Disconnect the low-voltage signal harnesses (CAN bus, temperature sensors, etc.).
- Remove the Retaining Bolts: The battery is held in place by multiple bolts securing it to the chassis. Remove these bolts carefully.
Step 4: Installing the New CNS Battery Pack
Now that the old unit is out, it’s time to install your new, high-performance replacement.
- Position the New Pack: Carefully lower the new Nissan Leaf battery pack into the chassis. Ensure the orientation matches the original (input/output ports facing the correct direction).
- Reconnect the Cables:
- Reconnect the low-voltage signal harnesses first.
- Reconnect the high-voltage cables. Ensure the terminals are clean and tight to prevent arcing.
- Secure the Bolts: Reinstall the retaining bolts. Use a torque wrench to tighten them to the manufacturer’s specification (typically around 30-40 Nm, but refer to your specific model manual).
- Reinstall the MSD: Insert the MSD handle back into the “On” position and secure the cover.
Step 5: Post-Installation & System Check
Once the physical installation is complete, the job isn’t quite done.
- Reconnect the 12V Battery: Reconnect the auxiliary battery terminals.
- Power On: Turn the key (or press the start button). The dashboard should light up without any immediate errors.
- Initial Charge: We strongly recommend charging the new battery to 100% immediately after installation. This helps the BMS (Battery Management System) to calibrate the State of Charge (SOC) accurately.
- Test Drive: Take the car for a short, cautious drive to ensure the traction system is functioning correctly.
Why Choose a CNS BATTERY Replacement?
When replacing your Nissan Leaf’s heart, you need a partner you can trust. CNS BATTERY stands out in the aftermarket for several reasons:
- Brand New CATL Cells: Unlike refurbished or used batteries, we use brand-new, premium-grade cells from CATL, the world’s leading lithium battery manufacturer. This ensures maximum range and longevity.
- OEM-Level Compatibility: Our packs are engineered to meet Original Equipment Manufacturer (OEM) standards. They are a direct plug-and-play replacement, meaning no modifications to your Leaf’s chassis or wiring are needed.
- Unbeatable Value: We help you save over 50% compared to dealership prices without sacrificing quality.
- Comprehensive Warranty: We back our products with a robust 2-year / 80,000 km warranty, covering defects and performance degradation, providing peace of mind that generic brands cannot match.
Frequently Asked Questions (FAQ)
1. Is it safe to install a Nissan Leaf battery myself?
While this guide provides the technical steps, working with high-voltage systems is dangerous. If you are not a certified electrician or experienced mechanic, we strongly recommend hiring a professional. However, our packs are designed for “Plug and Play” compatibility, meaning the wiring harnesses match the OEM specifications perfectly, making the physical swap straightforward for a qualified technician.
2. Will a new battery fix the “Turtle Mode”?
Yes. “Turtle Mode” indicates that the battery cannot deliver the required power, usually due to severe degradation or cell imbalance. Installing a brand-new battery pack from CNS BATTERY will eliminate this issue and restore your vehicle’s full acceleration and top speed.
3. How long does the installation take?
For a professional mechanic, the physical installation typically takes 1 to 2 hours. For a DIY enthusiast, it may take longer, especially if you are doing it for the first time. Remember to factor in the time for the initial charge and BMS calibration.
4. What battery sizes are available for the Nissan Leaf?
CNS BATTERY offers a range of capacities to suit different needs and budgets:
- 40 kWh: Perfect for daily commuting and city driving.
- 50 kWh / 62 kWh: The most popular choice, offering a balanced range for highway driving.
- 68 kWh: Our premium upgrade, providing the longest possible range for long-distance travel.
5. Do I need to reprogram the car after installation?
The installation is primarily physical. However, if you are upgrading to a different capacity (e.g., from 40kWh to 62kWh), the BMS programming might need adjustment to display the correct range on the dashboard. Our technical team can assist with this calibration process.
Ready to Revive Your Nissan Leaf?
Don’t let a dead battery end your EV journey. Replacing your Nissan Leaf or e-NV200 battery is a smart investment in sustainability and performance.
If you have specific questions about compatibility with your Leaf model (ZE0, AZE0, or ZE1) or need help selecting the right capacity, contact our technical experts today. We offer free compatibility assessments and personalized quotes to get you back on the road.
Get Your Free Custom Quote Now: Contact CNS BATTERY