Connecting the HV Cable: Common Mistakes in e-NV200 Battery Installs
If you are preparing to replace the battery in your Nissan e-NV200, you are likely aware of the significant cost savings compared to dealer prices. However, the installation process, specifically connecting the High Voltage (HV) Cable, is where many technicians—both amateur and professional—run into trouble.
As a leading manufacturer of OEM-compatible EV batteries, CNS BATTERY has analyzed thousands of installation feedback loops. We have identified the most frequent errors made during e-NV200 battery swaps that lead to system failures, error codes, or even safety hazards.
This guide is designed to help you avoid these pitfalls and ensure a smooth, safe installation.
Why the HV Cable Connection is Critical
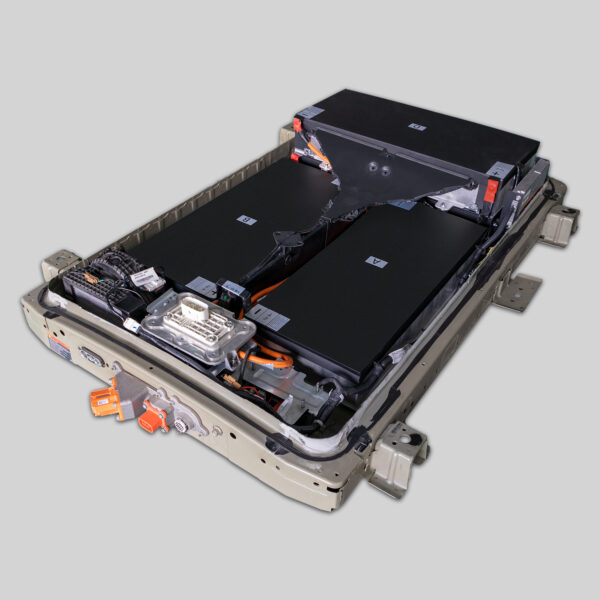
The HV cable is the lifeline of your electric vehicle. It carries hundreds of volts from the battery pack to the motor and charger. In the Nissan e-NV200, a poor connection doesn’t just mean “no power”—it can trigger the Vehicle Control Module (VCU) to lock the system, display fault codes, or damage the new battery’s Battery Management System (BMS).
Before you start, ensure your workspace is dry, you are wearing insulated gloves, and the vehicle’s 12V power is completely disconnected.
🛑 The Top 3 Mistakes Technicians Make
Based on our technical support logs, these are the errors that cause the most “Oh no!” moments.
1. Ignoring the Torque Specifications
The Mistake: Many installers treat the HV terminals like regular car battery terminals. They either under-tighten (causing arcing and heat) or over-tighten (stripping the soft copper or aluminum threads).
The Reality: The e-NV200 uses specific torque settings to ensure conductivity without damaging the busbars inside the pack.
- The Fix: Always use a calibrated torque wrench. For most CNS e-NV200 packs, the standard is 8-10 Nm for the main output terminals, but always refer to the specific manual provided with your battery model (40kWh vs 50kWh may vary slightly).
2. Reusing Old Hardware (The Rusty Bolt Trap)
The Mistake: Removing the old battery and simply bolting the old cables onto the new pack.
The Reality: The original bolts and washers have been exposed to the elements for years. They are often corroded or have lost their conductivity. Using them can increase resistance, leading to voltage drop and overheating.
The Fix: Always use the new hardware provided in the installation kit. If your kit did not include new bolts, purchase fresh, high-grade (e.g., M10 or M12 depending on spec) nickel-plated copper lugs or bolts. Do not reuse old hardware.
3. Cross-Threading the Main Cables
The Mistake: Forcing the bolt into the terminal port without checking the alignment.
The Reality: The internal terminals on lithium batteries are often made of softer materials than lead-acid terminals. Forcing a bolt can strip the internal threading of the battery housing. Once stripped, it is nearly impossible to achieve a safe, tight seal, leading to immediate return requests.
The Fix: Start the bolt by hand. Ensure it spins freely for the first few threads before applying any torque. If it feels “gritty” or stiff, back it out and realign.
🛡️ Signal Wire & BMS Connection Errors
While the HV cable provides the power, the Signal Wire (Communication Harness) tells the car the battery is ready. This is a frequent source of “No Communication” errors.
- The Mistake: Plugging in the signal wire before the HV cables.
- The Fix: Always connect the HV Cables first, then the signal wire. Connecting the signal wire first can sometimes confuse the BMS handshake process during the initial power-up.
- The Mistake: Forgetting the waterproof seal.
- The Fix: The signal port on the CNS e-NV200 battery has an IP67-rated seal. Ensure the rubber grommet is seated correctly before snapping the connector shut. A damaged seal can lead to moisture ingress and short circuits down the line.
⚡ The “Spark” Test: A Dangerous Myth
There is a dangerous myth in the EV community that you should test a new battery by “sparking” the cables to see if it has power.
Do not do this.
- Why: Lithium batteries discharge at an incredibly high rate. A direct short circuit (spark test) can cause a violent explosion, fire, or weld the tools to the terminals.
- The Safe Test: Always use a multimeter. Set it to DC voltage and check the main output terminals. A fully charged e-NV200 40kWh or 50kWh pack should read between 360V and 400V depending on the state of charge.
💡 Pro Tip: The “Double Check” List
Before you close the cover and lower the battery into the vehicle, run through this mental checklist:
- Hardware: New bolts/washers used? ✅
- Torque: Tightened to spec (not finger-tight)? ✅
- Seals: Signal wire grommet intact? ✅
- Cleanliness: No metal shavings or tools left inside the tray? ✅
Why Choose a CNS BATTERY for Your e-NV200?
At CNS BATTERY, we don’t just sell lithium packs; we provide a complete powertrain solution backed by a decade of R&D.
When you choose a CNS replacement battery for your Nissan e-NV200, you are choosing:
- Brand New CATL Cells: Unlike recycled or second-life batteries, we use pristine cells for maximum lifespan and safety.
- OEM-Level Compatibility: Our packs are engineered to fit the e-NV200 chassis perfectly, with plug-and-play connectors that match the original factory design.
- Unbeatable Warranty: We stand by our quality with a 2-year / 80,000 km warranty, covering defects and performance degradation.
Don’t let installation anxiety hold you back. Our technical team is ready to guide you through every step.
📩 Get Your Free Quote Today
Ready to revive your Nissan e-NV200 with a brand-new, high-capacity battery?
Get a Free Custom Quote Now and see how much you can save compared to dealership prices.
❓ Frequently Asked Questions (FAQ)
Q1: How long does it take to install an e-NV200 battery?
For a professional technician, the physical swap usually takes 1 to 2 hours. This includes removing the old pack, connecting the HV cables on the new pack, and reinstalling the underbody covers. DIY users should allocate extra time for safety checks and familiarization with the manual.
Q2: Do I need to reprogram the BMS after connecting the HV cable?
Yes, in most cases. After the physical connection is secure, the vehicle’s VCM needs to recognize the new battery. We provide detailed video tutorials and remote support to guide you through the programming handshake process. Usually, this involves connecting a diagnostic tool or following a specific ignition sequence.
Q3: What happens if I cross the positive and negative HV cables?
This is extremely dangerous and will cause catastrophic damage. Reversing the polarity will instantly destroy the Battery Management System (BMS) and likely damage the vehicle’s inverter. Always double-check the red (+) and black (-) markings on the cables and terminals before connecting.
Q4: Are the HV cables included with the CNS e-NV200 battery?
Typically, the main HV cables are part of the vehicle harness, not the battery pack. However, our batteries come with the correct terminal interfaces to accept your vehicle’s original cables. If your original cables are damaged, we can supply compatible replacement harnesses—please contact our sales team for details.


