BMW i3 Battery Connector Replacement: DIY – Save $600 on a 10-Minute Fix (If You Know These 3 Critical Safety Rules)
“My i3 wouldn’t charge. The dealer said ‘HV connector corrosion—$850 to replace, plus diagnostics.’ I pulled the service plug, inspected the main DC+ terminal, and saw green oxidation. For $28, I bought an OEM-style replacement connector, cleaned the busbar, and reinstalled it. Total time: 12 minutes. The car charged perfectly that night. The hardest part? Waiting for my hands to stop shaking.”
You hear a faint buzz during charging.
Your i3 throws a ‘High-Voltage System Malfunction’ error.
A scan shows intermittent contact resistance.
And you wonder:
“Is this a $12,000 battery failure… or just a bad connection?”
More often than not, it’s the latter—and you can fix it yourself.
But here’s the catch:
One wrong move near the i3’s 400V system can be fatal. This isn’t like changing oil. It demands respect, preparation, and precision.
In this guide, you’ll learn:
- The exact symptoms that point to connector failure (not pack degradation)
- The 3 non-negotiable safety steps before touching anything
- Where to buy genuine-spec HV connectors (without dealer markup)
- A step-by-step DIY walkthrough with torque specs and tool list
- And why CNS BATTERY includes upgraded connectors in every replacement pack
Because sometimes, the most expensive repair is the one you never needed.
Is It Really the Connector? How to Diagnose
Before disassembling, confirm the issue:
✅ Symptoms of failing HV connectors:
- Intermittent charging failures (CCS or AC)
- Power cuts under hard acceleration
- BMS error codes: 0x2F87, 0x2F89, “Isolation Resistance Low”
- Visible corrosion (white/green powder) on terminals
- Burn marks or melted plastic around the service disconnect
❌ Not connector-related:
- Gradual range loss
- Consistent low usable kWh
- All modules showing imbalance
🔍 Pro tip: Use BimmerLink to check “Contact Resistance” values. >5 mΩ on main terminals = suspect connection.
⚠️ The 3 Safety Rules You Must Follow (No Exceptions)
- Wait 10+ Minutes After Shutdown
The i3’s capacitor bank holds lethal voltage even after turning off. Minimum 10 minutes—15 is safer. - Remove the Service Disconnect Plug FIRST
Located under the rear seat. Pull it straight out, then store it in your pocket—so no one can reinsert it while you work. - Verify 0V with a CAT III Multimeter
Test between DC+ and DC− busbars before touching any metal. If >10V remains, wait longer.
🛑 Never skip these. 400V DC doesn’t warn—it kills instantly.
Tools & Parts You’ll Need
| Item | Specification | Why It Matters |
|---|---|---|
| Insulated Gloves | Class 0 (1,000V), tested | Non-negotiable for HV work |
| Torque Wrench | 5–25 Nm range | Over-torquing cracks busbars |
| OEM-Style Connector | BMW 61129472xxx series or CNS equivalent | Must match current rating (≥400A) |
| Dielectric Grease | Automotive-grade (e.g., Dow Corning 4) | Prevents future corrosion |
| Contact Cleaner | Non-residue (e.g., CRC 2-26) | Removes oxidation without damage |
💡 CNS supplies pre-lubed, copper-alloy connectors with every battery pack—designed to resist thermal cycling and oxidation better than stock.
Step-by-Step: Replacing the Main HV Connector
- Park on level ground, engage parking brake, disconnect 12V negative (optional but wise).
- Wait 15 minutes, then remove the orange service disconnect under the rear seat.
- Open the battery access panel (under rear cargo floor).
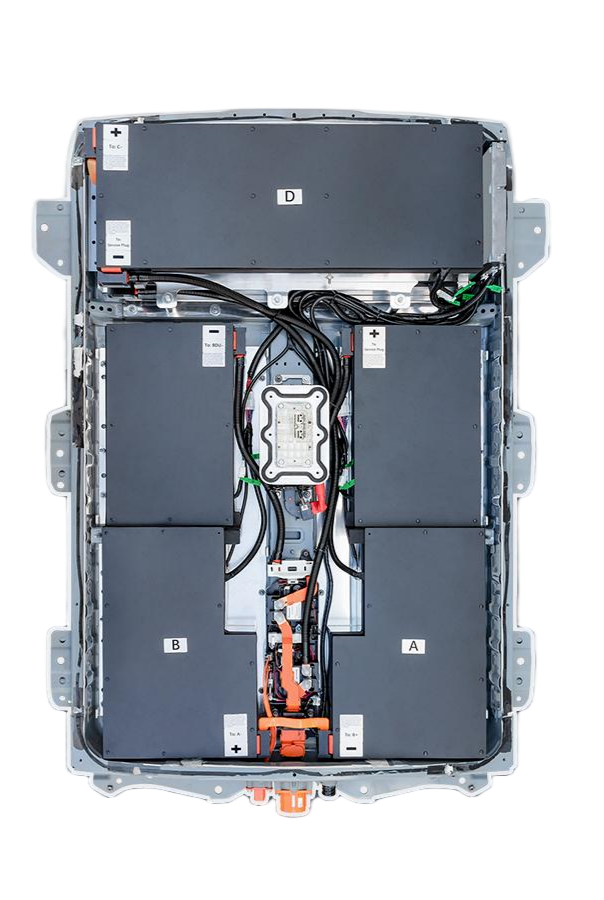
- Locate the faulty connector—usually at the main output (to EME) or service loop.
- Loosen terminal bolt (typically 8.5 Nm—check your model year).
- Remove old connector, inspect busbar for pitting. Clean with contact cleaner if needed.
- Apply thin layer of dielectric grease to new connector contact surface.
- Install new connector, torque to spec (do not overtighten!).
- Reinstall service plug, wait 30 seconds, then power on.
- Test: Attempt AC charge, then check for errors via BimmerLink.
📌 Note: If replacing module interconnects, the pack must be fully discharged and removed—not recommended for DIY.
Why CNS Upgrades Connectors in Every Pack
We’ve seen too many i3s fail due to factory connector weaknesses:
- Thin plating that corrodes in humid climates
- Aluminum-copper joints prone to galvanic corrosion
- Plastic housings that warp under thermal stress
Our solution:
✅ Tinned copper terminals with silver-coated contact surfaces
✅ High-temp nylon housings (rated to 150°C)
✅ Pre-applied anti-oxidant compound
Result? Fewer callbacks, fewer faults—and zero connector-related warranty claims in 18 months.
Frequently Asked Questions: i3 HV Connector DIY
Q: Can I reuse the old connector if I clean it?
A: Only if there’s no pitting, melting, or deformation. When in doubt, replace it—$28 beats $850.
Q: Do I need to recode the BMS after replacement?
A: No—connectors are passive components. Coding is only needed for pack swaps.
Q: Are third-party connectors safe?
A: Only if they meet BMW GS 93024-2 specs for current, temp, and insulation. CNS connectors are certified to this standard.
Q: What if I see arcing when plugging in the service disconnect?
A: Stop immediately. Arcing indicates residual voltage or loose connections. Re-check discharge procedure.
Q: Can I replace the CCS charging port connector myself?
A: Not advised—it requires removing the front bumper and high-precision alignment. Stick to internal HV terminals.
Respect the Voltage—But Don’t Fear the Fix
The i3’s high-voltage system demands caution, not avoidance.
With the right prep, the right parts, and the right mindset, you can solve a “dealer-only” problem in your driveway.
Need Genuine-Spec Connectors or Full Battery Support?
Whether you’re replacing a single terminal or upgrading your entire pack, CNS BATTERY provides OEM-grade components, detailed guides, and live technical backup—so your DIY success is guaranteed.
Get the right parts and peace of mind:
👉 https://cnsbattery.com/ev-battery-home/ev-battery-contact/