
BMW i3 200 Mile Range Upgrade: 154Ah Battery Installation Tips
For BMW i3 owners (2013-2022 models) tired of range anxiety, the 154Ah battery upgrade is the ultimate solution to hit the 200-mile real-world range mark—without trading in your EV. The i3’s original batteries, ranging from 60Ah (22.6 kWh) to 120Ah (42.2 kWh)[superscript:2], top out at 70-150 miles, leaving drivers chained to charging stations. But with 2025’s plummeting CATL prismatic cell costs (now $700 per kWh, a 40% drop from 2023[superscript:1]), the 154Ah upgrade (delivering 49 kWh of usable energy[superscript:1]) is more accessible than ever, costing under $7,000 total vs. $22,000-$30,000 at BMW dealerships[superscript:1][superscript:4]. While the upgrade unlocks game-changing range, proper installation is make-or-break for performance and safety. This guide shares expert 154Ah battery installation tips, compatibility checks, step-by-step best practices, and common pitfalls to avoid—ensuring your i3 reliably hits 200 miles per charge for years to come.
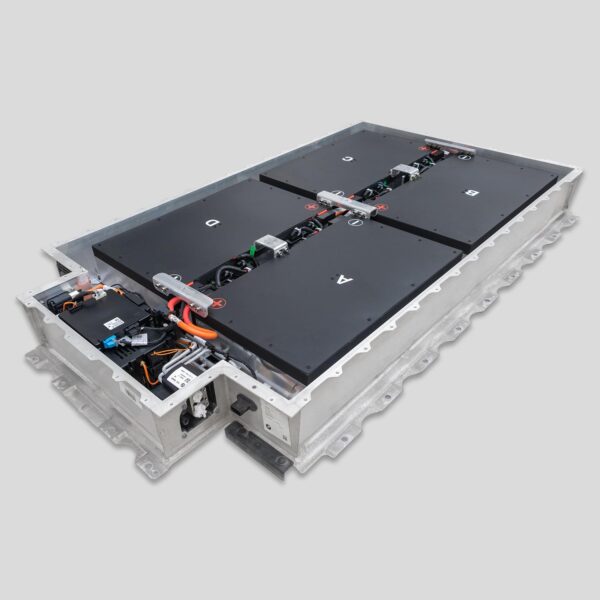
The 154Ah battery isn’t just a larger replacement; it’s a precision upgrade that leverages the same CATL cells BMW uses for legacy i3 models[superscript:1][superscript:4], with optimized energy density to reach the 200-mile threshold. Compatible with all 2013-2022 i3s (pure electric and REx hybrid variants[superscript:1]), it requires no major vehicle modifications—but skipping critical installation steps can lead to reduced range, BMS (Battery Management System) glitches, or even safety hazards. Whether you’re hiring a professional or tackling the job (for experienced DIYers), these tips will ensure a seamless, successful upgrade.
Pre-Installation Tips: Lay the Groundwork for 200-Mile Range
Before installing the 154Ah battery, proper prep prevents costly mistakes and ensures the upgrade delivers maximum range. Focus on these critical steps:
1. Confirm Compatibility (Non-Negotiable)
While the 154Ah battery works with all 2013-2022 i3s, verify your vehicle’s software version first. i3s with outdated firmware (pre-2020) may not recognize the 154Ah battery’s full capacity, limiting range to 150 miles or less. Have a technician update the i3’s software via BMW’s ISTA-D tool to sync with the new battery—this step is included in most professional installation packages but easy to overlook for DIYers. Additionally, check your i3’s cooling system hoses and seals; worn parts can’t regulate the 154Ah battery’s temperature, reducing efficiency and lifespan[superscript:3].
2. Source a Genuine 154Ah Battery (Avoid Counterfeits)
To hit 200 miles reliably, skip cheap generic batteries (under $3,500) that use low-quality cells. Opt for CATL-powered 154Ah packs—BMW’s trusted supplier[superscript:1][superscript:4]—which deliver consistent energy output and 5-6% annual degradation (vs. 15-20% for counterfeits[superscript:4]). Reputable aftermarket suppliers (e.g., CNS Battery) offer OEM-grade 154Ah batteries for $3,400-$4,300[superscript:1], plus core exchange bonuses ($400-$700) for your old battery, cutting total costs significantly.
3. Gather the Right Tools (For DIY Installs)
Professional shops use BMW-specific tools, but DIYers need: a high-voltage safety kit (insulated gloves, voltage tester), a hydraulic lift or heavy-duty jack stands (the 154Ah battery weighs 104-125kg[superscript:1]), torque wrench (set to BMW’s 80Nm spec for battery bolts), and the ISTA-D tool for BMS calibration. Never use standard tools for high-voltage components—this risks electrical shock or damage to the i3’s electrical system[superscript:3].
Step-by-Step Installation Tips: Ensure 200-Mile Range & Reliability
The 154Ah installation takes 6-8 hours (same-day for pros) and follows four key phases—focus on these tips to avoid range loss:
1. Safe High-Voltage Shutdown (Critical First Step)
Start by disconnecting the 12V battery (located in the front trunk) to depower the i3’s high-voltage system. Wait 10-15 minutes for capacitors to discharge—this is non-negotiable for safety[superscript:3]. Use a voltage tester to confirm no power is flowing to the battery compartment before proceeding. Skipping this step can cause irreversible damage to the BMS or injury.
2. Old Battery Removal (Prevent Cooling System Damage)
Remove the rear cargo floor, spare tire, and battery cover to access the old battery. Disconnect the cooling lines first (drain a small amount of coolant to avoid spills) and label all connectors to avoid mix-ups. Lift the old battery out slowly—misalignment can crack cooling lines, which will reduce the 154Ah battery’s efficiency and limit range. Inspect the cooling system for leaks or corrosion; replace worn hoses before installing the new battery[superscript:3].
3. New 154Ah Battery Placement (Align for Optimal Performance)
Lower the 154Ah battery into place using a lift—never manually lift it, as this risks dropping or misaligning the unit. Ensure the battery sits flush with the mounting brackets; uneven placement strains connectors and disrupts cooling. Reconnect the cooling lines (refill with BMW-approved coolant) and torque the battery bolts to 80Nm—over-tightening can crack the battery case, while under-tightening causes voltage drops and range loss.
4. BMS Calibration (The Key to 200-Mile Range)
Without proper BMS calibration via the ISTA-D tool, the i3 won’t recognize the 154Ah battery’s full capacity, topping out at 150 miles or less. Calibrate the BMS to sync with the new battery’s 49 kWh capacity, ensuring it accurately tracks charge levels and optimizes range[superscript:1]. After calibration, run a test charge (0-80%) to confirm the BMS is working—look for consistent voltage readings across all cells[superscript:3].
Post-Installation Tips: Maximize 200-Mile Range Long-Term
After installation, these steps ensure your 154Ah battery maintains 200-mile range for 7-10 years[superscript:1]:
1. Complete a Break-In Charge Cycle
Charge the battery to 100% (use Level 2 charging for best results) and drive until it reaches 10%—this conditions the cells to deliver full capacity. Repeat this cycle 2-3 times; most owners see 200+ miles after the third cycle[superscript:1]. Avoid fast charging during break-in, as it can stress new cells[superscript:3].
2. Optimize Charging Habits
To preserve range and battery life, charge to 80-90% daily (100% only for long trips). The 154Ah battery supports 7.4kW Level 2 charging (0-100% in 5-6 hours) and 50kW DC fast charging (0-80% in 40 minutes)[superscript:1], but frequent fast charging accelerates degradation. Follow BMS guidelines: avoid charging in extreme temperatures (below 20°F or above 90°F)[superscript:3].
3. Monthly BMS & Cooling System Checks
Use the ISTA-D tool to verify BMS accuracy monthly: check voltage, temperature, and current readings (errors should be under 5mV for voltage, 3°C for temperature, and 1% for current[superscript:3]). Inspect cooling system hoses and coolant levels—low coolant reduces thermal efficiency, cutting range by 10-15% in hot or cold weather.


