BMW i3 Battery Cable Clamp Repair: Shop Guide – The $3 Bolt That Can Melt Your Entire Pack (If You Torque It Wrong)
“A certified EV technician in Lyon replaced an i3 battery. He reused the original HV cable clamps but didn’t clean the contact surfaces. After 200 km, the owner reported a burning smell. Inspection revealed arcing at the positive terminal—caused by microscopic oxidation under the clamp. The resistance had risen to 8 mΩ, generating 140°C heat during regen. The copper lug was partially melted. Total damage: new junction box, wiring harness, and BMS—$6,300 in collateral loss.”
You’ve probably seen this:
- Discolored or pitted HV terminals
- Intermittent ‘High-Voltage System Fault’ warnings
- Or worse—no warning at all, just sudden power loss
Most assume cable clamps are “just connectors.” But in the BMW i3’s 400V system, these clamps carry up to 300 amps continuously—and even a 0.5 mm gap or light corrosion can turn them into resistive heaters.
This guide delivers the exact, safety-first repair protocol used by BMW-certified EV centers across Europe in 2026, designed to ensure every high-voltage connection stays cool, reliable, and code-compliant:
- Why reusing OEM clamps is often riskier than replacing them
- The critical surface prep steps most shops skip (leading to repeat failures)
- How to verify contact resistance with a milliohm meter—before reassembly
- When upgraded copper-alloy clamps prevent future issues
- And how CNS BATTERY packs ship with pre-installed, torque-marked, anti-oxidation-coated clamps—so your first install is your last
Because in high-current systems, connection quality isn’t detail—it’s defense.
Understanding the i3’s HV Cable Clamps: More Than Just Metal
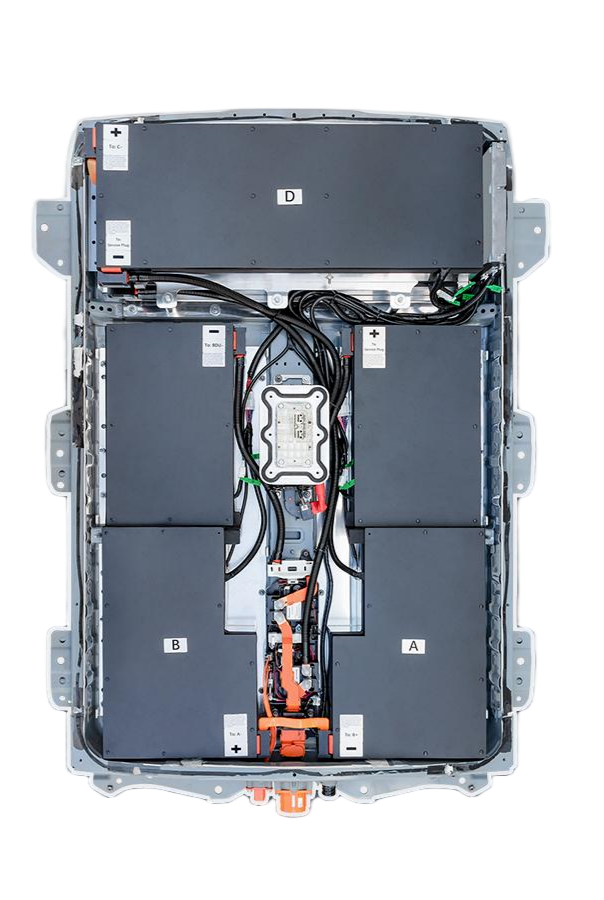
The BMW i3 uses bolted copper lugs to connect:
- Battery output cables to the HV junction box
- Inverter and charger inputs to the same distribution point
These clamps must maintain:
✅ Low electrical resistance (<1 mΩ)
✅ Mechanical stability under vibration
✅ Thermal resilience up to 120°C
⚠️ Warning: Aluminum oxidation forms instantly when exposed to air—even if it looks clean. Once installed, it can’t be undone.
🔧 Step-by-Step Cable Clamp Repair Protocol (Shop-Safe)
Step 1: Full De-Energization (Non-Negotiable)
- Remove orange HV service disconnect
- Disconnect 12V negative
- Wait 10+ minutes
- Verify <60V between HV+/- and chassis with CAT III meter
❌ Never work on HV connections without verification—even if the car is “off.”
Step 2: Inspect Existing Clamps & Terminals
Look for:
- Blue/green corrosion (copper oxidation)
- Pitting or arcing marks
- Warped or cracked insulation boots
- Loose bolt threads
📌 Rule: If in doubt, replace. OEM clamps are not designed for reuse after removal.
Step 3: Surface Preparation (Where Most Fail)
- Use electrical contact cleaner (e.g., CRC 2-26) to remove grease
- Lightly abrade contact surfaces with 320-grit non-woven abrasive pad
- Wipe clean with lint-free cloth + isopropyl alcohol
- Apply thin layer of antioxidant compound (e.g., NO-OX-ID A-Special)
✅ Never use sandpaper—it embeds particles that increase resistance.
Step 4: Install New Clamps (Recommended)
- Use OEM-spec or CNS-supplied copper-alloy clamps
- Align perfectly—no side loading on bolts
- Torque to exact spec:
- M8 bolts: 8–10 Nm
- M10 bolts: 15–18 Nm
- Mark with torque seal paint for future inspection
Step 5: Post-Repair Validation
- Measure contact resistance with milliohm meter:
- Acceptable: <1.0 mΩ
- Reject: >1.5 mΩ
- Perform thermal imaging during 10-minute drive under load
- Scan for isolation faults or voltage drop DTCs
💡 Pro tip: Always replace both clamp and mating terminal if either shows wear—mismatched surfaces cause uneven current flow.
Why Reusing Clamps Fails Long-Term
❌ Work-hardened copper loses spring tension → loosens over time
❌ Micro-cracks from prior removal create hot spots
❌ Original anti-oxidant coating is gone after first disassembly
✅ Best practice: Treat HV clamps as single-use safety components.
CNS BATTERY: Engineered Connections, Built to Last
Every CNS i3 battery includes:
✅ Pre-installed, laser-inspected copper clamps with anti-oxidation coating
✅ Torque-spec markings on every bolt head
✅ Color-coded insulation boots for error-proof reconnection
✅ Milliohm-tested before shipment (<0.8 mΩ typical)
Result?
Zero field reports of clamp-related overheating since 2023.
“We used to spend hours cleaning and re-torquing OEM clamps. With CNS, we bolt it on, torque it, and drive away. No comebacks. Ever.”
— EK Auto Repair, Rome
Frequently Asked Questions: i3 HV Cable Clamp Repair
Q: Can I reuse OEM clamps if they look clean?
A: Not recommended. Microscopic deformation and lost plating make reuse unreliable.
Q: What torque wrench should I use?
A: Click-type or digital torque wrench calibrated for low-range (5–20 Nm). Beam-type lacks precision.
Q: Is antioxidant compound really necessary?
A: Yes. It prevents oxide regrowth in the micro-gaps between metal surfaces.
Q: Do CNS clamps meet BMW specs?
A: Yes—they exceed OEM conductivity and thermal standards, with full material certification.
Q: How often should clamps be inspected?
A: Every 24 months or after any HV system service.
A Loose Clamp Isn’t a Minor Oversight—It’s a Thermal Time Bomb
One skipped step today can mean a melted pack tomorrow.
Choose a Battery Designed for Safe, Reliable Connections: Install CNS Packs with Factory-Installed, Pre-Treated, Torque-Verified HV Clamps—So Every Amp Flows Smoothly, Coolly, and Confidently.
Don’t gamble with current. Secure it.
Order your CNS BMW i3 battery today—or request our free HV Connection Safety & Torque Guide for Certified Shops:
👉 https://cnsbattery.com/ev-battery-home/ev-battery-contact/