Here is the SEO-optimized article tailored for Nissan Leaf Plus owners looking to upgrade their battery, written from the perspective of a CNS BATTERY expert.
🚀 The Ultimate DIY Guide: Installing a New Battery in Your Nissan Leaf Plus
Upgrading your Nissan Leaf Plus (or any Leaf model) with a new battery pack is the single most effective way to restore your car’s original range and performance. Whether your battery has degraded over time or you are looking to swap a used pack for a brand-new, high-quality solution, this guide is designed to walk you through the process safely and efficiently.
At CNS BATTERY, we specialize in manufacturing OEM-compatible lithium-ion battery packs for Nissan and BMW vehicles. We understand the anxiety that comes with such a significant repair, which is why we provide not just the hardware, but also the technical support to ensure your installation is a success.
🛠️ Preparation: Tools and Safety First
Before you begin the physical installation, ensuring you have the right tools and safety gear is crucial. Lithium-ion batteries store a significant amount of energy, so safety must be your top priority.
Safety Gear (Mandatory):
- Insulated Gloves: To prevent electrical shock.
- Safety Glasses: To protect your eyes from debris or sparks.
- Non-Conductive Tools: Ensure your wrenches and screwdrivers have insulated handles.
Mechanical Tools:
- Socket Wrench Set: For removing bolts and brackets.
- Torque Wrench: To ensure bolts are tightened to the correct specification (usually around 80-100 Nm for main terminals, but refer to your specific pack manual).
- Jack Stands: Never work under a vehicle supported only by a jack.
- Terminal Cleaner: To ensure a clean connection between the battery terminals and the vehicle cables.
⚡ Step-by-Step Installation Process
This section outlines the general workflow for replacing your Nissan Leaf Plus battery. Please note that while the process is generally “Plug-and-Play,” specific steps may vary slightly depending on your Leaf’s generation (ZE0, AZE0, or ZE1).
Step 1: Disconnect the Vehicle Power
- Crucial: Park your vehicle on a flat surface and engage the parking brake.
- Open the hood and disconnect the 12V auxiliary battery. This cuts off the low-voltage power that controls the high-voltage contactors, ensuring the system is dead before you start working.
Step 2: Remove the Old Battery (If Applicable)
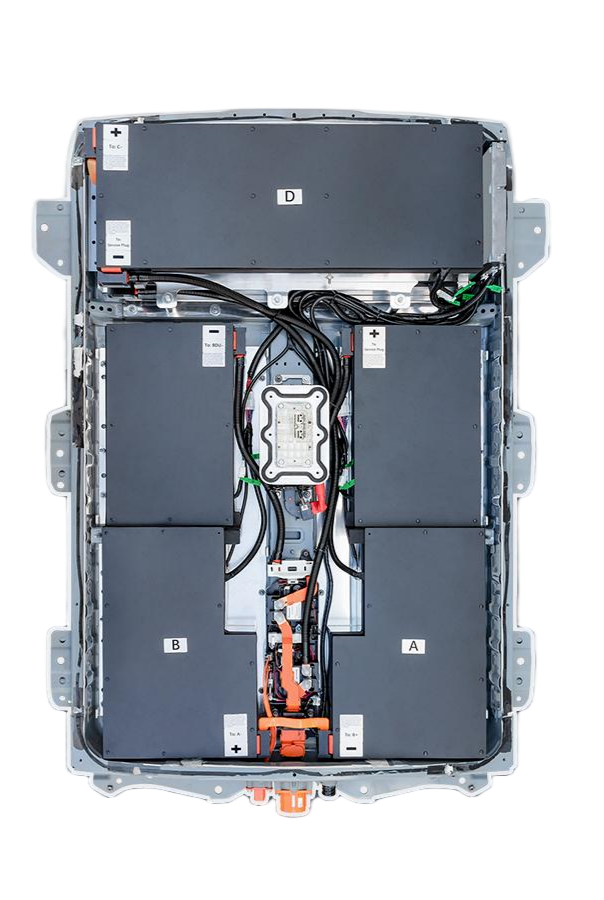
- Access the battery pack. In the Nissan Leaf, this is located under the floor of the vehicle.
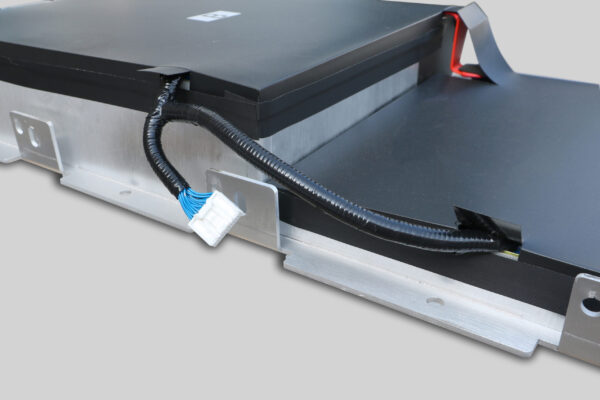
- Carefully disconnect the high-voltage cables (positive and negative) from the old battery terminals. Always cover the disconnected terminals with insulating tape to prevent accidental short circuits.
- Remove the battery mounting brackets and bolts. The Leaf battery is heavy (approximately 300kg / 660lbs), so use a proper lift or engine hoist to lower it safely.
Step 3: Position and Install the New CNS Battery
- Using your lifting equipment, carefully position the new CNS BATTERY pack into the chassis.
- Reinstall the mounting brackets and bolts. Do not fully tighten them yet—leave them loose enough to allow for slight movement during cable connection.
Step 4: Connect the Cables and Program the BMS
- This is the most critical step. Connect the high-voltage cables (positive first, then negative) to the battery terminals.
- BMS Programming: Unlike simple plug-and-play devices, modern EV batteries require the Battery Management System (BMS) to be synchronized with the vehicle. CNS BATTERIES come pre-programmed, but you may need to connect a diagnostic tool to “wake up” the BMS or confirm the connection.
- Expert Tip: If you encounter a communication error during this step, do not panic. Our technical support team offers remote video guidance to walk you through the BMS reset or reprogramming process.
Step 5: Final Torque and Reassembly
- Once the cables are connected and the system has been verified, torque all the mounting bolts and terminal nuts to the manufacturer’s specifications.
- Reinstall any underbody shields or covers.
- Reconnect the 12V battery.
📱 Post-Installation: Testing and Calibration
After the installation is complete, it is essential to test the system before taking your Nissan Leaf Plus for a drive.
- Initial Check: Turn on the ignition (do not start the car yet). Check the dashboard for any error codes. The battery health indicator should show 12 bars (or the full capacity of your new pack).
- First Charge: Plug the vehicle into a Level 1 or Level 2 charger. Allow the battery to charge to 100%. This helps the BMS calibrate the State of Charge (SOC) accurately.
- System Diagnostics: If you have access to a Nissan Consult scanner, run a quick diagnostic to ensure there are no pending codes related to the battery or communication lines.
💡 Why Choose a CNS BATTERY for Your Leaf Plus?
Choosing the right replacement battery is just as important as the installation itself. At CNS BATTERY, we engineer our packs to exceed industry standards, specifically for Nissan Leaf owners.
- Brand-New CATL Cells: Unlike many “refurbished” batteries on the market that use degraded second-hand cells, every CNS battery is assembled using brand-new, top-tier cells from CATL (Contemporary Amperex Technology Co. Limited), the world’s largest battery manufacturer. This ensures maximum energy density and thermal stability.
- OEM-Level Compatibility: Our packs are designed to fit the Nissan Leaf chassis perfectly (ZE0, AZE0, ZE1). The connectors, mounting points, and communication protocols are reverse-engineered to match the original factory specifications, minimizing the need for modifications.
- Unbeatable Warranty: We back our confidence in quality with a 2-year / 80,000 km warranty. This coverage is significantly longer than what most competitors offer and includes protection against defects in materials and workmanship.
- Cost Efficiency: By cutting out the middleman and manufacturing directly, we offer a solution that costs roughly 50% less than buying a new pack from a Nissan dealership, without sacrificing safety or performance.
📝 Expert Advice for a Smooth Transition
As experts in the field, we often see customers make a few common mistakes during DIY installations. Here is our advice to avoid them:
- Do Not Rush the BMS: The most frequent issue DIYers face is not allowing the BMS to initialize properly. If the car doesn’t start immediately after installation, wait 5-10 minutes for the system to communicate before disconnecting anything.
- Check the VIN Compatibility: While our packs fit most Leaf models, it is always best to double-check your Vehicle Identification Number (VIN) with our sales team before purchase to ensure the software version matches your car’s year.
- Use Anti-Seize Compound: When reinstalling the main terminal bolts, apply a small amount of anti-seize compound to the threads. This prevents them from seizing due to corrosion, making future maintenance much easier.
📩 Get Your Free Custom Quote Today
Installing a new battery in your Nissan Leaf Plus is a rewarding project that can save you thousands of dollars compared to buying a new car. With the right preparation and a high-quality battery from CNS BATTERY, you can get back on the road with confidence.
Are you ready to revive your EV? We offer personalized consultation and compatibility checks to ensure you get the perfect battery for your specific model.
👉 Contact Our Technical Experts Now for a Free Quote
❓ Frequently Asked Questions (FAQ)
Q1: Is the installation really “Plug-and-Play,” or do I need special tools?
While the mechanical connection is plug-and-play, you will need basic automotive tools (wrenches, jack stands) and a digital multimeter to check voltages. For the software side, while the battery is pre-programmed, having access to a basic OBD2 scanner can help clear any residual error codes from the old battery.
Q2: How long does the installation take?
For a professional mechanic, the installation typically takes 1 to 2 hours. For a DIY enthusiast with some mechanical experience, it may take around 2 to 3 hours, depending on how quickly you can remove the old mounting hardware and position the new heavy pack.
Q3: What kind of range can I expect after installing a new CNS battery?
You should expect to achieve the advertised range of the battery pack you purchased. For example, a new 62kWh CNS battery should provide a full charge range of approximately 430-440 km (depending on driving conditions and climate), which is a significant improvement over a degraded old battery.
Q4: What if I run into trouble during the installation?
CNS BATTERY provides comprehensive after-sales support. If you encounter a wiring issue or a BMS communication error, our technical team offers remote video guidance (via Zoom or similar) to walk you through the troubleshooting process. Most issues are resolved within 24 hours.