DIY e-NV200 Lithium Battery Installation with Long Warranty
If you are a Nissan e-NV200 owner, you know the struggle. The original battery pack, while reliable for years, eventually degrades, leaving you with a van that needs daily charging just to get through the city. You might be looking at quotes from dealerships and seeing prices that make you wince—often exceeding $10,000 USD. You are not alone in asking: “Is there a better way to get my van back on the road with a full range without breaking the bank?”
The answer is yes. A growing number of fleet managers and individual owners are turning to DIY e-NV200 lithium battery installation. This isn’t just about saving money (though saving over 50% is a huge perk); it is about upgrading to a brand-new, high-performance pack that outlasts the old one. In this guide, we will walk you through why a DIY replacement is viable, what to look for in a new battery, and how a long warranty protects your investment.
Why Replace Your e-NV200 Battery?
The Nissan e-NV200 is a workhorse. Whether you use it for deliveries, as a mobile workshop, or as a family camper, its utility is undeniable. However, the limitations of early lithium-ion technology mean that after 5-8 years, the battery capacity can drop significantly.
- The Range Problem: An old battery might only give you 100-150 km (60-90 miles) of range. For a van designed for work, this is a productivity killer.
- The Cost Trap: Going back to the OEM (Original Equipment Manufacturer) for a replacement often means paying the full retail price for a new technology that has dropped significantly in cost to manufacture.
- The DIY Opportunity: Unlike complex modern EVs that require proprietary software to unlock the battery, the e-NV200’s architecture is relatively straightforward. This opens the door for third-party manufacturers to create plug-and-play solutions that match the original factory standards.
By opting for a custom e-NV200 battery replacement, you are not just fixing a broken car; you are essentially buying a brand-new electric van for half the price.
Finding the Right DIY Solution: Plug-and-Play is Key
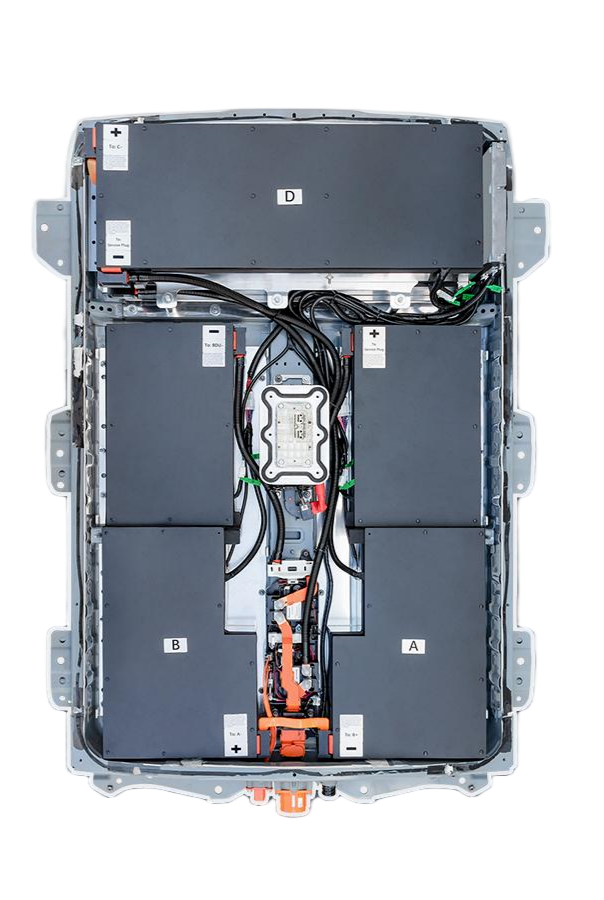
When searching for a “DIY e-NV200 lithium battery,” the most critical factor is compatibility. You do not want to buy a box of cells and wires; you need a complete, sealed pack that integrates with your van’s systems.
Here is what a professional-grade DIY solution offers:
- Physical Fit: The battery must fit perfectly into the chassis cradle. This requires precise engineering to match the OEM dimensions.
- Connector Compatibility: The high-voltage (HV) connectors and the CAN-bus communication lines must match. If they do not, you will need to cut and splice wires, which is dangerous and voids any hope of a warranty.
- BMS Integration: The Battery Management System (BMS) must communicate with the Nissan Vehicle Control Unit (VCU). A good replacement pack uses the same communication protocols so that your dashboard shows the correct State of Charge (SOC) and does not throw error codes.
At CNS BATTERY, we specialize in these exact solutions. Our packs for the e-NV200 are designed as drop-in replacements. This means you can unbolt the old unit and bolt in the new one without modifying the chassis or rewiring the car.
The Power of New Technology: 40kWh and 50kWh Upgrades
One of the most exciting aspects of replacing your battery is the opportunity to upgrade. While the original e-NV200 often came with a 24kWh or 30kWh pack, modern replacements utilize the latest CATL (Contemporary Amperex Technology Co. Limited) cells.
This allows for significant upgrades:
- 40kWh Option: This is the standard replacement for most e-NV200 models. It restores your van to factory-new range levels, typically giving you around 200-240 km (125-150 miles) of real-world driving.
- 50kWh Option: For those who need more, a 50kWh upgrade is often possible. This pushes the range closer to 300 km (185 miles), making highway driving and long delivery routes stress-free.
These new cells are not just about capacity; they are about safety and longevity. New lithium iron phosphate (LFP) or NMC cells have a much lower self-discharge rate and can handle more charge cycles than the decade-old technology in your current pack.
The Safety Net: Why a Long Warranty is Non-Negotiable
DIY does not mean “buyer beware.” In fact, when you are installing the battery yourself, a robust warranty is even more critical. You need to know that if something goes wrong—whether it is a cell imbalance, a BMS failure, or a manufacturing defect—you are covered.
Many cheap aftermarket batteries offer no warranty or a very short one (3-6 months), which is a massive gamble. At CNS, we back our confidence in our engineering with an industry-leading warranty.
| Feature | Standard Aftermarket | CNS BATTERY Standard |
|---|---|---|
| Warranty Period | 3-6 Months (if any) | 2 Years / 80,000 km |
| Coverage | Parts only, no labor | Full replacement or repair |
| Degradation | Not covered | >70% Capacity Guaranteed |
Why is our warranty unbeatable?
We offer a 2-year or 80,000 km warranty (whichever comes first). This far surpasses the standard industry offering for replacement batteries. This warranty covers defects in materials and workmanship. Furthermore, we guarantee that your battery will maintain at least 70% of its capacity throughout the warranty period. If it degrades faster than that, or if any component fails, we provide a free replacement or repair.
This level of coverage is only possible because we use brand-new, top-tier cells and rigorous quality control. We do not use recycled or salvaged cells that might fail in a year.
Your Step-by-Step DIY Installation Guide
Installing a new battery pack is a significant task, but it is absolutely achievable for a competent DIYer or a small garage. Here is a general overview of the process when using a compatible pack:
- Preparation: Ensure you have the right tools (torque wrench, jack stands, insulated gloves) and a safe, flat workspace. Always disconnect the 12V auxiliary battery first to ensure no high-voltage systems are live.
- Removal: The e-NV200 battery is located under the floor of the van. You will need to remove the underbody panels. The pack is held in by several large bolts. Carefully disconnect the high-voltage connectors and the communication harness.
- Installation: Lift the old pack out and position the new CNS BATTERY pack. This is where the “plug-and-play” design saves the day. The connectors should match perfectly.
- Reassembly: Bolt the new pack down to the specified torque. Reconnect the HV cables and the communication lines. Replace the underbody panels.
- First Power-Up: Reconnect the 12V battery. Turn on the ignition. Your dashboard should recognize the battery immediately. If you encounter any communication errors, this is where professional support is vital.
Expert Tip: While the hardware is plug-and-play, sometimes the software needs a handshake. If you are unsure about the BMS programming or encounter error codes, do not force it. Contact the manufacturer’s technical support for remote guidance to avoid damaging the new pack.
Real-World Results: What to Expect After Installation
Once your new battery is installed, the transformation is immediate.
- Restored Range: Say goodbye to the “150 km anxiety.” With a 40kWh or 50kWh new pack, you will experience the van exactly as it was when it rolled off the lot—responsive, quiet, and capable of full-day operation.
- Faster Charging: New batteries accept charge more efficiently. You will notice that public DC fast chargers fill up your battery much quicker than before, and Level 2 charging times return to factory specifications.
- Peace of Mind: Knowing you have a 2-year warranty means you can use the van for work or leisure without constantly worrying about breakdowns.
Conclusion: A Smart Investment for Your Van
Choosing a DIY e-NV200 lithium battery installation is one of the smartest financial decisions you can make for your vehicle. Instead of sinking $15,000 into a new van (or a dealership replacement), you can invest roughly $7,000-$8,000 in a brand-new, high-quality pack that restores 100% of the functionality.
Remember, the key to a successful DIY project is the quality of the parts and the strength of the warranty. Do not settle for cheap, uncertified batteries with no support. Choose a solution engineered to OEM standards with the safety net of a long-term warranty.
Ready to revive your e-NV200?
Get a free, no-obligation quote today and see how much you can save.
Get Your Free Custom Quote Now
Frequently Asked Questions (FAQ)
1. Is DIY installation safe for the Nissan e-NV200?
Yes, if you follow proper safety protocols. The process is primarily mechanical (unbolting and bolting). However, you must handle the high-voltage connectors with care. We recommend wearing insulated gloves and ensuring the 12V battery is disconnected before starting. If you are uncomfortable with high-voltage systems, consult a local mechanic for the final connection.
2. Will a new battery affect my car’s warranty or software?
Our batteries are designed to mimic the original OEM communication protocols. In most cases, the car’s software recognizes the new battery seamlessly, and no error codes appear. We provide compatibility checks via VIN number to ensure the software matches your specific model year before you purchase.
3. What if I encounter an error code during installation?
While our packs are plug-and-play, occasional hiccups can happen during the BMS (Battery Management System) handshake. Our technical support team offers remote video guidance. We can walk you through the reprogramming steps or troubleshooting via video call to resolve the issue in minutes.
4. How long does the installation take?
For a professional mechanic, the physical swap usually takes about 1-2 hours. For a DIY enthusiast, it may take 2-3 hours, depending on your experience level and tool availability. The process involves removing underbody panels, disconnecting the old pack, and bolting in the new one.
5. What payment methods do you accept for international customers?
We understand international transactions can be complex. We accept various secure methods, including Bank Transfer (T/T) and Trade Assurance orders via Alibaba. For specific payment options in your region, please contact our sales team directly.