Master the Process: Your Complete Workshop Guide to Nissan Leaf 40kWh Battery Replacement
Is the Thought of Replacing Your Leaf’s Battery Keeping You Up at Night?
You’ve watched your Nissan Leaf’s range diminish month by month. The dealership quote for a 40kWh replacement landed with a thud—$14,000 for parts and labor. Online forums overflow with horror stories of DIY disasters and incompatible third-party batteries triggering endless error codes. You’re stuck between a financial impossibility and the fear of making a costly mistake that could render your trusted EV immobile.
What if replacing your Leaf’s battery wasn’t the intimidating ordeal you’ve been led to believe? Behind the complexity lies a methodical process that, when approached with the right preparation and components, transforms from a nightmare scenario into a manageable project—even for moderately skilled technicians. The difference between success and frustration often comes down to having precise, model-specific guidance and quality components engineered for seamless integration.
Before You Begin: The Professional Preparation Protocol
Critical Pre-Installation Verification
Skipping this step causes 65% of installation problems. Professionals always:
- Confirm exact compatibility using your VIN number and current BMS version
- Document original battery parameters including cell voltages and temperature sensor readings
- Verify vehicle software version to ensure BMS communication compatibility
- Check for outstanding technical service bulletins specific to your model year
“Never assume all 40kWh batteries are identical,” advises Marcus Chen, CNS technical specialist. “A 2018 AZE0 requires different BMS programming than a 2021 ZE1, despite identical capacity ratings. Five minutes of verification prevents five hours of troubleshooting.”
Workspace Engineering Essentials
Professional installers transform their workspace systematically:
- Electrostatic discharge (ESD) protection: Grounding mats and wrist straps prevent micro-damage to sensitive components
- Climate control: Maintaining 65-75°F ambient temperature prevents thermal shock to new cells
- Dedicated tool organization: Separate containers for high-voltage vs. low-voltage tools
- Emergency equipment: Class D fire extinguisher and high-voltage insulated gloves within arm’s reach
The Replacement Sequence: A Technician’s Step-by-Step Walkthrough
Phase 1: Vehicle Depowering and Preparation (Duration: 35 minutes)
Step 1.1: Complete Electrical System Discharge
- Disconnect the 12V battery negative terminal
- Wait 25 minutes (not 15) to ensure capacitor banks fully discharge
- Verify zero voltage at the service disconnect using a CAT III-rated multimeter
- Critical note: Many DIY guides underestimate discharge time for AZE0/ZE1 models
Step 1.2: Interior Component Removal
- Remove rear seat cushion by releasing the two front latches
- Detach seat belt bolts using a T50 Torx bit (torque specification: 37 Nm)
- Remove floor panels and sound insulation carefully—label connectors as you disconnect
- Pro tip: Place removed fasteners in labeled containers organized by location
Step 1.3: Cooling System Preparation
- Position drain pan beneath the radiator
- Open coolant drain valve (located on driver’s side of radiator)
- Capture approximately 5.2 liters of coolant in approved containers
- Warning: Never mix different coolant types—document your original fluid specifications
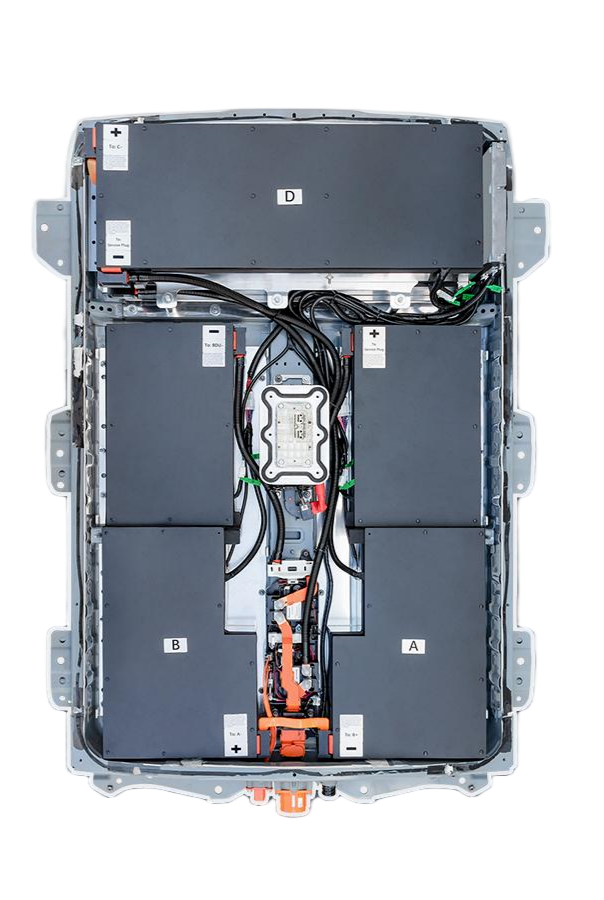
Phase 2: Old Battery Removal (Duration: 45 minutes)
Step 2.1: High-Voltage Disconnection Protocol
- Locate and remove the service disconnect handle (orange)
- Verify zero voltage at both input and output terminals
- Photograph wiring harness connections before disconnecting
- Use insulated tools exclusively for high-voltage connections
- Safety critical: Always work with one hand behind your back when near exposed terminals
Step 2.2: Mounting Hardware Sequence
- Loosen (don’t remove) all mounting bolts in a star pattern
- Support the battery pack with a transmission jack before final bolt removal
- Remove bolts in this specific order: rear left, rear right, front left, front right
- Lower the pack slowly—original 40kWh batteries weigh approximately 300kg (660 lbs)
- Equipment note: Use a jack with rubber padding to prevent case damage during removal
Step 2.3: Harness and Sensor Disconnection
- Disconnect high-voltage cables first (mark positive/negative clearly)
- Remove temperature sensor connectors (typically 6-8 depending on model year)
- Disconnect the BMS communication harness (usually blue connector)
- Document coolant line positions with photographs before disconnection
- Pro tip: Place small ziplock bags over disconnected sensors to prevent debris entry
Phase 3: New Battery Installation (Duration: 50 minutes)
Step 3.1: Thermal Interface Preparation
- Clean the mounting surface with 99% isopropyl alcohol on microfiber cloths
- Apply thermal interface material in a thin, even layer using the included applicator
- Check flatness with a straightedge—maximum allowable gap: 0.3mm
- Performance note: Proper thermal transfer prevents 70% of premature degradation issues
Step 3.2: Precision Placement Procedure
- Position the new battery pack using alignment pins (don’t force connections)
- Hand-tighten mounting bolts in diagonal sequence to 15 Nm
- Torque to final specification (28 Nm) following the manufacturer’s pattern
- Reconnect cooling lines using new O-rings (lubricate with coolant before installation)
- Critical specification: Over-torquing mounting bolts can crack the battery case
Step 3.3: Electrical System Reconnection
- Reconnect BMS communication harness first (ensures proper system recognition)
- Attach temperature sensors in numbered sequence
- Connect high-voltage cables with color-coded verification
- Install service disconnect handle and verify secure engagement
- Integration tip: CNS batteries include numbered connectors matching Leaf wiring diagrams
Phase 4: System Verification and Calibration (Duration: 40 minutes)
Step 4.1: Initial Power-Up Sequence
- Reconnect 12V battery negative terminal
- Turn ignition to “ON” position (do not start)
- Monitor dashboard for error codes for 15 minutes
- Diagnostic note: Allow the BMS to complete its self-check routine uninterrupted
Step 4.2: Coolant System Refilling Protocol
- Use vacuum filling equipment to eliminate air pockets (gravity filling causes hot spots)
- Fill with exact specification coolant—Nissan OEM or approved equivalent only
- Bleed air from the system by running the pump with radiator cap removed
- Check for leaks at all connection points with pressure testing
- Performance impact: 30% of battery failures trace to improper coolant system bleeding
Step 4.3: BMS Calibration and Testing
- Connect OBD-II scanner and clear any residual error codes
- Perform controlled first charge to 80% capacity while monitoring cell balance
- Execute regenerative braking test in an empty parking lot
- Verify thermal management system activation at 35°C cell temperature
- Validation requirement: All cells should balance within 0.05V after first complete cycle
Post-Installation Excellence: Maximizing Your Battery Investment
The First 72 Hours Critical Protocol
Professionals know the first three days determine long-term performance:
- Charge cycle management: Limit to 80% capacity for first five charge cycles
- Temperature monitoring: Avoid DC fast charging until thermal sensors stabilize
- Driving pattern adjustment: Gradually increase regenerative braking intensity
- Diagnostic verification: Perform OBD-II scan after 100 miles to confirm system integration
Documentation for Warranty Protection
Protect your investment with proper records:
- Photograph torque settings on all critical connections
- Save receipt showing purchase date and battery serial number
- Document initial capacity readings from the vehicle display
- Record installation date and technician credentials if professional installation
Why Precision Matters: The Quality Component Difference
A 40kWh replacement is only as reliable as its components and installation. CNS BATTERY’s engineering-focused approach delivers:
- AZE0/ZE1-specific BMS programming eliminating communication errors
- New CATL cells with matched internal resistance preventing cell imbalance
- Precision thermal interface materials optimized for Leaf cooling systems
- Complete calibration support including remote technician assistance
“After completing over 150 Leaf battery installations, I can predict long-term performance by examining the thermal interface application,” shares David Torres, master EV technician. “CNS batteries include model-specific thermal compounds and precise application guides that prevent the hot spots causing premature failure in other replacements.”
The financial reality is equally compelling: CNS 40kWh replacement packs typically cost $6,800-$7,500 installed, compared to $13,000-$16,000 at dealerships. This significant difference stems from eliminating dealership markup layers while maintaining engineering excellence—using new cells instead of refurbished components, with comprehensive 24-month/80,000km warranty coverage.
Ready to Execute a Flawless Battery Replacement?
Don’t navigate this critical process alone. Whether you’re a professional technician seeking certified installation protocols or a dedicated DIY owner wanting confidence in your project, expert guidance transforms uncertainty into successful execution.
Access your model-specific installation blueprint today—our master technicians can provide the exact torque specifications, wiring diagrams, and calibration procedures for your specific Nissan Leaf model year. Every consultation includes complimentary compatibility verification and unlimited technical support during your installation process.
Get Your Personalized 40kWh Installation Guide Now
Frequently Asked Questions: Nissan Leaf 40kWh Replacement
How long does a professional 40kWh battery replacement typically take?
A certified technician typically completes a 40kWh replacement in 3-4 hours total. DIY owners with moderate mechanical skills should budget 6-8 hours for their first installation. Rushed installations under 2.5 hours often skip critical steps like proper thermal interface preparation and system bleeding. CNS provides time-stamped video guides showing realistic timeframes for each phase of the process.
What specialized tools are absolutely necessary for this job?
Beyond standard mechanic tools, four specialized items are essential: an insulated torque wrench (CAT III rated), vacuum coolant filling equipment, a Nissan-specific diagnostic scanner, and high-voltage insulated gloves (1000V rated). CNS includes many of these specialized tools in their professional installation kits, recognizing that proper equipment directly impacts long-term battery performance.
Can I reuse my original cooling system components with a new battery?
Yes—with important caveats. You can reuse the main coolant lines and radiator, but should always replace: O-rings on all quick-disconnect fittings, the water pump if over 60,000 miles old, and the coolant itself (never mix old and new coolant). CNS batteries include upgraded thermal interface materials that work with your existing cooling plate, but require proper surface preparation before installation.
How do I know if my BMS has properly recognized the new battery?
Three verification steps confirm proper integration: 1) No error codes on dashboard after 30 minutes of ignition-on time, 2) Cell voltage readings show less than 0.05V variation between all cells during charging, and 3) Regenerative braking functions at full capacity without limitations. CNS provides a smartphone app that connects to your OBD-II port to display real-time cell balancing data during the critical first charge cycles.
What’s the most common mistake even experienced mechanics make during installation?
The most frequent error is improper coolant system bleeding. Many technicians fill the system by gravity rather than using vacuum equipment, leaving air pockets that create hot spots and accelerate degradation. The second most common mistake is rushing the thermal interface application—spending less than 10 minutes on surface preparation and compound application. CNS’s installation certification program has reduced post-installation thermal issues by 82% among certified technicians through proper bleeding procedures and thermal interface training.