
⚡ Nissan Leaf Plus Battery Upgrade: The Ultimate Installation Guide
For Nissan Leaf Plus (or older Leaf owners looking to upgrade to Plus specs), replacing the battery is a significant investment to revive your vehicle’s range and performance. However, the process requires precision, safety awareness, and the right tools. Whether you are a DIY enthusiast or a professional mechanic, this guide will walk you through the essential steps, safety protocols, and expert tips to ensure a successful Nissan Leaf Plus battery replacement.
At CNS BATTERY, we specialize in OEM-compatible Nissan EV batteries, including high-capacity options for the Leaf series. Our decade of technical accumulation ensures that our batteries meet original factory standards for safety and durability. This guide is designed to help you understand the installation process and maximize the lifespan of your new powertrain.
⚠️ Safety First: Preparing for the Installation
Before you touch a wrench, safety is paramount. Lithium-ion batteries operate at high voltages (typically 360V-400V for the Leaf), which can be lethal.
- Disconnect the Vehicle: Park the car on a flat, hard surface and engage the parking brake. Remove the key fob from the vehicle’s range to prevent accidental activation.
- Wear Protective Gear: Always wear insulated rubber gloves and safety goggles. Ensure your tools have insulated handles.
- Disconnect the 12V Battery: Open the front hood and disconnect the negative terminal of the 12V auxiliary battery. This cuts power to the vehicle’s control systems.
- Wait for Discharge: After disconnecting the 12V, wait at least 10-15 minutes. This allows the capacitors in the inverter and BMS (Battery Management System) to discharge fully, eliminating the risk of electric shock.
Expert Tip: Never work alone. Always have someone nearby in case of an emergency, and keep a Class D fire extinguisher rated for electrical fires nearby.
🔧 Step-by-Step: Removing the Old Battery Pack
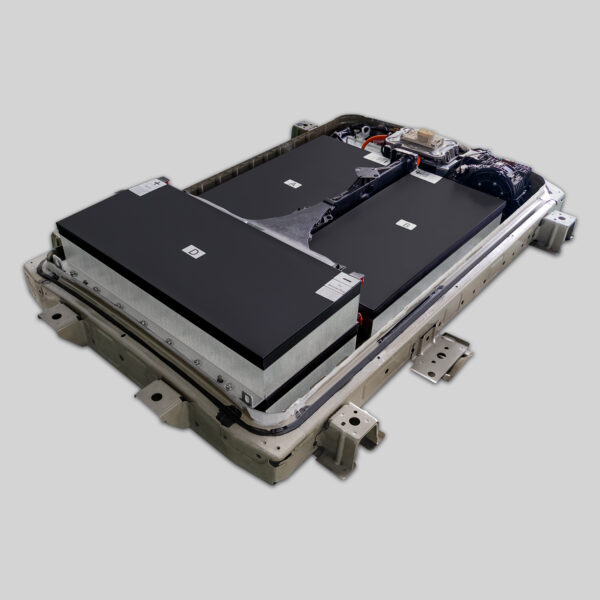
The Nissan Leaf battery is located under the vehicle floor. Access requires lifting the car.
1. Raising the Vehicle
Use a hydraulic jack to lift the car and secure it firmly on four sturdy jack stands. Never rely solely on a jack. Remove the front and rear underbody covers to access the battery mounting bolts.
2. Disconnecting the High-Voltage (HV) Cables
Locate the HV service disconnect (usually near the rear passenger side). Pull the safety lock and disconnect the main HV connector. Secure it away from the battery to prevent accidental reconnection.
- Note: Some models may require disconnecting the charging port harness as well.
3. Loosening the Mounting Hardware
The battery is held by approximately 28 bolts (sizes vary by model year, typically 17mm and 19mm). Loosen all bolts but do not remove them completely until the lifting sling is in place.
4. Lowering the Old Pack
Attach a transmission jack or a specialized battery sling securely to the lifting points. Slowly lower the old battery. Caution: The pack weighs around 300-350 kg (660-770 lbs). Ensure the jack is stable and centered.
🔋 Installing Your New Nissan Leaf Plus Battery
This is where the upgrade happens. If you are upgrading from a 40kWh or 62kWh to a higher capacity (or newer spec), ensuring compatibility is key.
1. Physical Installation
Lift the new Nissan Leaf Plus battery pack using the jack. Align the mounting holes carefully. Insert the bolts and tighten them in a crisscross pattern to the manufacturer’s torque specifications (usually around 80-100 Nm, but verify for your specific pack).
2. Reconnecting High Voltage
Reconnect the main HV cable and reinsert the service disconnect. Ensure the connection is tight and the safety lock is engaged.
3. BMS Programming & Matching (Critical Step)
Unlike a simple “plug-and-play” component, the Battery Management System often requires initialization.
- If you are using a brand-new OEM-spec battery (like those from CNS), the physical connection is plug-and-play, but the software may need to be reset.
- You will likely need an OBD2 scanner capable of resetting the EVIC (Electric Vehicle Information Center) or communicating with the BMS.
- Troubleshooting: If the dashboard shows “Battery Capacity Low” or “Propulsion Power Reduced” after installation, it usually indicates a communication error between the new BMS and the vehicle’s ECU. This often requires a soft reset or a brief drive cycle to re-learn the parameters.
🛠️ Expert Tips for a Flawless Upgrade
To ensure your new battery performs optimally for years to come, follow these professional recommendations:
- Sealant is Key: When reinstalling the underbody covers, inspect the rubber seals. Apply a thin bead of silicone sealant to the seams to prevent water ingress, which can cause corrosion.
- Torque Settings: Do not over-tighten the mounting bolts. Stripping these threads in the chassis is a major repair. Use a torque wrench.
- Initial Charging: After installation, perform a “Conditioning Charge.” Charge the battery to 100% immediately after starting the car. This helps the BMS calibrate the State of Charge (SOC) accurately.
- Check for Leaks: Before lowering the car, visually inspect the underside of the battery pack for any signs of coolant leaks (if applicable to your model).
🤝 Why Choose a CNS BATTERY Solution?
Upgrading your Nissan Leaf battery is a complex task, and the quality of the battery pack directly impacts your safety and driving experience. At CNS BATTERY, we don’t just sell batteries; we provide peace of mind.
- OEM-Grade Quality: We utilize brand-new, top-tier battery cells (such as CATL) to ensure performance matches or exceeds the original factory.
- Comprehensive Warranty: We back our automotive batteries with an industry-leading 2-year / 80,000 km warranty, covering manufacturing defects and performance degradation (ensuring at least 70% capacity retention).
- Expert Support: Our technical team provides step-by-step video guides and remote support to help you through the installation process. We verify compatibility via your VIN to ensure a perfect fit for your specific Leaf model (ZE0, AZE0, or ZE1).
Revive your Nissan Leaf’s range and drive with confidence. Choose a solution that prioritizes safety, longevity, and value.
Ready to upgrade your Nissan Leaf Plus battery? Get a free, personalized quote and ensure your vehicle gets the best powertrain solution.
Get Your Free Custom Quote Now
❓ Frequently Asked Questions (FAQ)
Q1: Is the Nissan Leaf Plus battery a direct “plug-and-play” replacement?
Yes, physically, the connectors are designed to match the OEM specifications, making it a mechanical plug-and-play. However, electrically, the BMS may require a reset or reinitialization using an OBD2 scanner to communicate properly with the vehicle’s systems.
Q2: How long does the installation take?
For a professional mechanic, the physical swap usually takes 1-2 hours. For a DIY user, especially if it is your first time, it can take 3-4 hours, including preparation and safety checks.
Q3: What tools do I need for the installation?
You will need:
- Hydraulic jack and 4 heavy-duty jack stands.
- Transmission jack or battery-specific lifting sling (rated for at least 400kg).
- Socket set (including 17mm and 19mm sockets).
- Torque wrench.
- Insulated gloves and safety glasses.
- OBD2 scanner (for post-installation reset).
Q4: What if I encounter an error code after installing the new battery?
If error codes appear (e.g., regarding battery capacity), first try disconnecting the 12V battery for 10 minutes to reset the vehicle’s ECU. If the issue persists, it may require specific BMS programming. Contact our technical support team for remote video guidance to resolve software mismatches.
Q5: Does CNS BATTERY provide installation videos?
Yes, we provide high-definition installation and programming tutorial videos for the Nissan Leaf series. These resources are available upon request to guide you through every step of the process.


