
Here is the SEO-optimized article tailored for Nissan Leaf e+ owners, focusing on installation best practices and leveraging the expertise of CNS BATTERY.
Nissan Leaf e+ New Battery Installation: Expert Tips & Safety Guide
Upgrading or replacing the battery in your Nissan Leaf e+ is a significant investment that can restore your vehicle’s legendary range and performance. Whether you are a professional technician or a seasoned DIY enthusiast, proper installation is the single most critical factor determining the lifespan and safety of your new EV battery pack.
At CNS BATTERY, we specialize in manufacturing high-performance, OEM-compatible replacement batteries for the Nissan Leaf series (including the e+ models). With over a decade of R&D experience and utilizing premium brand-new CATL battery cells, our packs are engineered to deliver superior energy efficiency and durability. However, even the highest quality battery requires meticulous handling during installation.
This guide provides essential expert tips to ensure your new battery is installed safely, correctly, and ready to hit the road for years to come.
1. Pre-Installation: Preparation is Key
Before you even open the hood, preparation ensures a smooth workflow and prevents costly mistakes.
- Verify Compatibility: The Nissan Leaf e+ typically utilizes higher capacity packs (such as 62kWh variants). Always cross-check your Vehicle Identification Number (VIN) with the manufacturer’s specifications. At CNS, we offer a free pre-sale compatibility assessment to guarantee the battery dimensions, voltage, and communication protocols match your specific Leaf model year.
- Gather the Right Tools: Do not improvise. You will need insulated wrenches, torque wrenches (to ensure proper bolt tightness without stripping), dielectric grease, and a dedicated EV battery lifting crane or trolley. Using the wrong tools can damage the Battery Management System (BMS) or the casing.
- Workspace Safety: Ensure your workspace is clean, dry, and well-ventilated. Lithium-ion batteries are sensitive to moisture and extreme temperatures.
2. The Removal Process: Handle with Care
Removing the old battery requires caution to protect yourself and the vehicle’s electronics.
- Disconnect Power: Always start by disconnecting the 12V auxiliary battery to cut power to the vehicle’s systems.
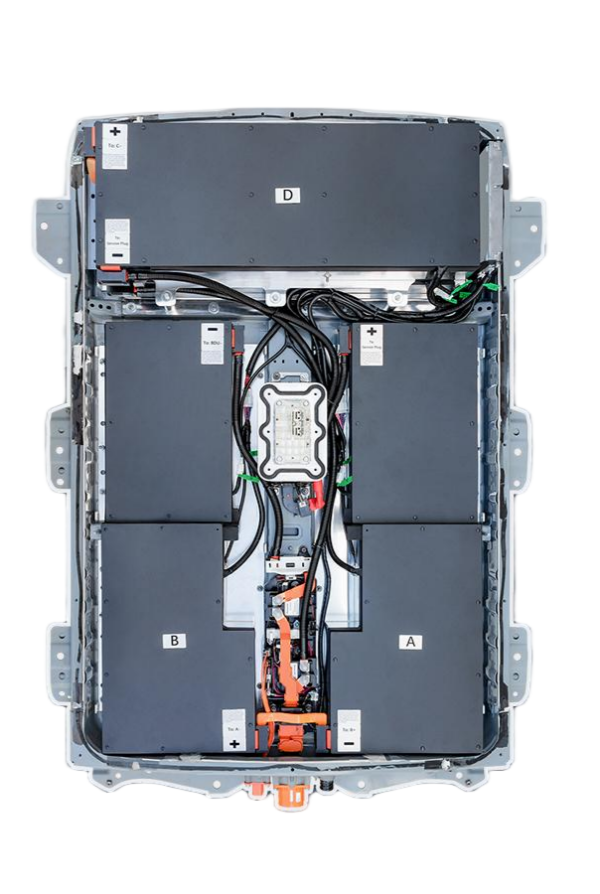
- High Voltage Disconnection: Locate the High Voltage (HV) service plug (usually found under the rear seat or in the trunk) and remove it. Wait at least 10 minutes to allow the capacitors in the inverter to discharge.
- Physical Removal: When unbolted, the pack is heavy. Never lift manually—use a mechanical lift to avoid injury and damage to the battery tray.
3. Installing Your New CNS Battery Pack
This is where precision matters. A rushed installation can lead to short circuits or poor connections.
- Visual Inspection: Before mounting, inspect the new battery casing for any transit damage. Ensure all connectors are clean and free of debris.
- Positioning: Carefully lower the new battery into the chassis. Ensure it sits flush without forcing it, as misalignment can damage internal cell connections.
- Torque Specifications: When bolting the battery to the chassis and connecting the HV cables, strictly adhere to the manufacturer’s torque specifications. Over-tightening can crack the casing or strip threads, while under-tightening can cause arcing and overheating.
- Plug-and-Play Connectivity: Our CNS batteries are designed for OEM-standard compatibility. Connect the main HV cables and signal connectors. Ensure the seals are intact to maintain the battery’s IP67 waterproof rating.
4. Post-Installation: Programming & Testing
Once the physical installation is complete, the electronic integration begins.
- BMS Synchronization: After connecting the battery, the Vehicle Control Unit (VCU) needs to recognize the new Battery Management System. This often requires a diagnostic scan tool (like Consult-III or equivalent) to reset the odometer for the battery and confirm communication.
- The First Charge: For the first cycle, we recommend a slow, Level 1 or Level 2 charge. Avoid DC fast charging immediately after installation. This allows the BMS to balance the cells and establish accurate State of Charge (SoC) readings.
- System Check: Before driving, start the vehicle and check the dashboard for any error codes. Perform a short test drive to monitor power delivery and responsiveness.
5. Why Choose a CNS BATTERY for Your Leaf e+?
When upgrading your Nissan Leaf, you deserve a solution that offers reliability without the exorbitant cost of dealership replacements.
- Premium Components: We utilize brand-new CATL lithium cells, ensuring performance far superior to refurbished or recycled packs.
- Cost Efficiency: Save over 50% compared to original manufacturer prices while maintaining OEM-grade fitment.
- Unbeatable Warranty: We back our confidence in quality with a comprehensive 2-year / 80,000 km warranty, covering manufacturing defects and performance degradation, providing peace of mind long after installation.
Frequently Asked Questions (FAQ)
Q1: Can I install a CNS Nissan Leaf battery myself, or do I need a mechanic?
While the physical installation of a CNS battery is designed to be a “plug-and-play” process similar to the original factory unit, we strongly recommend having a certified technician perform the work. Handling high-voltage components requires specific safety training and diagnostic tools for BMS programming. However, if you are an experienced DIYer with the correct lifting equipment and EV knowledge, our customer service team offers video call guidance to support you through the process.
Q2: How long does the installation process take?
For a professional technician, installing a Nissan Leaf battery typically takes 1 to 2 hours. This includes the removal of the old unit, positioning the new CNS battery, securing the connections, and performing the initial system diagnostics. DIY users may require additional time for preparation and verification.
Q3: What should I do if the dashboard shows an error code after installation?
Modern EVs are complex. If you see an error code (such as a battery warning or communication fault), do not attempt to drive the vehicle. These codes usually indicate a need for BMS programming or calibration. Contact our technical support team immediately; we can often resolve this remotely via video guidance or by advising your mechanic on the necessary reset procedures.
Q4: Does installing an aftermarket battery void my Nissan Leaf’s warranty?
Installing a non-dealer battery can be a complex topic. However, because CNS batteries are built to OEM specifications and use brand-new, high-quality cells, they often present fewer risks than failing original packs. We recommend discussing specific warranty implications with your service provider. Our batteries are designed to integrate seamlessly to minimize compatibility issues.
Q5: What maintenance tips will help my new Leaf e+ battery last longer?
To maximize lifespan, avoid consistently charging to 100% for daily use (aim for 80-90%); this reduces cell stress. If storing the vehicle for months, keep the charge level between 40-60%. Additionally, avoid frequent “flooring” of the accelerator from a standstill, as this creates high current draw and heat.
Ready to restore your Nissan Leaf e+ to its full potential?
Get a Free Custom Quote for Your Nissan Leaf Battery


