
Nissan Leaf 30kWh Swap Tutorial: The Ultimate Upgrade Guide for 2026
The Nissan Leaf 30kWh battery is a relic of the early EV era. If you are driving a first-generation Leaf (SV or SL trim from 2011-2012), you are likely facing the harsh reality of battery degradation. The original range of 73 miles (117 km) has probably dwindled to a range anxiety-inducing 40-50 miles (65-80 km) in cold weather.
But before you scrap your car or spend $16,000 at a dealership for an OEM pack, there is a smarter, safer, and far more cost-effective solution. Upgrading your 30kWh Leaf to a modern 40kWh, 62kWh, or even a 68kWh battery is the ultimate hack to revive your vehicle.
At CNS Battery, we have helped thousands of Leaf owners perform this transformation. This guide is not just theory; it is based on our decade of experience in OEM-compatible powertrain engineering. We will walk you through why the swap is necessary, the best battery options available in 2026, and a step-by-step installation tutorial.
Why You Should Never Stick with the 30kWh Battery
The 30kWh battery (often referred to as the “3P” or “L3” pack) was a pioneer, but it is now obsolete for daily use.
- Capacity Collapse: These batteries suffer from severe capacity fade. Most 30kWh packs today retain less than 50% of their original capacity.
- Lack of Heating/Cooling: Unlike modern packs, the 30kWh relies on passive air cooling. This makes it vulnerable to heat damage in summer and unusable range loss in winter.
- Economic Wastage: Keeping the original pack often costs more in the long run due to reduced resale value and the need for frequent charging infrastructure.
The Verdict: Swapping is not just an upgrade; it is a resurrection of your vehicle’s value.
The Best Battery Options for Your Leaf 30kWh Swap
When upgrading from a 30kWh chassis, you have three main options. We specialize in providing Plug-and-Play (PnP) solutions that require zero modifications to your car’s wiring harness.
| Battery Option | New Range (Est.) | Compatibility | Best For |
|---|---|---|---|
| 40kWh Upgrade | 150 miles (240 km) | Leaf ZE0, AZE0, ZE1 | Budget-conscious drivers wanting reliable daily commutes. |
| 62kWh Upgrade | 200+ miles (320 km) | Leaf ZE0, AZE0, ZE1 | Long-distance drivers and ride-share operators. |
| 68kWh Custom | 240 miles (380 km) | Custom Chassis Fit | Enthusiasts wanting maximum range and future-proofing. |
Why Choose CNS Battery for Your Swap?
We do not sell recycled junk. Our packs utilize brand-new CATL (Contemporary Amperex Technology) cells, the same tier-1 supplier used by major automakers. This ensures safety, longevity, and a cycle life far exceeding the original Nissan pack.
Step-by-Step: Nissan Leaf 30kWh to 62kWh Swap Tutorial
This tutorial assumes you are upgrading to a modern 62kWh pack (the most popular choice). This process turns your 2011-2012 Leaf into a 2018-spec vehicle.
Tools Required:
- Socket Wrench Set (10mm, 14mm)
- Torque Wrench
- Insulated Screwdrivers
- Cable Ties
- CNS 62kWh Battery Pack
Safety First:
Warning: Always disconnect the 12V auxiliary battery before starting any high-voltage work. Wear insulated gloves. Ensure the vehicle is on a level surface and in Park.
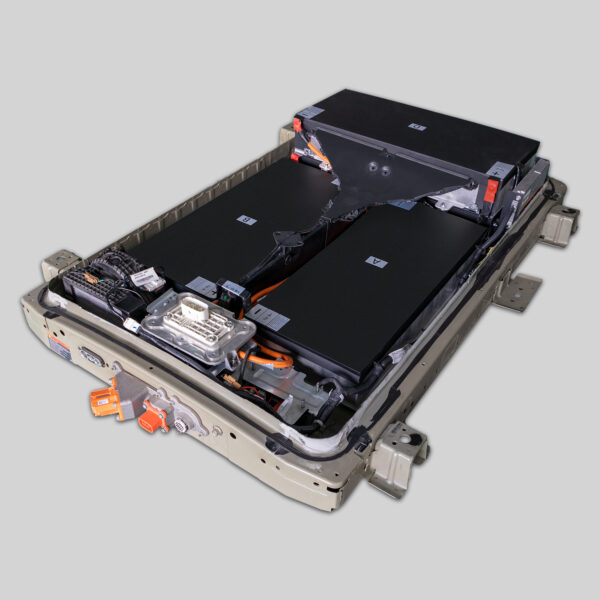
Phase 1: Removing the 30kWh Pack
- Disconnect Power: Open the hood and disconnect the negative terminal of the 12V battery.
- Access the Undercarriage: Lift the vehicle using a hydraulic jack and secure it with jack stands. The battery is located under the floor.
- Remove the Skid Plate: Remove the bolts securing the plastic/metal undertray to expose the battery pack.
- Disconnect HV Cables: Locate the main positive and negative high-voltage cables. Disconnect them carefully and insulate the ends.
- Unbolt the Pack: The 30kWh pack is held by approximately 16-20 bolts. Remove these bolts and carefully slide the old pack out.
Phase 2: Installing the 62kWh Pack (The Magic Moment)
The beauty of our CNS design is the OEM-standard footprint.
- Positioning: Slide the new 62kWh pack into the chassis. The mounting points are engineered to match the original Nissan Leaf specifications perfectly.
- Bolting: Secure the pack using the original bolts (or the ones provided in our kit). Torque them to the factory specification (typically 80-100 Nm).
- Wiring: Connect the main HV cables. The connectors are color-coded and keyed to prevent reverse polarity.
- BMS Programming (Crucial Step): This is where most DIYers get stuck. The Battery Management System (BMS) needs to communicate with the car’s ECU.
- Expert Tip: We provide free remote video guidance. If you encounter a “Traction Battery Fault” light, contact our support team. We will guide you through the coding process using a laptop and CAN adapter to sync the new SOC (State of Charge) with the dashboard.
Phase 3: Testing and Calibration
- Reconnect 12V: Reconnect the auxiliary battery.
- First Boot: Turn the key. The car should recognize the new battery voltage automatically.
- Charge Cycle: Plug in the charger. The car should accept a full charge. We recommend doing a full discharge and recharge cycle once to calibrate the new BMS.
Frequently Asked Questions (FAQ)
Q1: Is the Nissan Leaf 30kWh to 62kWh swap really plug-and-play? Do I need to cut wires?
A: Yes, it is truly Plug-and-Play for the physical installation. You do not need to cut or splice any wires. The chassis bolts, high-voltage connectors, and cooling lines (if applicable) are OEM-compatible. However, the BMS software does require coding to match the new capacity. Our technical team provides free remote assistance for this step.
Q2: How much does a 62kWh replacement cost compared to Nissan OEM?
A: A brand-new OEM 62kWh pack from a dealership can cost upwards of $14,000 – $16,000 USD. At CNS Battery, our 62kWh upgrade kit, utilizing brand-new CATL cells, costs approximately 50% less. This makes the swap not just a performance upgrade, but a massive financial saving.
Q3: Will this void my car’s warranty or cause dashboard errors?
A: Since the physical dimensions and electrical interfaces are identical to the OEM standard, there are no dashboard errors related to physical connectivity. The car will drive normally. However, if your vehicle is still under the original Nissan manufacturer warranty (unlikely for a 30kWh car), installing an aftermarket component may affect that specific warranty coverage. For most owners of 10+ year old Leafs, this is not a concern.
Q4: How long does the installation take?
A: For a professional mechanic, the physical swap takes about 1 to 1.5 hours. For a DIY enthusiast with basic tools, it usually takes around 2 hours. The most time-consuming part is safely lifting the vehicle and removing the old bolts, which may be rusted.
Q5: What kind of warranty does CNS Battery offer?
A: We stand by our quality. We offer an industry-leading 2-year / 80,000 km warranty on all our automotive battery packs. This covers manufacturing defects and ensures the battery maintains at least 70% capacity over the warranty period.
Ready to Transform Your Leaf?
Don’t let the limitations of a 30kWh battery dictate your driving range. Upgrading to a 62kWh pack from CNS Battery gives you a “new” electric car for a fraction of the cost.
Our packs are built with new CATL cells, ensuring safety, fast charging, and zero failure rates. We have successfully shipped thousands of these upgrades worldwide, from California to Berlin.
Get Your Free Custom Quote Today.
Stop paying for taxis or worrying about range. Let CNS Battery put your mind at ease.


