
Here is the SEO-optimized article tailored for DIY enthusiasts looking to upgrade their Nissan Leaf or e-NV200 power battery.
🔋 The Ultimate DIY Guide: Upgrading to a Nissan Leaf Plus (62kWh) Power Battery
Are you a DIY enthusiast tired of the “range anxiety” that comes with the older 24kWh or 30kWh Nissan Leaf battery packs? You are not alone. Many passionate EV owners are reclaiming their driving freedom by upgrading to the Nissan Leaf Plus (62kWh) powertrain. This comprehensive guide is designed specifically for you—the hands-on technician or hobbyist ready to transform your vehicle into a long-range machine.
At CNS BATTERY, we understand that a DIY upgrade is about more than just saving money; it is about the satisfaction of engineering a superior solution yourself. We have supported countless DIY projects globally, providing the high-quality, plug-and-play components needed to make this complex upgrade safe and successful.
Why Upgrade to a Leaf Plus (62kWh) Power Battery?
The standard Nissan Leaf batteries (24kWh, 30kWh, and 40kWh) were revolutionary for their time, but technology has moved on. The 62kWh Leaf Plus battery represents a significant leap in energy density and range.
For a DIYer, upgrading means:
- Doubling Your Range: Jump from roughly 100-150 km (60-90 miles) to a reliable 340-380 km (210-235 miles) on a single charge.
- Modernizing Your EV: Utilizing newer Lithium-ion (NCM) chemistry for better thermal management and longevity compared to older LMO cells.
- Cost Efficiency: Performing the labor yourself drastically reduces the cost compared to a dealership replacement.
🛠️ Step 1: Understanding the Core Components
Before you start disassembling your car, you need to know exactly what parts you need to source for a complete Leaf Plus Power Battery upgrade.
A successful DIY conversion requires more than just dropping in a new pack. You need a harmonious system:
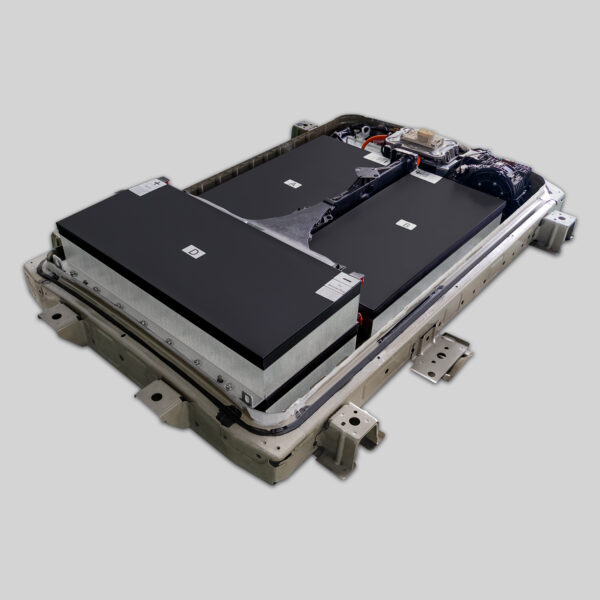
- The Battery Pack (62kWh): This is the heart. You need a pack specifically designed for the Leaf chassis (ZE0, AZE0, or ZE1).
- The Battery Management System (BMS): This is the brain. Crucially, the BMS must be pre-programmed or programmable to communicate with the Nissan Leaf’s Vehicle Control Module (VCM). This is often the most complex part of the DIY process.
- Thermal Management System: Ensuring the new pack integrates correctly with the car’s cooling lines is vital for safety and cell longevity.
Expert Tip: Many DIY failures occur because the BMS isn’t correctly registered to the car. At CNS, our Nissan Leaf Plus batteries come with BMS programming support, ensuring your DIY project isn’t stalled by software issues.
📦 Step 2: Selecting the Right DIY Kit
When shopping for a Leaf Plus Power Battery, you have two main options: sourcing used modules from scrapyards or purchasing a new, pre-assembled pack.
| Option | Pros | Cons | Recommendation |
|---|---|---|---|
| Scrapyard/Split Packs | Lower initial cost (if you find a donor). | High risk of cell degradation; requires extensive welding/balancing; no warranty. | Not Recommended for beginners. |
| New OEM-Compatible (CNS) | Brand new cells (CATL); factory assembly; plug-and-play design; full warranty. | Higher upfront cost, but lower lifetime cost. | Highly Recommended for reliability. |
Our Recommendation: As a professional in the field, I strongly advise using a new, high-quality 62kWh lithium battery pack. The risk of buying a used pack with hidden degradation is too high. A DIY project this big deserves a fresh start.
⚡ Step 3: The Installation Process (DIY Roadmap)
If you are comfortable changing your own oil or brakes, you likely have the mechanical skills for this job. The upgrade typically takes 1-2 hours for a professional, so expect a full afternoon for your DIY project.
Phase 1: Preparation
- Safety First: Disconnect the 12V battery and allow the car to sit for 15 minutes to discharge the capacitors.
- Drain Coolant: The high-voltage battery is liquid-cooled. You will need to drain the old coolant from the chassis before removing the pack.
Phase 2: Removal
- Jack up the vehicle and remove the undertray.
- Disconnect the high-voltage (HV) orange connectors and the coolant lines (have towels ready).
- Remove the mounting bolts. The old battery is heavy, so ensure you have proper lifting equipment.
Phase 3: Installation
- The “Plus” Fitment: The 62kWh pack is physically larger than the 24/30kWh packs. You may need to trim specific plastic retainers or brackets in the chassis bay to accommodate the new dimensions. This is normal.
- Plug-and-Play: Connect the new HV cables and coolant lines. Refill with fresh coolant.
- The Moment of Truth: Reconnect the 12V battery.
💻 Step 4: Programming & Commissioning
This is where the “Power Battery” upgrade becomes functional. Simply plugging in the battery does not guarantee it will work.
- Wake Up Call: The new BMS needs to “talk” to the car’s computer.
- Software Registration: You may need to use a Nissan Consult scanner (or equivalent) to register the new battery VIN and reset the battery capacity counter.
- First Charge: Perform a full charge cycle to allow the BMS to balance the cells.
Need Help? If you get stuck on the programming step, our technical team offers remote video guidance to walk you through the software handshake between the battery and your car.
🌟 Why Choose a CNS Leaf Plus Power Battery?
As a DIYer, you need a partner you can trust. Here is why our Leaf Plus Power Battery solutions are the top choice for enthusiasts:
- OEM Compatibility: We design our packs to fit the Nissan Leaf chassis (ZE0/AZE0/ZE1) perfectly. The connectors match the original factory standards, meaning no hacking or splicing wires.
- Premium CATL Cells: We use brand-new, top-tier cells known for their stability and energy density.
- Unbeatable Warranty: We back our work with a 2-year / 80,000 km warranty. Most DIY scrapyard swaps come with zero warranty.
- Global DDP Shipping: We handle the complex logistics of shipping lithium batteries worldwide, delivering right to your door.
📝 Conclusion
Upgrading to a Leaf Plus Power Battery is the ultimate way to breathe new life into your Nissan Leaf. It transforms a city car into a capable long-distance vehicle. While the process requires mechanical aptitude, the reward of cruising with over 200 miles of range is unmatched.
Ready to start your upgrade? Don’t gamble with your vehicle’s safety. Get a free quote for a high-performance, plug-and-play Nissan Leaf Plus Battery and let us help you power your journey.
Get Your Free Custom Quote Now
❓ Frequently Asked Questions (FAQ)
Q1: Can I really install the 62kWh Leaf Plus battery myself? Yes, absolutely. If you have basic mechanical skills and the right tools (torque wrench, jack stands), you can do it. The process is largely mechanical (bolts and bolts). However, programming the BMS can be tricky. We provide step-by-step video tutorials and remote support to help you through the software side if needed.
Q2: Is the Leaf Plus battery a direct fit (Plug and Play)? For the Nissan Leaf models ZE0, AZE0, and ZE1, the installation is plug-and-play regarding the electrical connectors and physical mounting points. However, due to the larger size of the 62kWh pack compared to older 24/30kWh packs, you may need to trim specific plastic retainers or brackets in the chassis bay to fit the larger module. This is standard procedure for this upgrade.
Q3: What is the range after upgrading to the Leaf Plus Power Battery? After a successful upgrade, you can expect a real-world range of approximately 340-380 km (210-235 miles). This is nearly double the range of the older 24kWh and 30kWh models. The actual range will depend on your driving style, weather conditions, and whether you use climate control.
Q4: How long does the installation take? For a DIY enthusiast, the physical installation usually takes about 2 hours. This includes draining the coolant, removing the old pack, installing the new pack, and refilling the coolant. If you are doing this for the first time, we recommend setting aside half a day to ensure you are not rushed.
Q5: Do I need special tools for the Leaf Plus upgrade? You will need standard automotive tools: a floor jack, jack stands, wrenches or socket sets, and insulated gloves for safety. Crucially, you will also need a Nissan Consult scanner (or compatible OBD2 scanner) to reset the battery management system and register the new pack with the car’s computer.

