
How to Install a New Battery in a Nissan Leaf SL: A Comprehensive Guide
Replacing the battery in your Nissan Leaf SL is a significant investment that can breathe new life into your electric vehicle (EV). Whether you are upgrading to a higher capacity pack or simply replacing a degraded unit, a successful installation requires careful planning, the right tools, and strict adherence to safety protocols.
At CNS BATTERY, we specialize in providing OEM-compatible Nissan Leaf batteries, including options for the SL trim. Our packs utilize brand-new CATL battery cells, ensuring superior performance, safety, and longevity compared to refurbished alternatives. This guide is designed to walk you through the entire process, ensuring you can complete the job safely and efficiently.
🛠️ Preparation and Safety
Before you begin, it is crucial to prioritize safety. Lithium-ion batteries operate at high voltages and require specific handling procedures.
Essential Tools and Equipment:
- Insulated Safety Gear: High-voltage insulated gloves, safety glasses, and non-conductive footwear.
- Mechanical Tools: A sturdy floor jack, jack stands, and a torque wrench.
- Electrical Tools: A digital multimeter (to verify voltage and continuity) and insulated wrenches/screwdrivers.
- Cleaning Supplies: Battery terminal cleaner and dielectric grease.
Safety Checklist:
- Disconnect Power: Ensure the vehicle’s 12V auxiliary battery is disconnected before starting any work.
- Environment: Work in a dry, well-ventilated area away from flammable materials.
- BMS Programming: If your vehicle requires BMS (Battery Management System) updates, ensure you have access to the necessary programming tools or contact our technical support for remote video guidance.
📋 Step-by-Step Installation Guide
Step 1: Vehicle Preparation
- Park the vehicle on a level surface and engage the parking brake.
- Disconnect the 12V negative terminal to cut off all auxiliary power.
- Use a floor jack to lift the vehicle and secure it with jack stands. Never work under a vehicle supported only by a jack.
Step 2: Removing the Old Battery
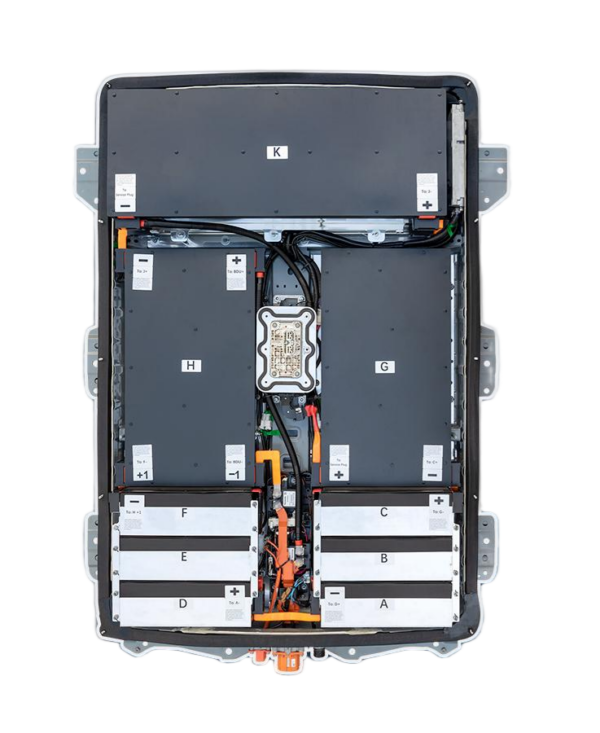
- Locate the battery pack underneath the vehicle.
- Carefully disconnect the high-voltage connectors and the low-voltage signal cables. Take note of the routing and orientation of these cables for reinstallation.
- Remove the mounting bolts securing the battery to the chassis. Depending on the age of your vehicle, these bolts may be tight or rusted; use appropriate penetrating oil if necessary.
- Slowly lower the old battery pack using the floor jack.
Step 3: Installing the New CNS Battery
- Inspect the new CNS BATTERY pack for any physical damage during shipping.
- Lift the new battery into position using the floor jack. Align the mounting holes with the chassis brackets.
- Secure the battery with the mounting bolts. Tighten them to the manufacturer’s specified torque settings to ensure a secure fit.
- Reconnect the high-voltage and low-voltage cables. Ensure all connections are tight and secure to prevent arcing or signal errors.
Step 4: System Check and Programming
- Reinstall the 12V battery cables.
- Turn the ignition on (do not start the vehicle yet) and use a diagnostic scanner to check for any error codes.
- If required, perform the BMS programming. Our customer service team offers remote video support to guide you through this process if you encounter issues.
Step 5: Final Testing
- Start the vehicle and check the dashboard for the “Ready” signal.
- Verify the State of Charge (SOC) and ensure the battery bars are displaying correctly (e.g., 12 bars for a full charge on compatible models).
💡 Why Choose a CNS BATTERY Pack?
When replacing your Nissan Leaf SL battery, you have options, but the quality of the cells and the warranty are critical factors.
Comparison of Battery Options:
| Feature | CNS BATTERY | Refurbished Batteries | OEM Factory Batteries |
|---|---|---|---|
| Cell Quality | Brand-new CATL cells | Recycled/Used cells | Original Manufacturer Cells |
| Warranty | 2 Years / 80,000 km | Often None or Very Short | Standard Factory Warranty |
| Cost | ~50% Less than OEM | Moderate (but high failure risk) | Very Expensive |
| Performance | Stable, Long Lifespan | Degrades Quickly, Risk of Swelling | Stable |
Choosing a CNS battery means you are not just buying a replacement; you are investing in a solution that offers 50% cost savings compared to dealership prices, while utilizing premium-grade cells that guarantee reliability.
❓ Frequently Asked Questions (FAQ)
1. How long does the installation take?
For a professional technician, the installation typically takes 1-2 hours. DIY enthusiasts may take longer, especially if performing BMS programming for the first time. We provide detailed step-by-step installation videos and PDF guides to assist you.
2. Is the installation “Plug-and-Play”?
For many Nissan Leaf models (including specific ZE0, AZE0, and ZE1 variants), the connection is designed to be plug-and-play, meaning the connectors match the original factory parts perfectly. However, depending on your specific SL model year and software version, minor BMS programming might be required, which our team can assist with.
3. What if I encounter a problem during installation?
Our professional customer service team is here to help. We offer support via phone, email, or online chat. If you face wiring or programming issues, we can arrange a free video call (via Zoom or similar) where an expert will guide you step-by-step until the problem is resolved.
4. Does replacing the battery affect my car’s warranty?
Replacing the battery with a high-quality aftermarket pack like CNS generally does not void the entire vehicle warranty. However, it may affect the powertrain warranty specifically related to the battery. We recommend checking your specific vehicle documentation. Our packs undergo rigorous compatibility checks based on your VIN to ensure they function seamlessly with your vehicle’s systems.
Ready to revive your Nissan Leaf SL? Get a free quote for your custom battery solution today.


