
⚡ DIY Guide to Installing a New Nissan Leaf ZE1 Battery: Step-by-Step
Are you ready to revive your Nissan Leaf ZE1? If your 2021+ model is struggling with range anxiety or battery degradation, a full pack replacement is the most cost-effective solution to restore it to “like new” condition. Replacing the battery in a Nissan Leaf ZE1 doesn’t require a dealership visit costing thousands of dollars. With the right preparation and a high-quality aftermarket pack, you can complete this transformation in a single afternoon.
This guide is designed for the DIY enthusiast or the professional technician looking for a reliable, step-by-step walkthrough. We will cover the entire process of installing a new Nissan Leaf ZE1 40kWh, 50kWh, or 62kWh lithium battery pack.
⚠️ Safety First: Preparing Your Workspace
Before you touch a wrench, safety is paramount. Lithium-ion batteries store high voltage, so strict protocols must be followed.
Gather Your Tools:
- Insulated Tools: A full set of insulated wrenches and screwdrivers.
- PPE (Personal Protective Equipment): Rubber gloves, safety glasses, and non-conductive footwear.
- Lifting Equipment: A heavy-duty engine crane or transmission jack. Note: A full EV battery pack weighs approximately 300kg (660 lbs).
- Discharge Kit: To safely drain the high-voltage capacitor in the inverter (if applicable to your specific procedure).
Workspace Checklist:
- Park the vehicle on a flat, level surface.
- Engage the parking brake and chock the wheels.
- Disconnect the 12V auxiliary battery negative terminal to cut all low-voltage power before starting.
🛠️ Phase 1: Removal of the Old Battery
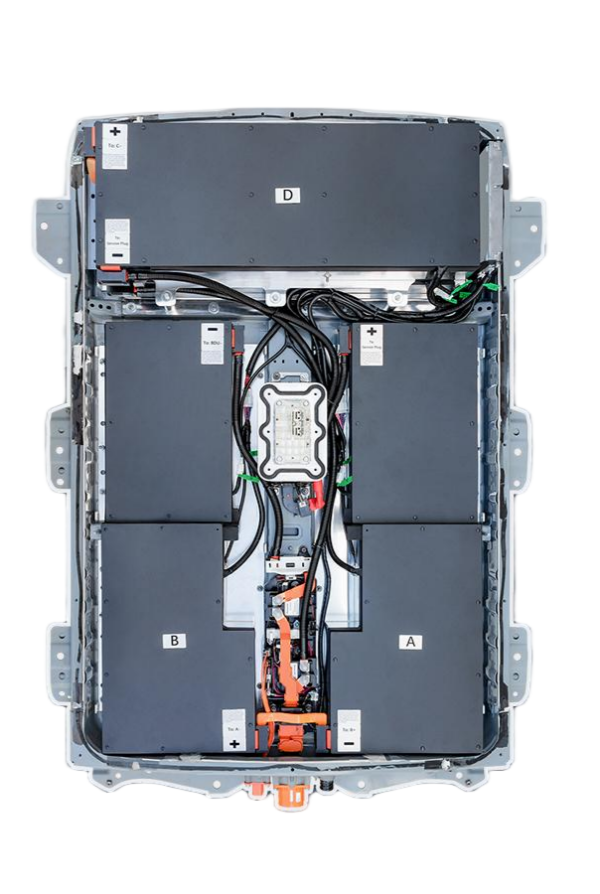
The Nissan Leaf ZE1 has a modular design, but the battery pack is integrated into the chassis. Follow these steps carefully:
- Remove the Undertray: Locate and unscrew the plastic underbody shield. This provides access to the battery mounting points.
- Disconnect High Voltage (HV): Locate the main HV connector on the side of the battery. Release the locking mechanism and carefully disconnect the orange cable. Tape the ends securely.
- Disconnect Low Voltage (LV): Disconnect the LV communication harness from the Battery Management System (BMS).
- Unbolt the Pack: There are typically 8-10 large mounting bolts securing the pack to the chassis subframe. Remove these carefully.
- Lift Out: Attach the lifting sling or crane hooks to the designated lifting points on the battery frame. Do not lift by the electrical terminals. Slowly lift the pack straight down, ensuring no cables are caught.
📦 Phase 2: Installing the New CNS BATTERY Pack
This is where you install your new CNS BATTERY pack. CNS specializes in OEM-compatible solutions for the Leaf ZE1, utilizing brand-new CATL (Contemporary Amperex Technology Co. Limited) cells. This ensures a perfect fit and superior performance compared to refurbished options.
Why choose a new pack? Refurbished batteries often use degraded cells, leading to rapid capacity loss. A new CNS pack offers a 2-year / 80,000km warranty, guaranteeing longevity and peace of mind.
- Lower the New Pack: Carefully guide the new battery into the chassis. The mounting points and connectors are designed to be a plug-and-play match for the ZE1.
- Secure the Mounts: Reinstall the chassis bolts. Torque them to the manufacturer’s specification (usually around 100-120 Nm, but consult your specific manual).
- Reconnect Harnesses:
- Reconnect the Low Voltage (LV) harness to the BMS.
- Reconnect the High Voltage (HV) orange connector. Ensure the locking clip clicks firmly.
- Reinstall Undertray: Replace the plastic underbody shield to protect the new pack from road debris.
💻 Phase 3: BMS Programming & Final Checks
A brand-new battery requires the car to recognize its BMS. This step is crucial for the “Lemon Battery” indicator to disappear and for the car to accept the charge.
- Reconnect 12V: Reattach the negative terminal of the 12V battery.
- System Wake-Up: Turn the car “On” (do not start the motor). The dashboard will likely show a warning light.
- BMS Calibration:
- Plug in the charger: Connect the vehicle to a Level 1 or Level 2 charger.
- Initialization: The car will communicate with the new BMS. This process can take 5 to 10 minutes. You may hear relays clicking inside the battery pack as the pre-charge circuit activates.
- Success: Once communication is established, the charging light will turn green, and the dashboard warnings should clear.
🚗 Test Drive & Validation
After the installation, take the car for a short test drive in a safe area.
- Check Gauges: Verify the state of charge (SOC) is displaying correctly.
- Check Regen: Test the regenerative braking to ensure the motor controller is communicating with the battery.
- Monitor Temperatures: Ensure the thermal management system is functioning if your pack includes liquid cooling.
💡 Why Choose CNS BATTERY for Your ZE1?
When sourcing a replacement battery for your Leaf ZE1, quality and support are non-negotiable. Here is how CNS BATTERY compares to the competition:
| Feature | CNS BATTERY (New) | Refurbished/Used Market |
|---|---|---|
| Cell Quality | Brand-new CATL cells | Aged, degraded, or mixed cells |
| Warranty | 2 Years / 80,000km | Often None or 30 Days |
| Performance | Full 100% capacity, 440km+ range | Unpredictable degradation |
| Support | Video call guidance & technical hotline | Usually none |
| Price | 50%+ savings vs OEM | Cheap upfront, expensive long-term |
❓ Frequently Asked Questions (FAQ)
Q1: Do I need special software to program the new battery?
A: No. The CNS BATTERY pack is designed for plug-and-play compatibility with the Nissan Leaf ZE1. The car automatically recognizes the new BMS during the first charging cycle. However, if you encounter any communication errors, our technical support team offers remote video guidance to resolve it in minutes.
Q2: How much does a DIY Nissan Leaf ZE1 battery replacement cost?
A: The cost varies depending on the capacity (40kWh, 50kWh, or 62kWh). Generally, you can expect to save over 50% compared to purchasing a new pack from a Nissan dealership. For an exact quote tailored to your needs, use our custom quote tool.
Q3: Is it safe to do this DIY, or should I hire a mechanic?
A: While this guide provides the steps, working with high voltage is dangerous. If you are not comfortable with automotive electrical systems, we strongly recommend hiring a certified mechanic. However, many of our customers successfully perform this swap with basic tools and the help of a friend. We provide comprehensive installation videos and manuals to assist you.
Q4: What is the expected lifespan of the new CNS BATTERY pack?
A: Using brand-new CATL cells, the CNS BATTERY pack is engineered to last over 10 years or 200,000+ kilometers under normal driving conditions. We back this confidence with a 2-year unconditional warranty and prorated coverage for performance degradation, ensuring your battery maintains at least 70% capacity.
📩 Ready to Restore Your Range?
Don’t let a degraded battery sideline your Nissan Leaf ZE1. With a CNS BATTERY replacement pack, you can enjoy the reliability of brand-new cells and the freedom of long-distance driving once again.
Get Your Free Custom Quote Today


