
🛠️ DIY e-NV200 Power Battery Installation: The Ultimate Sustainable Option for 2026
Is your Nissan e-NV200 struggling to complete its daily routes? Are you tired of the plummeting range and the exorbitant costs quoted by dealerships for an OEM replacement? You’re not alone. As electric vehicle fleets age, battery degradation becomes a harsh reality. However, replacing your entire vehicle isn’t the only solution.
In 2026, the smartest and most sustainable choice for e-NV200 owners is a DIY battery replacement using high-quality, new OEM-compatible packs. This guide will walk you through why this is the ultimate sustainable option and how you can save thousands while extending your vehicle’s life.
Why “DIY” is the Most Sustainable EV Strategy
Sustainability isn’t just about driving electric; it’s about maximizing the lifespan of the resources already invested in your vehicle. Manufacturing a new car has a massive carbon footprint. By choosing to replace your e-NV200 battery instead of scrapping the van, you are actively reducing waste and lowering your overall environmental impact.
For the hands-on owner or fleet manager, DIY installation removes the barrier of expensive labor fees. While we always recommend professional installation for safety, the process for modern battery swaps has become remarkably straightforward—often described as “Plug-and-Play.”
The Cost Crisis: Why OEM Batteries Don’t Make Sense
Let’s address the elephant in the room: cost. Dealership replacement batteries often carry a premium price tag, sometimes exceeding $16,000 USD. For a used vehicle like the e-NV200, this simply isn’t a viable financial decision.
This is where the CNS BATTERY solution changes the game. By leveraging direct manufacturing and cutting out the dealership markup, CNS offers a path to sustainability that is also economically sound.
📊 The Value Comparison: Is DIY Worth It?
Before you grab your tools, let’s look at the hard numbers. Replacing your battery yourself (or with a friend’s help) is the ultimate way to maximize your return on investment.
| Feature | Refurbished/Scrap Yard Battery | CNS New DIY Battery Pack | OEM Dealership Battery |
|---|---|---|---|
| Core Components | Used, degraded cells (High Risk) | Brand New CATL Cells | Brand New Cells |
| Price Point | Medium (High failure risk) | ~50% of OEM Cost | Very Expensive |
| Warranty | Often None or Very Short | 2 Years / 80,000 km | Standard Factory Warranty |
| Longevity | Unpredictable (Swelling Risk) | Stable & Durable | Stable & Durable |
| DIY Feasibility | High (But risky due to quality) | High (Plug-and-Play Design) | N/A (Dealership Only) |
Key Takeaway: A DIY installation using a brand new, high-quality pack like those from CNS offers the “Goldilocks zone” of sustainability—safe, affordable, and long-lasting.
🛑 The Refurbished Trap: Why “Cheap” is Expensive
Many DIY enthusiasts are tempted by “cheap” refurbished batteries. Do not fall into this trap. Refurbished packs are typically cobbled together from salvaged cells. These cells are already aged, and their health is inconsistent.
Imagine putting a ticking time bomb under the floor of your van. Refurbished batteries have a high failure rate, often swelling or catching fire due to unbalanced cell chemistry. They might save you money upfront, but they fail within months, costing you double in the long run and creating a dangerous safety hazard.
The sustainable choice is a battery built to last. New cells from a reputable manufacturer like CATL (the world’s largest battery maker) ensure thermal stability and long cycle life.
🚗 Your 2026 DIY e-NV200 Installation Guide
If you’ve decided to take the plunge, here is a general overview of what the e-NV200 battery replacement process looks like. Please note: Always disconnect the high-voltage system and wear appropriate PPE (Insulated gloves) before starting.
1. Preparation is Key
Before the old battery hits the ground, you need to ensure compatibility. This isn’t just about physical dimensions; it’s about the Battery Management System (BMS).
- VIN Check: Reputable suppliers (like CNS) offer pre-purchase VIN checks to guarantee the BMS programming matches your specific e-NV200 model year.
- Tools Needed: You will typically need standard wrenches, screwdrivers, and dielectric grease.
2. The Removal Process
The e-NV200 is designed for serviceability.
- Disconnect: Isolate the 12V battery and the high-voltage service plug.
- Drain: Some models require draining the coolant loop connected to the battery.
- Unbolt: Remove the underbody protection and unbolt the battery mounting brackets.
- Disconnect: Carefully unplug the high-voltage connectors and signal cables.
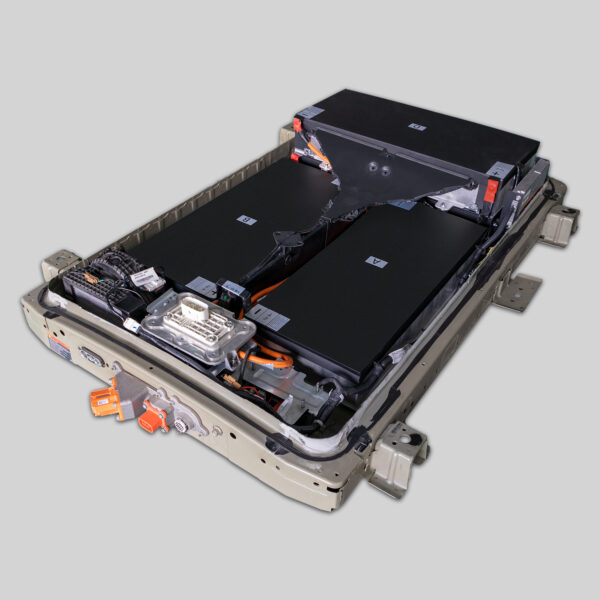
3. The “Plug-and-Play” Moment
This is where the magic happens. A true OEM-compatible pack should fit into the chassis rails perfectly.
- Fitment: Slide the new pack into place. If it requires force, something is wrong—do not force it.
- Connection: Reconnect the HV cables and signal wires. The connectors should be color-coded and keyed to prevent incorrect mating.
- Seal: Reinstall the underbody shields and refill coolant if necessary.
4. The First Charge
This is critical. Do not drive the vehicle immediately. Connect the charger and allow the BMS to perform its initial balancing cycle. This can take several hours. Once complete, the system should recognize the full state of charge (SOC).
🤝 Why Choose a CNS BATTERY for Your Project?
At CNS, we understand that DIYers need reliability above all else. We don’t sell refurbished junk; we sell peace of mind.
- Engineered for Compatibility: Our packs are reverse-engineered to match OEM specifications exactly. Whether you drive a Leaf or an e-NV200, our packs are designed to drop in without modification.
- Unbeatable Warranty: We back our confidence with a 2-year / 80,000 km warranty. This covers defects in materials and workmanship, far surpassing the standard for aftermarket batteries.
- Expert Support: Stuck on a wire? Our technical team offers remote video guidance to walk you through the installation or programming steps. You are not alone in this DIY journey.
Pro Tip: If you encounter a “Communication Error” during installation, it is almost always a loose signal cable. A quick call to support can resolve this in minutes, saving you a tow truck fee.
📝 Final Thoughts: Revive Your Ride
Choosing to install a new power battery in your e-NV200 is a declaration. It says you believe in the vehicle’s utility and you are committed to a greener future by avoiding premature scrappage.
By opting for a high-quality, new battery pack and tackling the installation yourself, you are saving thousands of dollars and ensuring your van has another 100,000 miles of life left in it. Don’t let range anxiety kill your business or your commute. Upgrade to a solution that is truly sustainable.
Ready to get your e-NV200 back on the road? Get a free quote today and speak to a technical expert about your specific model.
Get Your Free Custom Quote Now
❓ Frequently Asked Questions (FAQ)
Q1: Is it safe to install an EV battery myself?
While high-voltage work is inherently dangerous, the physical installation (removing bolts and disconnecting cables) is mechanical and low-risk if the system is powered down. The complexity lies in the BMS programming. We highly recommend having a friend who is mechanically inclined assist you, and utilize our remote video support for the electrical checks.
Q2: How long does the installation take?
For a professional technician, it typically takes 1-2 hours. For a DIYer, budget for 3-4 hours to account for reading instructions, taking photos of the old setup, and ensuring you don’t cross-thread any bolts.
Q3: What if my van doesn’t accept the new battery? (Compatibility)
This is why the pre-sale check is vital. If you provide your VIN to our sales team, they will verify the voltage, capacity, and interface matching (such as the connector type) before you purchase. If it doesn’t fit, we won’t sell it to you.
Q4: What kind of cells are used in the CNS e-NV200 battery?
We utilize brand-new, premium-grade lithium-ion cells sourced from top-tier manufacturers like CATL. These are the same quality cells found in new factory batteries, ensuring thermal stability and long cycle life—unlike the recycled cells found in refurbished packs.
Q5: Do I need special tools for the job?
No exotic tools are required. You will need standard automotive wrenches and screwdrivers. We often provide a free installation toolkit (including insulated gloves and terminal cleaner) with our packs to ensure you have the basics covered for a safe installation.


