BMW i3 Battery Sensor Replacement: Professional Steps – The Dangerous Myth of the “Quick Fix”
A 2016 BMW i3 rolls into your shop, stranded. The dashboard is lit up like a Christmas tree: “High Voltage System Malfunction,” “Charge Power Reduced,” and a specific fault code pointing to a Battery Voltage Sensor or Temperature Sensor. The customer, relieved, says, “Great! It’s just a sensor. My cousin said you can swap those out for $200. How fast can you do it?”
As a professional EV technician in 2026, you know the uncomfortable truth that lies beneath that hopeful request. In the BMW i3, battery sensors are not external, plug-and-play components like an oxygen sensor on a gas car. They are intricately woven into the Battery Management System (BMS) harness, often fused directly to the cell modules inside the sealed, high-voltage battery pack.
Can you really replace a single sensor without compromising the entire pack’s safety?
What happens when you break the factory seal to access a $50 wire?
And if the sensor failure is actually a symptom of deeper cell degradation, how do you pivot from a risky, low-margin repair to a high-profit, guaranteed upgrade?
At CNS BATTERY, we have seen the aftermath of attempted sensor swaps: corroded busbars, broken sensing wires that brick the whole pack, and water intrusion from failed resealing attempts. This guide outlines the professional reality of BMW i3 sensor replacement, explains why “repairing” sensors is often a liability trap, and reveals why replacing the entire battery system is the only safe, ethical, and profitable solution for your shop.
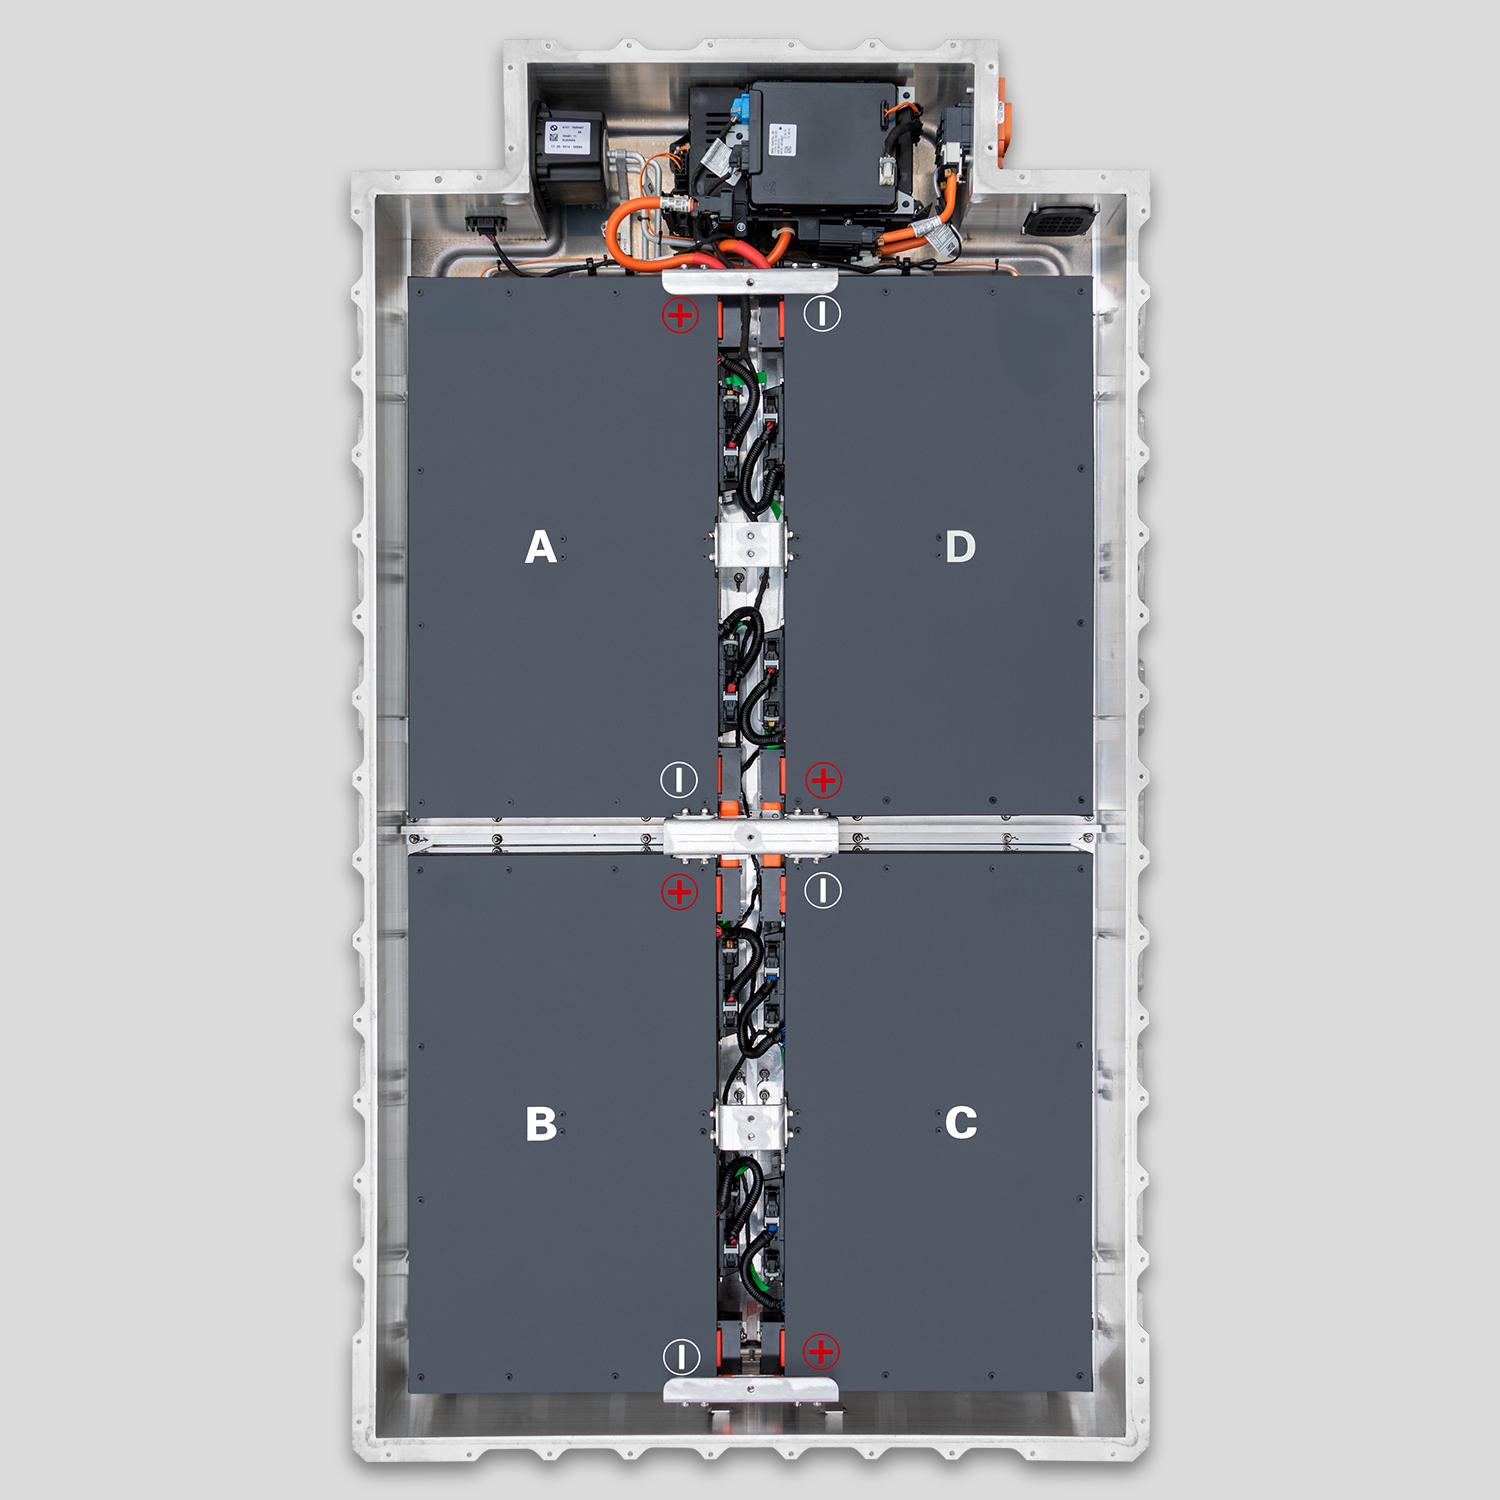
The Anatomy of Failure: Where Are the Sensors?
To understand why replacement is difficult, you must understand the architecture. The BMW i3 battery pack contains dozens of sensors:
- Voltage Sense Wires: Thin, fragile wires connected to every single cell module to monitor individual voltage. These are part of a unified harness that runs through the entire pack.
- NTC Temperature Sensors: Embedded directly into the cooling plates or between cell modules to monitor thermal hotspots.
- Current Sensors: Located at the main output terminals (often external, but integrated with the BMS).
The Problem: The voltage and temperature sensors are internal. Accessing them requires:
- Removing the lower battery casing.
- Draining the liquid cooling system.
- Disconnecting high-voltage busbars.
- Peeling back insulation and potentially separating cell modules.
- Breaking the factory IP67 seal.
The Professional Protocol: Why “Swapping” Is Rarely Viable
If a sensor fault code appears (e.g., P0B22 – Battery Voltage Sensor Circuit), follow this diagnostic workflow before considering any physical intervention.
Step 1: Verify the Fault (Don’t Trust the Code Blindly)
- Live Data Analysis: Use a bidirectional scanner (ISTA/Autel) to view live data from the suspected sensor. Is it reading 0V, 5V (rail voltage), or erratic values?
- Harness Inspection (External): Check the external connector where the sense harness exits the pack. Look for corrosion, rodent damage, or bent pins. This is the only “easy” fix. If the damage is here, repair the external connector.
- Internal Diagnosis: If external checks pass, the fault is inside the sealed pack.
Step 2: The Decision Point (The Danger Zone)
If the fault is internal, you face a critical decision:
- Option A: Open the Pack (High Risk).
- Procedure: Depower, drain coolant, cut the seal, open the case, locate the specific harness segment, splice/replace it, reseal, refill, and bleed.
- Risks:
- Wire Fragility: The sense wires are incredibly brittle. Trying to isolate one often leads to breaking adjacent wires, turning a single sensor fault into a “pack bricked” scenario.
- Seal Failure: Recreating the factory IP67 seal in a shop is nearly impossible. Moisture intrusion later causes shorts and fires.
- Coolant Contamination: Spilling conductive coolant on live circuits during disassembly can destroy the BMS.
- Liability: If the car catches fire months later due to a poor reseal, your shop is liable.
- Option B: Replace the Pack (Zero Risk).
- Procedure: Swap the entire failed unit for a new, sealed, tested system.
- Result: All sensors are brand new. No seal risks. No hidden corrosion.
Step 3: The Hard Truth
In 95% of cases involving internal sensor faults on aging i3s, Option A is financially and technically unsound.
- Labor Cost: 6–10 hours of skilled labor to open, fix, and reseal.
- Parts Cost: You cannot buy just the sensor harness from BMW. You must cannibalize a used pack, which introduces old, potentially faulty parts.
- Comeback Rate: High. Spliced sense wires often fail again due to vibration or heat.
The Verdict: If the sensor is internal, the entire battery pack must be replaced. Attempting to repair internal sensing harnesses is a “penny wise, pound foolish” strategy that endangers your reputation.
The CNS BATTERY Solution: Eliminate Sensor Headaches Forever
Why risk your shop’s liability and waste 10 hours on a fragile wire repair when you can install a brand-new system in half the time?
At CNS BATTERY, our BMW i3 Series Battery upgrades come with a completely new, factory-integrated sensor network. Every voltage wire and temperature probe is pristine, perfectly calibrated, and protected within a sealed, leak-proof casing.
Why Upgrading Beats Sensor Repair
- 100% New Sensors: No old, brittle wires. No corroded contacts. No guessing which sensor is bad. The entire monitoring system is renewed.
- Zero Seal Risks: Our packs arrive factory-sealed and leak-tested. Your team never breaks the casing, eliminating the risk of water intrusion or coolant leaks.
- Plug-and-Play Installation: Swap the old pack for the new one in 4–6 hours. No draining coolant, no cutting seals, no splicing wires.
- Perfect Data: New sensors provide accurate, real-time data to the BMS, ensuring optimal charging, balancing, and range estimation.
- Double the Range: While fixing the sensor fault, you upgrade the customer from a failing 60 Ah or 94 Ah pack to a 120 Ah to 180 Ah system, giving them 130–200+ miles of range.
- Cost Efficiency:
- Sensor Repair Attempt: $1,500–$2,500 (labor + used parts) + High Risk of Comeback/Liability.
- Dealership Replacement: $20,000+.
- CNS BATTERY Upgrade: $8,000 – $14,000 USD. You get a brand-new, error-free battery with double the range for half the dealer price.
Real Story: From “Broken Wire” to “Flawless Data”
“Elite EV Solutions” in Texas once attempted to repair a voltage sense wire on a 2015 i3. The tech opened the pack, spent 8 hours trying to splice the fragile harness, and accidentally snapped two adjacent wires while reassembling. The pack was now unreadable by the BMS. The customer was furious, and the shop had to eat the cost of a full dealer replacement ($19,000) to make it right.
“We learned our lesson,” says the owner. “Now, if a sensor code points internally, we immediately propose a CNS BATTERY upgrade. Last week, we swapped a 150 Ah unit in 5 hours. Zero codes, perfect sensor readings, and the customer drove away with 170 miles of range. We made a great profit, zero stress, and no liability. We never touch internal sensors again.”
Stop Splicing, Start Solving
BMW i3 battery sensor replacement is a task that sounds simple but is fraught with peril. Internal sensors are integral to the pack’s safety and function. Attempting to repair them in a shop environment is a gamble with high voltage, water integrity, and your business’s future.
Be the shop that prioritizes safety and certainty. Be the shop that offers complete, certified solutions rather than risky patches.
Diagnosed an internal battery sensor fault?
Don’t risk opening the pack. Contact CNS BATTERY today for a professional assessment. Discover how our BMW i3 Series Battery upgrades can eliminate sensor faults permanently, providing your customers with accurate data, perfect safety, and double the range.
👉 Get Your Sensor Fault Solution & Quote
Frequently Asked Questions (FAQ) for Shops
1. Can I replace just the faulty voltage sensor on a BMW i3?
No, not practically. The voltage sensors are part of an internal harness fused to the cell modules. Accessing them requires opening the sealed battery pack, which voids safety ratings and carries extreme risk. The industry standard is full pack replacement.
2. What are the signs of a failed battery sensor?
Common signs include specific fault codes (e.g., P0B22), erratic range estimates, inability to charge, or the BMS reporting implausible voltage/temperature readings (e.g., -40°C or 0V) for a specific module.
3. Is it safe to open the battery pack to fix a sensor?
Generally, no. Opening the pack exposes technicians to 400V hazards, risks damaging fragile internal components, and makes it nearly impossible to restore the factory IP67 water/dust seal. A failed seal can lead to catastrophic short circuits later.
4. How much does it cost to repair a sensor vs. upgrading?
Attempting a sensor repair can cost $1,500–$2,500 in labor and used parts, with a high risk of failure. A CNS BATTERY upgrade costs $8,000–$14,000 but provides a brand-new battery with new sensors, double the range, and a warranty, offering far better value.
5. Does CNS BATTERY include new sensors with their upgrades?
Yes. Every upgrade comes with a completely new, factory-installed sensor network (voltage, temperature, current). All data points are accurate and reliable from day one.
6. What if the sensor fault is external?
If the fault is in the external connector or wiring harness outside the sealed case, that can be repaired safely. However, if diagnostics confirm the issue is inside the pack, replacement is the only option.
7. How long does a full battery replacement take compared to sensor repair?
A CNS BATTERY upgrade takes 4–6 hours (plug-and-play). An internal sensor repair attempt can take 8–12+ hours with no guarantee of success and a high likelihood of causing further damage.