BMW i3 Battery Pack Inspection: Professional Checklist 2026 – The 20-Point Audit That Saves Lives
A 2016 BMW i3 rolls into your bay. The customer is anxious: “The range gauge is acting weird, and I heard a clunk underneath. Is the battery okay?”
In 2026, with the first generation of i3s surpassing the decade mark, “okay” is no longer an acceptable answer. The high-voltage battery pack is the heart of the vehicle, but it is also a complex, aging pressure vessel containing 400 volts of lethal energy. A superficial glance at the dashboard State of Charge (SOC) tells you nothing about internal corrosion, cell imbalance, or structural integrity.
Without a rigorous, professional inspection, you are flying blind. You might miss a slow coolant leak that will cause a short circuit next week, or a swollen module that is one charge cycle away from thermal runaway.
What does a true, liability-proof battery inspection look like in 2026?
Which hidden failure points separate a safe EV from a ticking time bomb?
And when your audit reveals critical degradation, how do you pivot from a scary diagnosis to a profitable, range-extending upgrade?
At CNS BATTERY, we have established the gold standard for EV diagnostics. We know that a thorough inspection is the foundation of trust and safety. This Professional Checklist 2026 guides you through the essential 20-point audit for the BMW i3, ensuring you catch every risk before it becomes a catastrophe, and positioning your shop as the ultimate authority on i3 longevity.
Phase 1: External Structural & Visual Audit (Safety First)
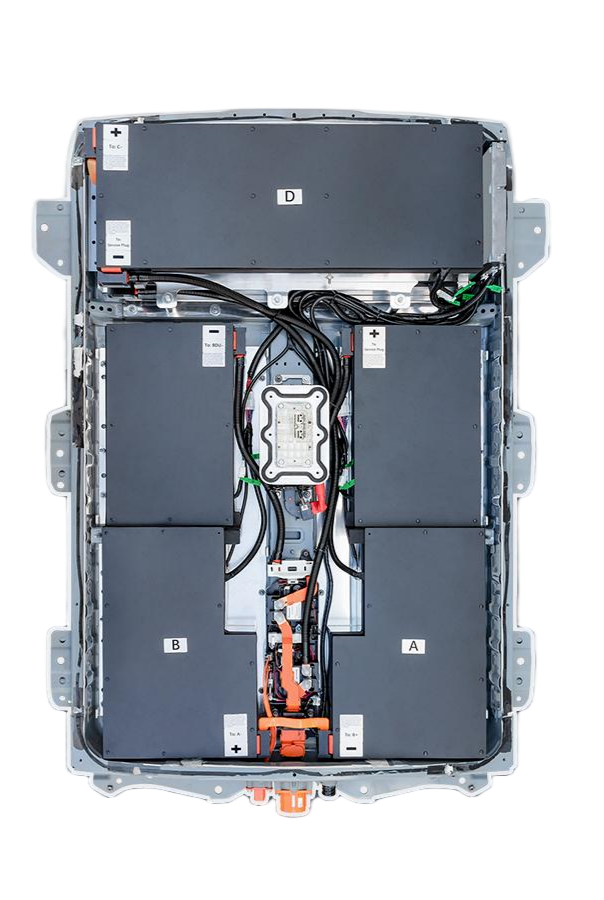
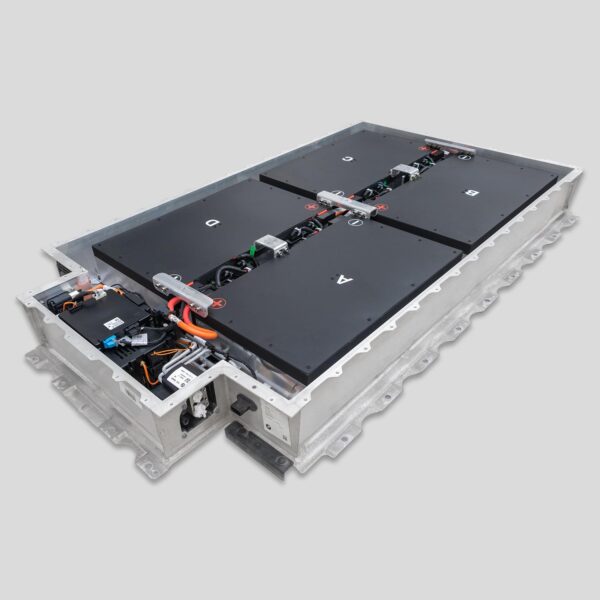
Before connecting any tools, perform a physical inspection of the pack’s exterior. The i3 battery is mounted low and is vulnerable to road debris.
1. Undercarriage Impact Check
- Action: Inspect the aluminum skid plate and the battery casing bottom for dents, scrapes, or puncture marks.
- Risk: Even a minor dent can compress internal cell modules, leading to internal shorts days later.
- Verdict: Any deformation >5mm requires immediate internal diagnostic or replacement.
2. Corrosion & Seal Integrity
- Action: Check the perimeter seal between the upper and lower casing halves. Look for rust streaks, bubbling paint, or gaps.
- Risk: Compromised seals allow water and road salt ingress, causing insulation faults.
- Verdict: Surface rust can be treated; structural corrosion means the pack is compromised.
3. High-Voltage Connector Inspection
- Action: Examine the main orange HV connector and the low-voltage communication port. Look for melting, discoloration, or green corrosion.
- Risk: High resistance at the connector causes overheating and potential fire.
- Verdict: Any sign of arcing or melting requires immediate harness and potentially pack replacement.
4. Coolant Line & Pump Check
- Action: Inspect the cooling hoses connected to the pack for cracks, leaks, or swelling. Check the electric pump for noise or leakage.
- Risk: Leaking coolant into the pack is the #1 cause of catastrophic failure in aging i3s.
- Verdict: External leaks are repairable; internal leaks (sweet smell from vents) condemn the pack.
5. Mounting Bracket Stability
- Action: Check all mounting bolts for torque and brackets for cracks or severe rust.
- Risk: Loose mounts cause vibration damage to internal cells and busbars.
- Verdict: Retorque to spec. Cracked brackets require replacement before any driving.
Phase 2: Electronic & Data Diagnostics (The Hidden Truth)
Visuals only tell half the story. Connect your bidirectional scan tool (BMW ISTA, Autel, etc.) to dive deep into the BMS data.
6. State of Health (SOH) Verification
- Action: Read the calculated SOH percentage. Do not trust the dashboard range; trust the BMS math.
- Threshold: <70% SOH indicates significant degradation. <60% is critical/end-of-service.
7. Cell Voltage Deviation (Resting)
- Action: Record the voltage of every single module while the car is off. Calculate the difference between the highest and lowest.
- Threshold: >0.10V deviation indicates imbalance. >0.20V suggests permanent capacity mismatch.
8. Internal Resistance (IR) Analysis
- Action: If your tool supports it, view the calculated internal resistance for each module.
- Threshold: Modules with IR significantly higher than the average are heat generators and failure points.
9. Temperature Sensor Consistency
- Action: Compare readings from all internal temperature sensors.
- Threshold: A variance of >5°C between sensors indicates a cooling blockage or a hot spot.
10. Insulation Resistance Test (Megger)
- Action: Perform a manual insulation test (as per previous guides) to verify resistance >1 MΩ.
- Threshold: Anything <500 kΩ is a critical safety hazard requiring immediate quarantine.
11. Charging History & Limits
- Action: Check if the BMS has artificially limited the maximum charge level (e.g., stopping at 80%).
- Significance: This indicates the BMS is protecting weak cells from overcharging.
12. Fault Code History (Pending & Stored)
- Action: Review not just current codes, but history. Look for recurring “Overtemperature” or “Imbalance” events.
- Significance: Patterns reveal intermittent failures that are about to become permanent.
Phase 3: Dynamic Load Testing (Stress Test)
Static data can lie. You must see how the battery behaves under stress.
13. Voltage Sag Under Load
- Action: Monitor cell voltages during hard acceleration or a dyno run.
- Red Flag: Watch for a specific module dropping voltage rapidly (“the cliff”) while others remain stable. This confirms a dead cell.
14. Thermal Response During Fast Charge
- Action: Initiate a DC fast charge (if possible) or high-current AC charge. Monitor temperature rise rate.
- Red Flag: Rapid heating in one section indicates high internal resistance or cooling failure.
15. Regenerative Braking Performance
- Action: Test regen braking. Weak batteries often limit or disable regen to protect cells.
- Significance: Lack of regen is a key symptom of a full or imbalanced pack.
16. Real-World Range Validation
- Action: Compare the estimated range vs. actual miles driven on a standardized loop.
- Significance: A large discrepancy confirms the BMS calibration is lost due to degradation.
Phase 4: The Verdict & The Pivot
Once the 20-point checklist is complete, you will have one of three outcomes:
- Green Light: Minor issues (external leak, loose mount). Repair and return.
- Yellow Light: Moderate degradation (SOH 70-80%, slight imbalance). Monitor and advise customer.
- Red Light: Critical failure (Internal leak, SOH <65%, high deviation, insulation fault). The pack is condemned.
The Pivot Point: When you deliver a “Red Light” diagnosis, the customer faces a crisis. The dealer wants $20,000+ for a remanufactured pack. This is where you introduce the CNS BATTERY Upgrade.
Why the Inspection Leads to an Upgrade
- Data-Driven Confidence: You aren’t guessing; you have 20 points of data proving the old pack is dead.
- Superior Alternative: Our 120 Ah to 180 Ah upgrades solve every single issue found in the checklist:
- Perfect Structure: New casing, no dents, no corrosion.
- Zero Imbalance: Brand-new matched cells with <0.01V deviation.
- Safe Insulation: >10 MΩ resistance guaranteed.
- Cool Operation: Advanced thermal management prevents overheating.
- Double Range: Restores 130–200+ miles of driving freedom.
- Cost Efficiency: At $8,000 – $14,000 USD, it’s half the dealer price for double the performance.
Real Story: From “Routine Check” to “Life-Saving Upgrade”
“City EV Diagnostics” performed this 20-point inspection on a 2015 i3 bought used by a family. Visually, it looked fine. But the Megger test showed 80 kΩ resistance, and the load test revealed one module dropping to 2.5V instantly.
“The car looked perfect, but our checklist proved it was a fire hazard,” says the owner. “We showed the family the data. They were terrified but grateful. We installed a CNS BATTERY 150 Ah upgrade the next day. The new pack passed all 20 points with flying colors. The family now has 170 miles of safe range. That checklist didn’t just sell a job; it saved lives.”
Stop Guessing, Start Auditing
The BMW i3 Battery Pack Inspection is not optional; it is your shield against liability and your key to profitability. In 2026, aging EVs demand rigorous scrutiny.
Use this checklist to uncover the truth. And when the truth reveals a failed battery, offer the only solution that guarantees safety and satisfaction.
Ready to professionalize your EV inspections?
Don’t leave safety to chance. Contact CNS BATTERY today to become a certified partner. Get access to our detailed inspection templates, diagnostic training, and wholesale pricing. Turn every inspection into a trusted consultation and a profitable upgrade.
👉 Get Your Professional Inspection Kit & Partner Access
Frequently Asked Questions (FAQ) for Shops
1. How long does a full 20-point battery inspection take?
A thorough inspection typically takes 1.5 to 2 hours. This includes lifting the vehicle, visual checks, scan tool diagnostics, and a short dynamic test. It is a billable service that builds immense trust.
2. Can I perform the insulation test with a standard multimeter?
No. You need a dedicated Megohmmeter (Insulation Tester) capable of outputting 500V DC. Standard multimeters cannot measure the high resistance values required to verify HV safety.
3. What is the most common failure found in 2026 i3 inspections?
Internal coolant leaks leading to low insulation resistance, and severe cell imbalance caused by natural aging. Both usually result in a recommendation for full pack replacement.
4. If the SOH is 75%, should I recommend replacement?
At 75%, the battery is degraded but may still be usable for city driving. However, you should warn the customer of reduced range and potential future issues. If SOH drops below 65-70%, replacement is strongly recommended.
5. Does CNS BATTERY provide inspection support?
Yes. As a partner, you get access to our technical team to help interpret complex data logs and determine if an upgrade is the best path for your specific customer.
6. What if the customer refuses to replace a “Red Light” battery?
Document everything. Provide a written report detailing the safety risks (fire, electrocution, stranding). Have the customer sign a waiver acknowledging they are driving an unsafe vehicle. However, ethically, you should refuse to clear codes or certify the car as safe.
7. How does the inspection help sell the upgrade?
It transforms the conversation from “I think you need a new battery” to “Here is the data proving your current battery is unsafe and failing.” Data eliminates doubt and justifies the investment in a CNS BATTERY upgrade.