BMW i3 Battery Pack Disassembly: Shop Best Practices – The High-Stakes Guide to Safety and Profit
The request comes in: “My 2015 i3 won’t charge. Can you just open the pack and swap the bad module?” It sounds like a straightforward job. Unbolt the cover, identify the weak cell, replace it, and send the customer on their way. But for any professional shop in 2026, opening a BMW i3 battery pack is not a simple repair; it is a high-stakes operation fraught with lethal risks, complex engineering challenges, and significant liability.
One wrong move with a torque wrench can puncture a cooling line, flooding 400-volt components with conductive fluid. One missed step in the discharge protocol can result in fatal electrocution. And even if you succeed in opening it, can you truly reseal a laser-welded factory unit to IP67 standards in a standard service bay?
Are you equipped with the specific tools and protocols required for safe disassembly?
Is module-level repair actually profitable when factoring in labor hours and liability risks?
And if the risks of disassembly outweigh the rewards, what is the smarter, safer, and more lucrative alternative for your shop?
At CNS BATTERY, we partner with forward-thinking independent shops to redefine EV service. We understand the intricacies of the i3 powertrain, but we also know that in many cases, disassembly is the wrong path. This guide outlines the best practices for BMW i3 battery pack disassembly for those critical scenarios where it is unavoidable, while revealing why complete system upgrades are becoming the preferred solution for smart, profitable shops.
The Pre-Disassembly Protocol: Safety Is Non-Negotiable
Before a single bolt is touched, rigorous safety protocols must be executed. The margin for error with a 400V lithium-ion system is zero.
1. Personal Protective Equipment (PPE)
- Mandatory: Class 00 (1000V) insulated gloves with leather protectors (air-tested before every use).
- Essential: Arc-flash rated face shield, non-conductive footwear, and removal of all metal jewelry (watches, rings).
- Environment: Establish a “High Voltage Zone” with proper signage and insulated rubber mats on the floor.
2. Complete Depower Sequence
- 12V Disconnect: Always disconnect the negative terminal of the 12V auxiliary battery first to prevent accidental contactor closure.
- Service Plug Removal: Locate and remove the Manual Service Disconnect (MSD). On most i3 models, this is under the rear seat bench.
- The Wait Time: You must wait at least 10 minutes (preferably 15) for the capacitors to fully discharge.
- Verification: Use a CAT III 1000V multimeter to verify 0 Volts between HV+ and HV-, and between both poles and the chassis. Never assume it’s dead; measure it.
3. Coolant Management
The i3 battery is liquid-cooled. Disassembly requires draining the specialized low-conductivity coolant.
- Procedure: Use a vacuum filler/extractor to drain the system into approved hazardous waste containers.
- Critical Warning: Never allow coolant to spill onto exposed electrical components. Even “new” coolant can become conductive when contaminated with dust or metal shavings during disassembly.
The Disassembly Process: Precision Over Force
If diagnostics confirm that internal access is absolutely necessary (e.g., for specific BMS component replacement or forensic analysis), follow these best practices:
Step 1: Casing Removal
- Torque Specs: The lower casing bolts often have specific torque-to-yield requirements. Use a calibrated digital torque wrench. Do not guess.
- Seal Integrity: The casing is sealed with a heavy-duty adhesive/gasket. Cutting through this without damaging the internal modules requires specialized trimming tools. Do not pry with screwdrivers, as this can crush cell modules.
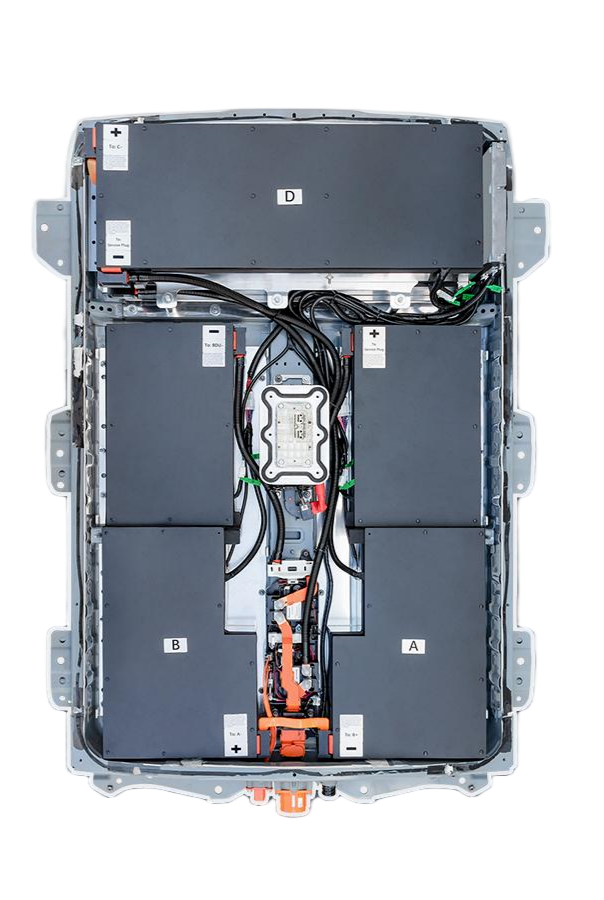
Step 2: Internal Access & Busbar Removal
- Insulation Checks: Once open, immediately re-verify isolation.
- Busbar Handling: The busbars connect the modules in series. Removing them breaks the circuit but also exposes live terminals if any residual charge exists. Handle with insulated tools only.
- Sensor Fragility: The voltage sensing wires are incredibly fragile. One snapped wire can render the entire pack unreadable by the BMS.
Step 3: Module Extraction (The Danger Zone)
- Weight: Individual modules are heavy and awkward. Use a dedicated lift assist if available.
- Cooling Plates: Modules are sandwiched between cooling plates. Separating them often requires breaking thermal bonds. If you damage a cooling plate, the entire pack is compromised.
The Hard Truth: Why Disassembly Is Often a Business Mistake
While knowing how to disassemble is vital for safety, knowing when not to is vital for profitability. In 2026, module-level repair via disassembly is increasingly becoming a losing proposition for independent shops.
1. The Resealing Nightmare
The BMW i3 pack is factory-sealed to IP67 standards (waterproof and dustproof). Once you cut the seal and open the case, you cannot reliably recreate that seal in a standard shop environment.
- Risk: A imperfect reseal leads to moisture intrusion, corrosion, and eventual short circuits.
- Liability: If that car suffers a battery fire six months later due to a seal failure, your shop is legally liable.
2. The Sourcing Black Hole
Where do you get a replacement module?
- No New Parts: BMW does not sell individual new modules anymore.
- Used Gamble: You are forced to source used modules from salvage yards. These have unknown cycle counts and internal resistance. Mixing a “fresh” used module with an old pack guarantees rapid re-balancing failures.
3. The Labor vs. Revenue Trap
- Time: A proper disassembly, module swap, and resealing attempt can take 12–18 hours.
- Revenue Cap: Customers unwilling to pay $20k for a dealer replacement are rarely willing to pay $3k+ for a risky module swap.
- Result: Low margin, high labor, high liability.
The CNS BATTERY Solution: The Profitable Pivot to Upgrades
Stop risking your shop’s reputation on dangerous disassembly procedures with uncertain outcomes. The smartest shops in 2026 are skipping the disassembly entirely and opting for Complete Pack Replacement using CNS BATTERY Upgrades.
Why Upgrading Beats Disassembly
- Zero Disassembly Risk: Our units arrive fully assembled, sealed, and tested. You never break the factory seal or expose live cells.
- Plug-and-Play Installation: Swap the entire pack in 4–6 hours. No coolant draining/refilling complexities (often pre-filled or easy-connect), no busbar fiddling, no resealing worries.
- Guaranteed Reliability: Brand-new Grade-A cells mean perfect balance and zero comebacks. No mixing old and new parts.
- Higher Profit Margins: Secure an $8,000–$14,000 ticket (parts + labor) with significantly lower labor hours than a disassembly repair.
- Customer Delight: You aren’t just fixing the car; you are doubling its range to 130–200+ miles.
- Warranty Confidence: Backed by our 3–5 Year Warranty, you eliminate the liability of a questionable repair.
Real Story: From “Disassembly Disaster” to “Upgrade Success”
“Metro Auto Tech” in Chicago attempted a module swap on a 2016 i3 last year. They spent 16 hours disassembling the pack, sourced a used module, and struggled to reseal the case. Two weeks later, the customer returned with water intrusion faults and a new imbalance code. The shop had to refund the labor and absorb the cost of a full replacement anyway. “It was a total loss,” admits the owner. “We lost money and the customer’s trust.”
This month, they partnered with CNS BATTERY. “We installed a 150 Ah upgrade in 5 hours,” the owner says. “No disassembly stress, no sealing issues. The customer paid $11,500, got 170 miles of range, and has a 4-year warranty. We made 3x the profit in 1/3 of the time. We never touch the inside of an i3 pack again.”
Stop Disassembling, Start Upgrading
BMW i3 battery pack disassembly should be reserved for extreme forensic needs, not routine repairs. The risks of resealing failure, part mismatch, and liability make it a poor business model for modern shops.
Be the shop that offers certainty, safety, and superior performance. Be the shop that chooses upgrades over risky disassembly.
Ready to transform your EV service strategy?
Ditch the high-risk disassembly jobs. Contact CNS BATTERY today to become a certified partner. Get access to wholesale pricing, installation training, and marketing support, and start offering the safest, most profitable battery solution in the industry.
👉 Become a Certified Upgrade Partner Today
Frequently Asked Questions (FAQ) for Shops
1. Is it safe for independent shops to disassemble BMW i3 battery packs?
It is high-risk. While possible with proper PPE and training, the inability to reliably reseal the pack to IP67 standards creates significant long-term liability for water intrusion and short circuits. Most shops find complete replacement safer and more profitable.
2. Can I reseal an opened i3 battery pack to factory standards?
No. The factory uses industrial robotic adhesive application and curing processes that cannot be replicated in a standard service bay. Attempting to reseal manually compromises the pack’s safety rating.
3. Where can I buy replacement modules for the i3?
There are no new OEM modules available. You must rely on used salvage parts, which carry unknown history and mismatched characteristics, leading to frequent repair failures.
4. How does the labor time compare between disassembly and upgrade?
A module repair via disassembly typically takes 12–18 hours. A CNS BATTERY full pack upgrade takes only 4–6 hours, allowing for faster bay turnover and higher profitability.
5. What warranty can I offer after a disassembly repair?
It is difficult to offer a meaningful warranty on a manually resealed pack with used components. With CNS BATTERY, you pass through a robust 3–5 Year Warranty, giving customers confidence and protecting your shop.
6. Do I need special tools for a CNS BATTERY upgrade?
You need standard High-Voltage (HV) safety gear and a lift. You do not need sealant applicators, vacuum chambers for resealing, or cell-testing equipment, as our packs arrive ready to install.
7. Is upgrading more profitable than repairing?
Yes. Upgrades offer higher ticket values ($8k-$14k), lower labor costs, zero sourcing headaches, and minimal risk of comebacks. Repairs have low margins, high labor, and high liability risks.