BMW i3 Battery Module Testing: DIY Methods That Actually Work (And When to Walk Away)
You’ve pulled your BMW i3’s battery pack. Four modules sit on your garage floor. One feels warmer than the others. The car shows “Reduced Power” after 20 km. You’re determined to test each module yourself—but where do you start?
Online forums suggest load testers, multimeters, or even “just swapping modules.” But without the right approach, you risk misdiagnosing a healthy module as faulty—or worse, installing a dangerous one.
At CNS BATTERY, we’ve seen it all: DIYers blowing fuses, misreading voltages, and even causing thermal events by skipping critical safety steps. In this 2026 guide, we’ll walk you through realistic, safe DIY testing methods using accessible tools—plus clear red flags that mean “stop and call a pro.”
Because when it comes to 400V lithium packs, confidence without competence is a recipe for disaster.
⚠️ Critical Safety First: What You MUST Do Before Touching Modules
The BMW i3 battery operates at 350–400V DC. Even disconnected, modules can hold lethal charge for days.
Never proceed without:
- A CAT III 1000V-rated multimeter (not a $20 hardware store model)
- Insulated gloves (Class 0, 1000V) and safety goggles
- Full isolation: Remove service disconnect AND wait 15+ minutes
- Non-conductive work surface (wood or rubber mat—no metal!)
🛑 If you lack any of these: do not open the pack. Module testing is not a beginner project.
DIY Method 1: Open-Circuit Voltage (OCV) Check – The First Filter
What it reveals: Gross imbalances or dead cells
Tools needed: Multimeter, torque screwdriver
Steps:
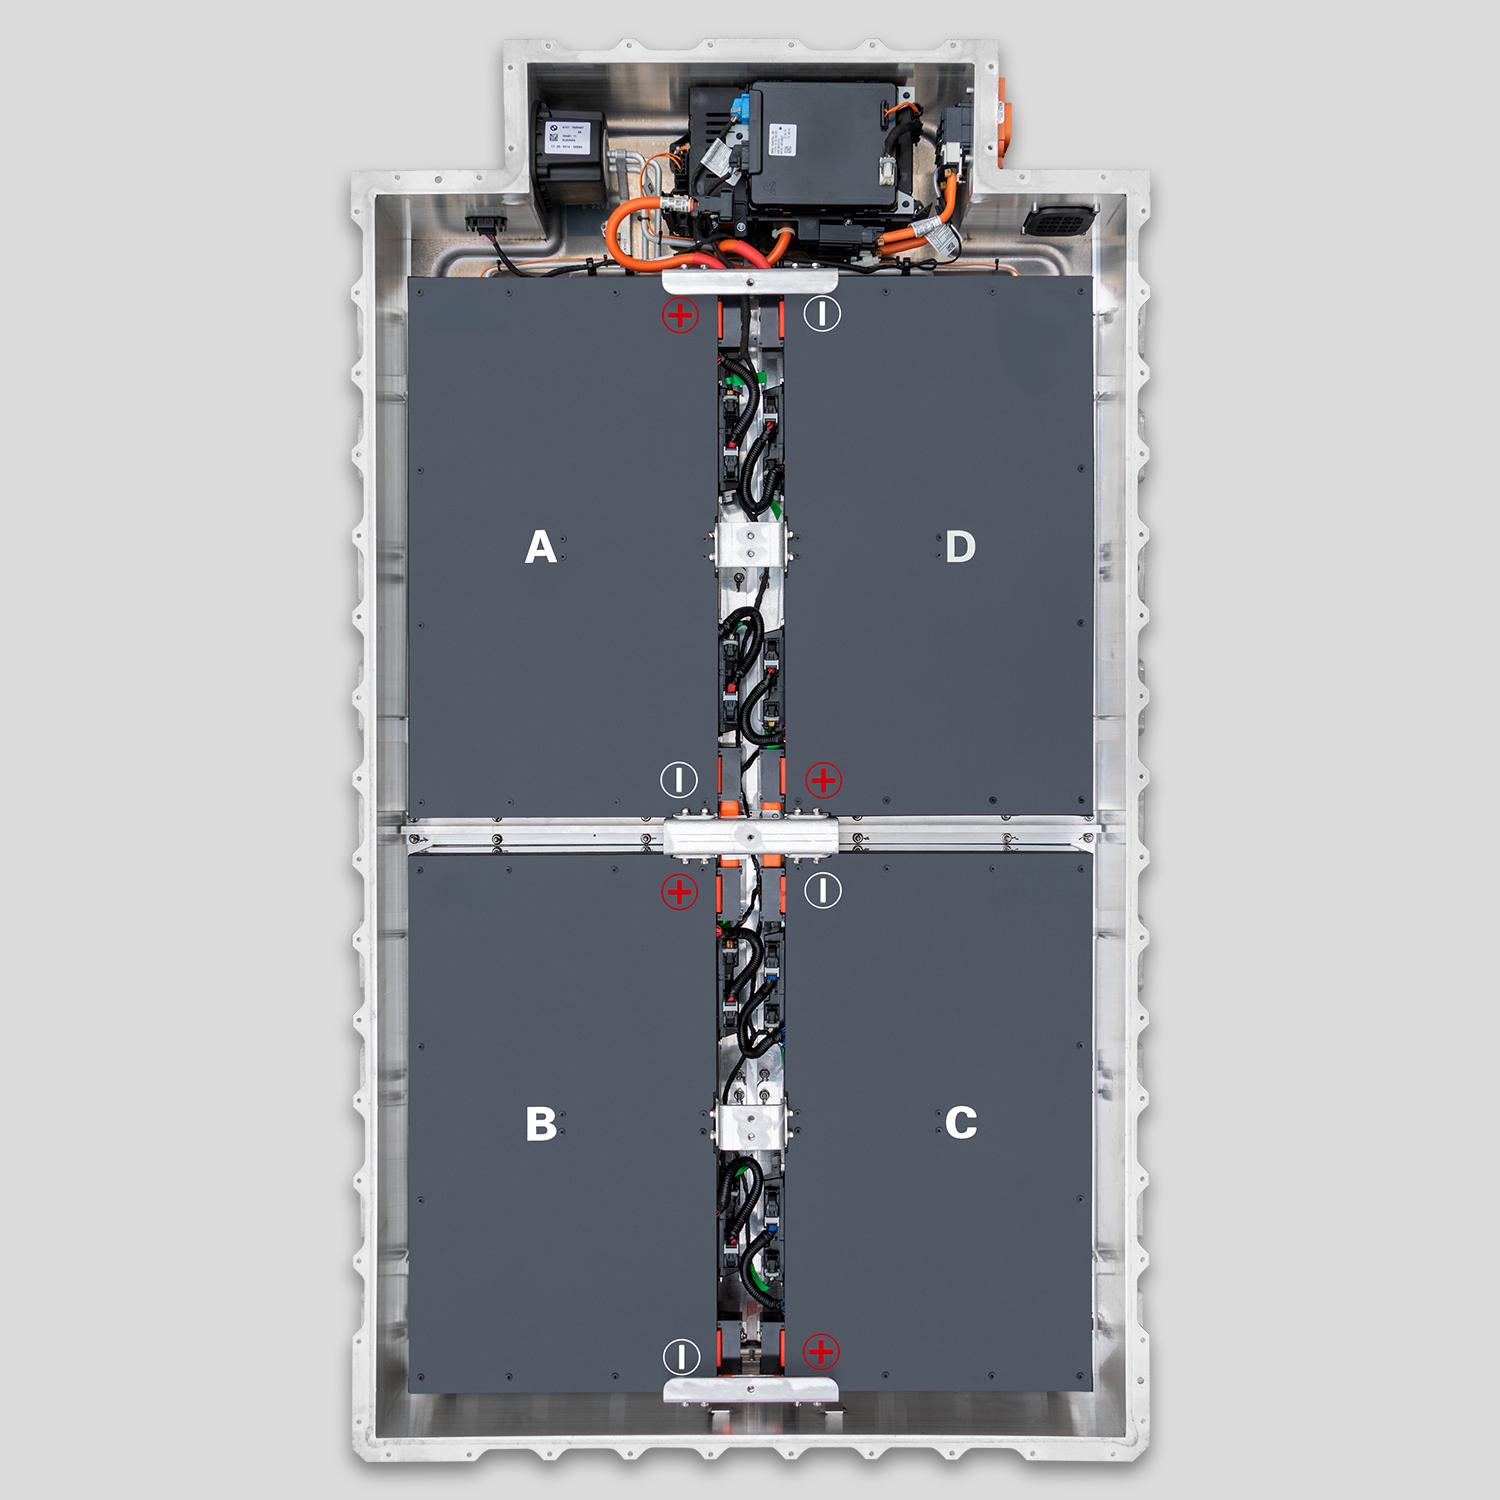
- Label each module (A, B, C, D)
- Measure voltage across main + and – terminals on each
- Record values (e.g., Module A: 98.2V, Module B: 97.8V…)
✅ Healthy range: All modules within ±0.5V of each other
❌ Warning signs:
- Any module <95V (possible cell failure)
- Spread >1.0V between highest and lowest
🔍 Note: OCV alone can’t confirm capacity—only major faults.
DIY Method 2: Internal Resistance Estimation (Using Load Test)
What it reveals: Weak cells with high impedance
Tools needed: 12V car headlight (55W) or resistive load bank, multimeter, timer
Steps:
- Connect load across module terminals
- Record voltage before and after 30 seconds under load
- Calculate drop: e.g., 98.0V → 94.5V = 3.5V drop
✅ Healthy: Drop ≤2.0V under 5A load
❌ Failing: Drop >3.0V indicates aging or damaged cells
⚠️ Never exceed 10A load on a single module. Overheating risks fire.
DIY Method 3: Cell-Level Voltage Scan (Advanced)
What it reveals: Individual failing cells within a module
Tools needed: Multimeter with fine probes, wiring diagram
Each i3 module contains 12–16 cells in series. Probe the nickel strips between cells to measure individual cell voltages.
✅ Healthy: All cells 3.20V–3.35V at rest
❌ Critical: Any cell <3.00V or >3.65V
📌 Pro tip: A single <2.8V cell can drag down the whole module—and trigger BMS shutdowns.
What DIY Testing CAN’T Tell You (And Why It Matters)
Even if voltages look good, your module could still be unsafe due to:
- Internal micro-shorts (undetectable without impedance spectroscopy)
- Swollen pouch cells hidden under busbars
- Degraded welds that fail under high current
This is why professional rebuilders use cyclers that discharge/charge at controlled rates to measure true capacity (Ah)—something impossible at home.
As Tom H. from Texas learned the hard way:
“My modules all read 98V. I reinstalled them—then the car shut down on the highway. Turned out two cells were internally shorted. Now I just buy tested packs.”
When to Skip DIY and Choose a Pre-Tested Replacement
Consider a full replacement if:
- Your i3 is over 5 years old
- You see any electrolyte residue or bulging
- You lack tools for cell-level probing
- You need reliable daily range (not experimental fixes)
CNS BATTERY packs solve this by delivering:
✅ Fully tested modules with verified capacity (>95% new)
✅ Brand-new CATL NMC cells—no hidden degradation
✅ Plug-and-play design: No balancing, coding, or guesswork
✅ 2-year / 80,000 km warranty—backed by real support
💡 Fact: For less than the cost of a professional module test ($300–$500), you can get a new 45kWh CNS pack with guaranteed performance.
Don’t Gamble With High-Voltage Guesswork
Testing modules feels empowering—but inaccurate results can leave you stranded or in danger. Know your limits.
Ready for Reliable, Tested Performance—Without the Risk?
Tell us your i3 model year and symptoms. We’ll help you decide: DIY test with caution or upgrade to a CNS battery with certified, ready-to-install modules.
👉 Contact CNS BATTERY for Pre-Tested, Safe i3 Battery Solutions
FAQ: BMW i3 Battery Module Testing
Q: Can I test modules while they’re still in the car?
A: Only OCV via the service port—but you can’t assess load response or cell balance without removal.
Q: Do I need to rebalance modules after testing?
A: If you disconnect them, yes. The BMS loses sync. Professional tools are required for proper reinitialization.
Q: Are CNS modules sold individually?
A: Yes. We offer single 45kWh/50kWh/62kWh modules with full test reports—if you’re qualified to install them.
Q: How accurate is a multimeter for cell voltage?
A: Good meters are ±0.5%. But poor probe contact adds error. Always double-check low readings.
Q: Can a “good” voltage reading hide a bad module?
A: Absolutely. Capacity fade often shows no voltage change at rest—only under load or during driving.