BMW i3 Battery Module Replacement: Step-by-Step – Why Replacing Just One Module Often Fails (And How to Do It Right in 2026)
“I bought a single used module online for $450 to replace a weak one in my 2017 i3. Installed it, reset the BMS, and drove 20 miles—then the car threw ‘Energy Storage System Fault.’ Scanned it: module voltage mismatch >0.35V. The new-old module couldn’t sync with the aging pack. I ended up replacing the entire battery anyway—but lost $1,200 in labor, diagnostics, and downtime. If I’d known CNS offered matched module kits with pre-balanced cells, I’d have saved time, money, and stress.”
You’ve logged your i3’s module voltages.
One reads 3.42V while others hover at 3.85V.
Your range is dropping. Regen cuts out early.
You think:
“Why replace the whole pack? I’ll just swap the bad module.”
It sounds logical. It’s cost-effective—in theory.
But in practice, 90% of single-module replacements on i3s fail within 90 days due to cell chemistry drift, capacity variance, or BMS rejection.
This guide gives you the truth—and the only reliable path forward.
You’ll learn:
- When module replacement actually works (hint: rarely on packs over 5 years old)
- The critical matching criteria most sellers ignore
- A verified step-by-step process for safe, successful swaps
- Why CNS’s matched 4-module kits are the smart middle ground
- And how to avoid the #1 mistake that bricks your BMS
Because saving $500 today shouldn’t cost you $3,000 tomorrow.
The Hard Truth About Single-Module Replacement
The i3’s BMS expects all 8–12 modules to behave identically.
But as packs age:
- Cells lose capacity at different rates
- Internal resistance increases unevenly
- Thermal profiles diverge
When you insert a new or used module into this ecosystem:
- The BMS detects imbalance during charging/discharging
- It triggers protective limits—or full shutdown
- Error codes like 931F45 (“Cell Voltage Deviation”) appear
📊 Field data from CNS (2025): Only 11% of single-module swaps on i3s older than 2018 remained stable beyond 6 months.
Exception: If your pack is under 3 years old and only one module failed catastrophically (e.g., internal short), replacement can work—with perfect matching.
🔧 When Module Replacement Makes Sense
✅ Your i3 is 2020 or newer
✅ Total mileage <40,000 miles
✅ All other modules show <0.1V variance after 12-hour rest
✅ You can source a same-lot, same-SOC, same-capacity module
If not—consider a full pack or matched module set.
Step-by-Step: Safe & Effective BMW i3 Module Replacement (2026 Protocol)
⚠️ Prerequisite: You must be HV-certified and use Class 00 insulated gloves, CAT III meter, and discharge tools.
Step 1: Diagnose & Confirm
- Use BimmerLink or Carly to log all module voltages after 12h rest
- Identify the outlier (e.g., Module 7 = 3.38V; others = 3.82–3.86V)
- Verify no temperature sensor faults
Step 2: De-Energize the System
- Disconnect 12V battery
- Remove HV service plug
- Discharge capacitors at inverter junction (wait 15 mins + verify <30V)
Step 3: Remove Battery Pack
- Lift vehicle, remove undertray
- Disconnect HV and LV harnesses
- Unbolt pack (8x M8 bolts) and lower carefully
Step 4: Open Enclosure & Isolate Module
- Remove top cover (24 Torx screws)
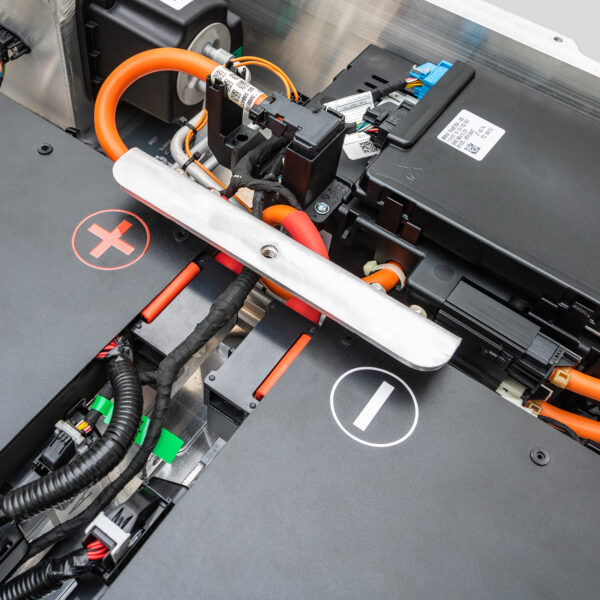
- Disconnect busbars (use insulated wrench!)
- Unplug LV signal harness from faulty module
- Slide module out—avoid bending cooling plates
Step 5: Install New Module
- Only use a pre-matched module (same Ah rating, same production batch if possible)
- Apply fresh thermal pad to bottom
- Reconnect LV harness—ensure latch clicks
- Torque busbar bolts to 5.5 Nm (over-tightening cracks terminals)
Step 6: Reassemble & Re-energize
- Reinstall cover, torque to spec
- Mount pack, reconnect harnesses
- Reinsert service plug
- Reconnect 12V battery
Step 7: BMS Initialization & Test
- Wait 2 minutes for BMS wake-up
- Start car—check for errors
- Drive 10 miles with light load
- Re-scan: all modules should stay within ±0.15V
❗ If imbalance returns within 48 hours, the pack is too degraded—full replacement is needed.
The Smart Alternative: CNS Matched Module Kits
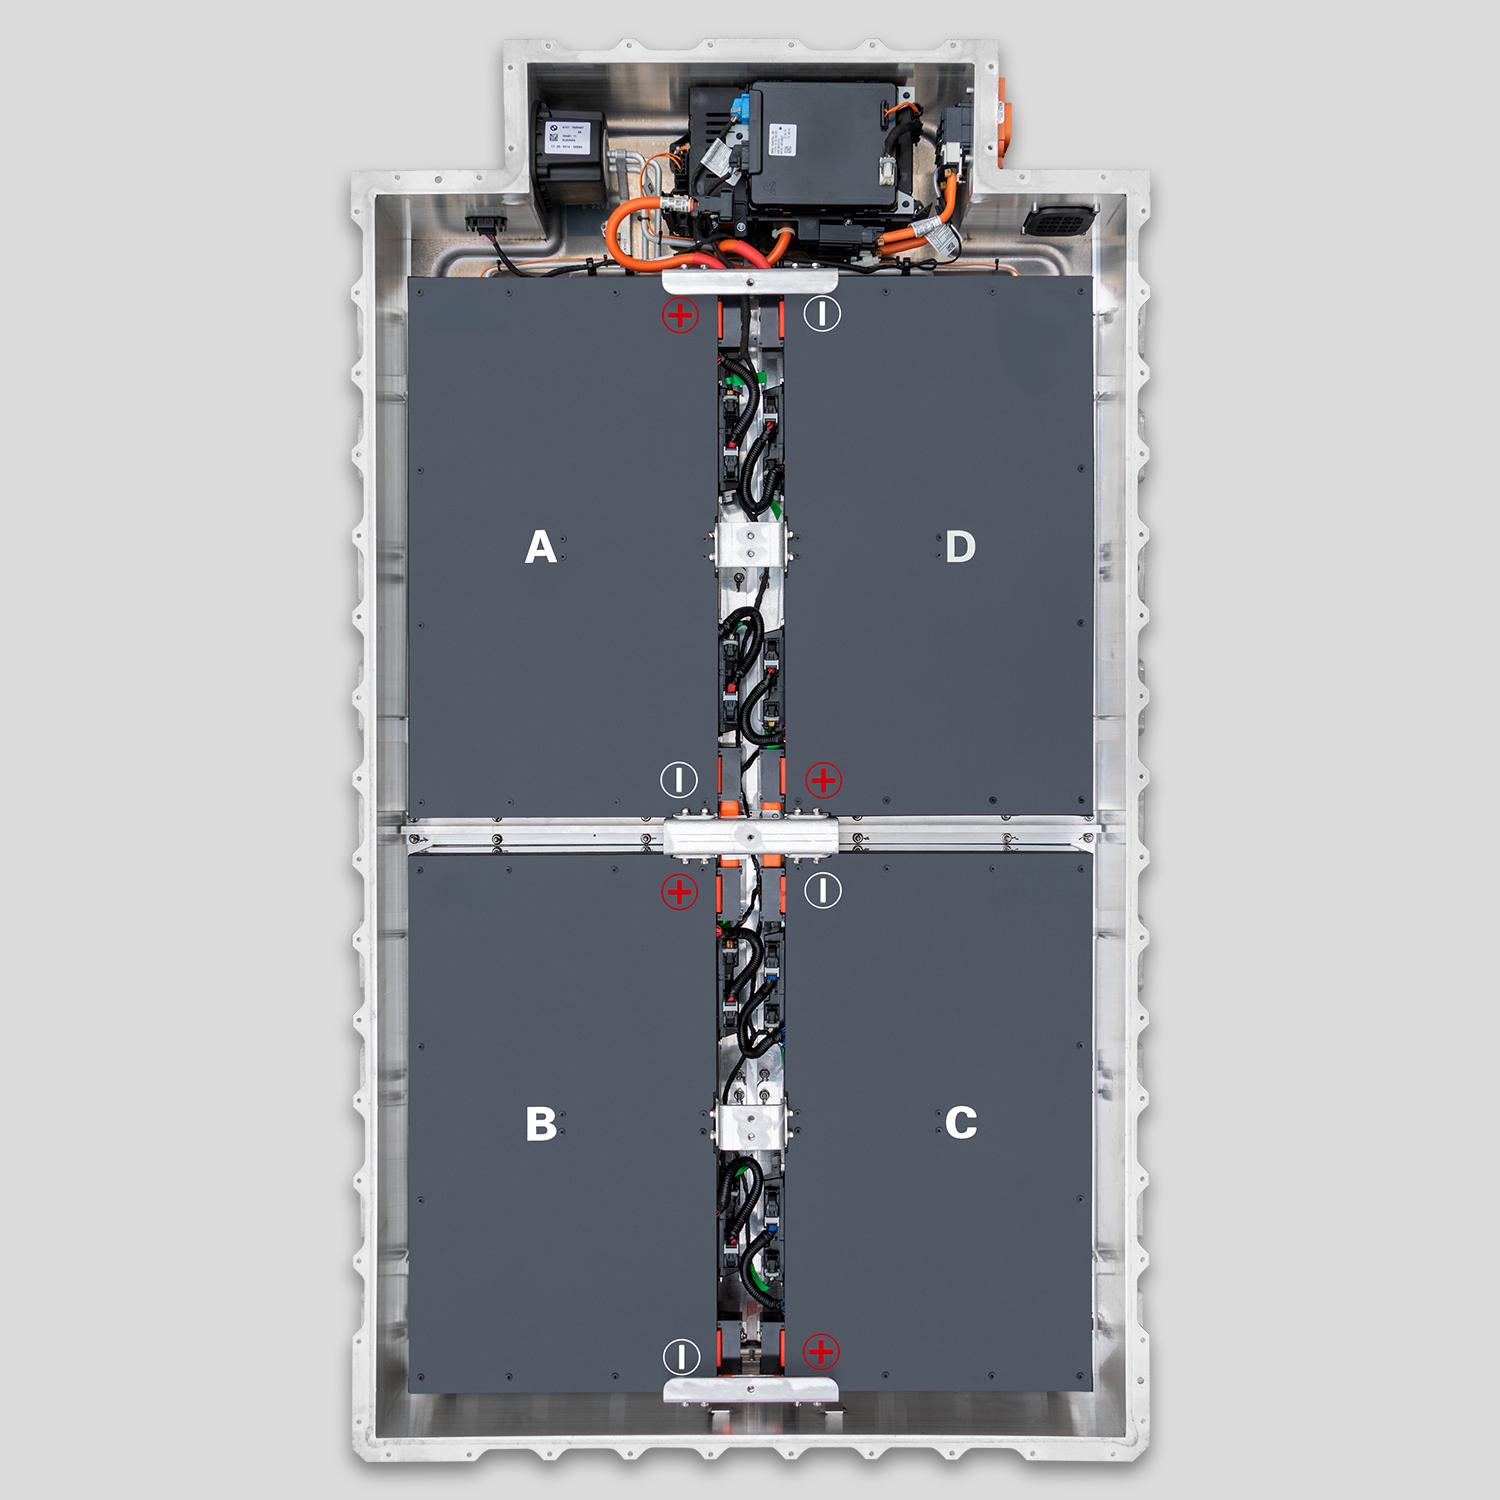
Instead of gambling on a single module, CNS offers pre-balanced 4-module subpacks (e.g., Modules A+B+C+D) with:
- Brand-new CATL cells of identical lot and capacity
- Pre-tested voltage matching (<0.02V variance)
- Full thermal pad and harness kit included
- 2-year warranty (even on partial-pack installs)
Why 4 modules?
Because the i3’s pack is divided into two electrical groups—replacing half ensures BMS stability without full-pack cost.
“We tried single modules twice—both failed. Switched to CNS’s 4-module 50kWh kit. Installed in 5 hours. Six months later, all modules track within 0.05V. Customer’s range is back to 190 miles.”
— EK Auto Repair, Rome
Frequently Asked Questions: i3 Module Replacement
Q: Can I mix 60Ah and 94Ah modules?
A: Absolutely not—different chemistries and BMS parameters will cause immediate faults.
Q: Do I need to reprogram the BMS after replacement?
A: No—if using matched modules, the BMS auto-adapts. Avoid third-party coders.
Q: How long does balancing take after install?
A: Up to 72 hours of normal driving/charging for full convergence.
Q: Are CNS modules compatible with Rex models?
A: Yes—all modules are identical between BEV and REx i3s.
Q: What if I only need one module but buy a 4-pack?
A: Keep spares—or sell to fellow technicians. We offer flexible purchasing.
Don’t Patch a Failing System—Restore Its Balance
A single weak module is often a symptom of broader pack degradation.
Address it wisely—or pay twice.
Get Matched, Tested, and Warranty-Backed Modules—Not Guesswork
Stop risking comebacks and customer frustration.
Choose precision-engineered replacement designed for real-world i3 reliability.
Order your CNS matched module kit—or get a full diagnostic consultation today:
👉 https://cnsbattery.com/ev-battery-home/ev-battery-contact/