BMW i3 Battery Isolation Test: Complete Professional Guide – The $50 Check That Saves Your Shop from Liability
A 2016 BMW i3 sits on your lift, displaying the dreaded “High Voltage System Malfunction” warning. The customer is anxious: “It just died while I was driving. The dealer said it’s an insulation fault. Can you just reset the code and see if it goes away?”
As a professional EV technician in 2026, you know that hitting “Clear Codes” on an isolation fault is not just unprofessional; it is negligent. An isolation fault means the vehicle’s 400-volt high-voltage (HV) system has lost its electrical separation from the chassis. In simple terms: the car’s frame could be electrified.
Resetting the code without performing a rigorous BMW i3 Battery Isolation Test is like silencing a smoke alarm while the house is still burning. The danger remains, and if the vehicle catches fire or electrocutes someone later, your shop will be held legally liable for approving an unsafe vehicle.
Why do standard OBDII scanners fail to detect lethal isolation breaches?
What is the exact step-by-step protocol to safely measure insulation resistance?
And when the test confirms the battery pack is internally compromised, how do you pivot from a dangerous “reset” to a safe, profitable, and permanent upgrade?
At CNS BATTERY, safety is our absolute priority. We know that accurate isolation testing is the gatekeeper between a safe repair and a catastrophic lawsuit. This guide provides the complete professional protocol for testing BMW i3 battery isolation, explains how to interpret the data, and reveals why replacing the entire system is the only ethical solution for failed packs.
Why Standard Scanners Aren’t Enough
Your generic scan tool can tell you that the BMS has detected an insulation fault (Code CD6902). It cannot tell you where the leak is, how severe it is, or if it’s safe to touch.
Relying solely on digital codes is dangerous because:
- False Negatives: A failing sensor might report “normal” while a slow leak develops.
- Lack of Quantification: You need to know the exact resistance value (in kΩ or MΩ) to assess safety, not just a “Pass/Fail” light.
- Isolation Issues: You cannot determine if the leak is in the battery, the motor, the compressor, or the cabling without physical isolation testing using high-voltage equipment.
To diagnose like a pro, you must move beyond the screen and use high-voltage measurement tools.
The Professional Toolkit: Essential Gear
Before touching a single bolt, ensure your shop is equipped with:
- Digital Megohmmeter (Insulation Tester): Capable of outputting 500V or 1000V DC. Brands like Fluke or Hioki are industry standards. Standard multimeters cannot do this.
- CAT III / CAT IV Multimeter: For verifying zero voltage before testing.
- Class 00 Insulated Gloves & Face Shield: Mandatory PPE for any HV interaction.
- BMW ISTA or Equivalent Bidirectional Tool: To manually open/close contactors for component isolation.
Step-by-Step: The Complete Isolation Test Protocol
Follow this rigorous workflow to safely and accurately diagnose isolation failures in the BMW i3.
Step 1: Safety Depower
- Disconnect the 12V auxiliary battery.
- Remove the High Voltage Service Plug (MSD).
- Wait 10 minutes for capacitor discharge.
- Verify 0 Volts at the main terminals before touching any connectors.
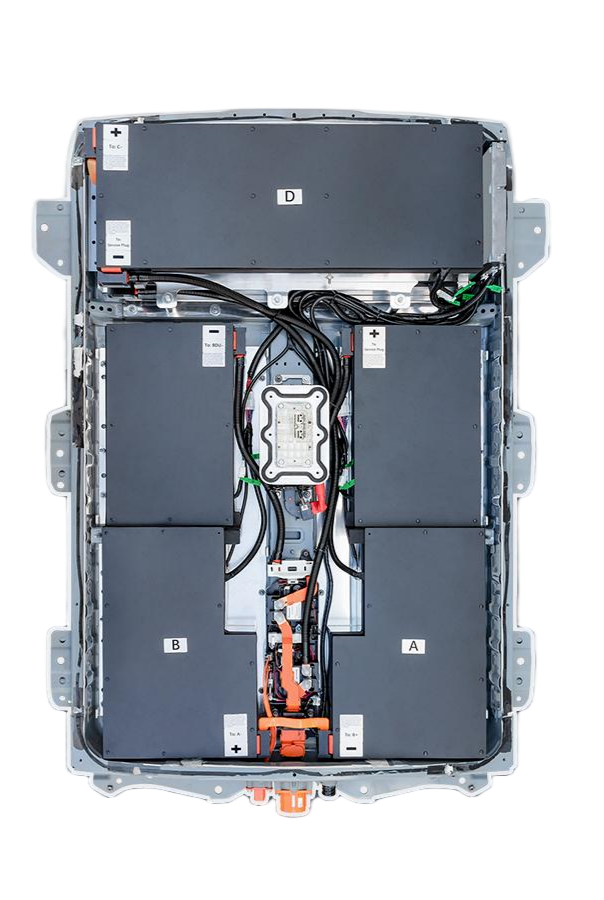
Step 2: Isolate the Battery Pack
The goal is to test the battery independently from the rest of the drivetrain.
- Disconnect HV Cables: Unplug the orange high-voltage cables connecting the battery to the motor and power electronics.
- Cap the Connectors: Immediately cover exposed HV terminals with insulated caps to prevent accidental contact or contamination.
Step 3: Perform the Megger Test
- Setup: Set your Megohmmeter to 500V DC (standard for 400V systems).
- Connect Leads: Attach the negative lead to a clean chassis ground (bare metal). Attach the positive lead to the HV+ terminal of the disconnected battery pack.
- Run Test: Activate the tester. Record the resistance value after 60 seconds (stabilized reading).
- Repeat: Move the positive lead to the HV- terminal and repeat.
- Cross-Check: Finally, test between HV+ and HV- (though this tests internal shorts, not insulation to ground).
Step 4: Interpret the Results
BMW and industry standards define specific thresholds for safety:
- > 500 kΩ/V (Safe): For a 400V system, you want to see > 200 kΩ (0.2 MΩ), ideally > 1 MΩ. The pack is electrically isolated. The fault likely lies elsewhere (cables, motor, compressor).
- < 100 kΩ/V (Critical Failure): If readings are below 40 kΩ (0.04 MΩ), the insulation is compromised. The pack is unsafe.
- The “Infinity” Reading: A healthy, dry pack should often read “OL” (Over Limit) or several Megaohms. Anything dropping into the kilo-ohm range indicates a conductive path (liquid or carbon tracking).
The Diagnosis: What the Numbers Mean for Your Customer
Once you have the data, the path forward becomes clear.
Scenario A: External Leak (The Good News)
If the battery tests Safe (>1 MΩ) but the car still throws a code when reconnected, the leak is likely in the HV cables, electric compressor, or heater.
- Action: Inspect orange cables for rodent damage or chafing. Test individual components by isolating them one by one.
- Outcome: Repairable. Replace the damaged cable or component.
Scenario B: Internal Battery Leak (The Bad News)
If the battery itself tests Low (<100 kΩ), the breach is internal.
- Common Causes:
- Coolant Intrusion: The #1 cause in aging i3s. Internal cooling plates corrode or seals fail, allowing conductive glycol to touch live cells.
- Physical Damage: A previous impact cracked the casing or internal modules.
- Thermal Degradation: Years of heat cycling have carbonized internal insulation materials.
- The Verdict: The battery pack is condemned. You cannot “dry out” a pack that has had conductive coolant inside. The corrosion is permanent, and the risk of sudden short-circuit or fire is extreme. Opening the pack to “fix” it violates safety protocols and exposes your shop to massive liability.
The CNS BATTERY Solution: Turn a Condemned Pack into Profit
When you deliver the news that a battery is internally leaked and unsafe, the customer faces a crisis. The dealer will quote $20,000+ for a remanufactured unit that may still have aging issues.
This is your opportunity to be the hero. Instead of sending them away, offer the CNS BATTERY High-Capacity Upgrade—a solution that is safer, better, and more affordable than the OEM alternative.
Why Upgrading Is the Only Safe Option
- Guaranteed Integrity: Our BMW i3 Series Battery upgrades are brand-new, factory-sealed units. They come with certified insulation resistance values well above safety limits (often >10 MΩ).
- Zero Leak Risk: New casings and advanced sealing technology eliminate the corrosion issues plaguing 10-year-old OEM packs.
- Plug-and-Play Safety: No risky disassembly of the old leaking pack. You swap the entire unit in 4-6 hours, minimizing technician exposure to hazardous fluids.
- Double the Range: Customers don’t just get a fixed car; they get 130–200+ miles of range, transforming their i3 into a modern, viable EV.
- Profitable Resolution: Secure an $8,000–$14,000 sale (parts + labor) with healthy margins. You solve a critical safety issue and earn a customer for life.
- Warranty Peace of Mind: Backed by our 3–5 Year Warranty, you eliminate the fear of future leaks or failures.
Real Story: From “Condemned” to “Certified Safe”
“Metro EV Repair” in Chicago recently diagnosed a 2015 i3 with a CD6902 code. Their Megger test showed 12 kΩ resistance on the battery pack—critically low. Further inspection revealed sweet-smelling coolant seeping from the pack’s vent valve.
“The dealer told the owner to scrap the car; the repair cost was too high,” says the shop owner. “We explained that the leak made the pack a fire hazard and offered the CNS upgrade. We installed a 150 Ah unit the next day. The new pack tested at >5 MΩ. The customer paid $11,500, got 170 miles of range, and drove away safely. We turned a potential lawsuit into our best job of the quarter.”
Stop Guessing, Start Testing
BMW i3 battery isolation tests are not optional; they are mandatory for safety. A low resistance reading is a red flag that demands immediate action. Do not attempt to patch a leaking high-voltage system.
Equip your shop with the right tools, follow the professional protocol, and when a leak is found, offer the solution that guarantees safety and performance.
Is your shop ready for professional EV isolation diagnostics?
Don’t risk safety or reputation. Contact CNS BATTERY today to become a certified partner. Access our technical guides, wholesale pricing, and training, and start turning dangerous battery failures into profitable, safe upgrades.
👉 Become a Certified Diagnostic Partner Today
Frequently Asked Questions (FAQ) for Technicians
1. What is the minimum acceptable insulation resistance for a BMW i3 battery?
BMW generally requires a minimum of 500 kΩ/V. For a ~400V system, this means >200 kΩ (0.2 MΩ). However, professional best practice dictates that anything below 1 MΩ warrants investigation, and anything below 100 kΩ indicates a critical failure requiring immediate pack replacement.
2. Can I reset the insulation fault code and drive the car?
Absolutely NOT. An insulation fault means the chassis could be energized at 400V. Driving the vehicle risks fatal electrocution to the driver/passengers and potential fire. The vehicle must be towed and diagnosed immediately.
3. What causes low insulation resistance in older i3s?
The most common cause is internal coolant leakage due to corroded cooling plates or failed seals. Other causes include physical damage to the casing, rodent-chewed HV cables, or moisture intrusion from flooding.
4. Can a battery with low insulation be repaired?
No. If the low resistance is caused by internal coolant contamination or degraded internal insulation, the pack is unrepairable. The conductive fluid creates permanent paths for electricity. Attempting to dry or clean it is unsafe and unreliable. The pack must be replaced.
5. How do I isolate the battery from the rest of the car for testing?
You must physically disconnect the high-voltage orange cables at the battery terminals. Ensure the 12V is disconnected and the service plug is removed before touching any HV components. Test the battery terminals directly against the chassis.
6. Does CNS BATTERY provide insulation test reports with their upgrades?
Yes. Every upgrade undergoes rigorous quality control, including insulation resistance testing, before shipping. We provide documentation confirming the pack meets or exceeds all safety standards upon installation.
7. What PPE is required for isolation testing?
Technicians must wear Class 00 (1000V) insulated gloves with leather protectors, arc-flash rated face shields, and non-conductive footwear. Always verify your multimeter and Megohmmeter are rated for CAT III 1000V or higher.