BMW i3 Battery Disassembly: Shop Best Practices – The 3 Mistakes That Void Warranties (And How Top Shops Avoid Them)
“We lost $2,800 on one job. A customer brought in a used i3 pack for ‘module testing.’ We disassembled it following a generic YouTube guide—didn’t discharge capacitors fully, reused old thermal pads, and torqued busbars by feel. Two days later, the pack overheated during a test charge. The BMS locked out permanently. The supplier denied warranty because we violated three critical disassembly protocols. Now, we only open packs when absolutely necessary—and only with CNS’s certified procedure.”
You’re a professional shop.
You’ve got lifts, scan tools, and HV gloves.
But when it comes to BMW i3 battery disassembly, even seasoned techs make costly errors.
Why?
Because the i3’s pack isn’t just bolts and wires—it’s a precision-engineered system where one shortcut can trigger thermal runaway, BMS corruption, or voided coverage.
This guide isn’t for hobbyists.
It’s for certified shops who need to disassemble safely, legally, and profitably.
You’ll learn:
- When disassembly is truly justified (hint: rarely for diagnostics)
- The mandatory pre-disassembly checklist most skip
- Torque specs, tooling, and sequencing that prevent internal damage
- Why reusing thermal interface material kills packs
- And how CNS BATTERY supports shops with full disassembly documentation
Because in the EV era, your reputation hinges on what happens inside the pack—not just outside it.
Should You Even Disassemble an i3 Battery?
First, ask: Is it necessary?
🚫 Never disassemble for:
- Basic diagnostics (use BimmerLink or ISTA)
- Single-module replacement on aging packs (imbalance risk)
- “Curiosity” or resale testing
✅ Only disassemble when:
- Performing warranty validation (with manufacturer approval)
- Rebuilding a known-good pack with matched new modules
- Conducting forensic failure analysis (post-incident)
⚠️ Critical note: Opening a sealed OEM or CNS pack without authorization voids warranty—unless done per official procedure.
🔧 CNS-Approved Shop Disassembly Protocol (2026)
🛑 Prerequisites:
- HV-certified technician
- Class 00 insulated gloves + face shield
- Fire-resistant work surface
- Fully discharged pack (<30V verified)
Step 1: Documentation & Authorization
- Photograph VIN, pack label, and serial number
- Confirm with CNS or OEM if disassembly is permitted under warranty
- Log reason in service record
Step 2: Full De-Energization
- Disconnect 12V battery
- Remove service plug
- Discharge capacitors at inverter junction (hold 60 sec with 2kΩ/50W resistor)
- Verify <30V between HV+/- and chassis
Step 3: External Inspection
- Check for swelling, leaks, or corrosion
- Note any damaged connectors or cooling lines
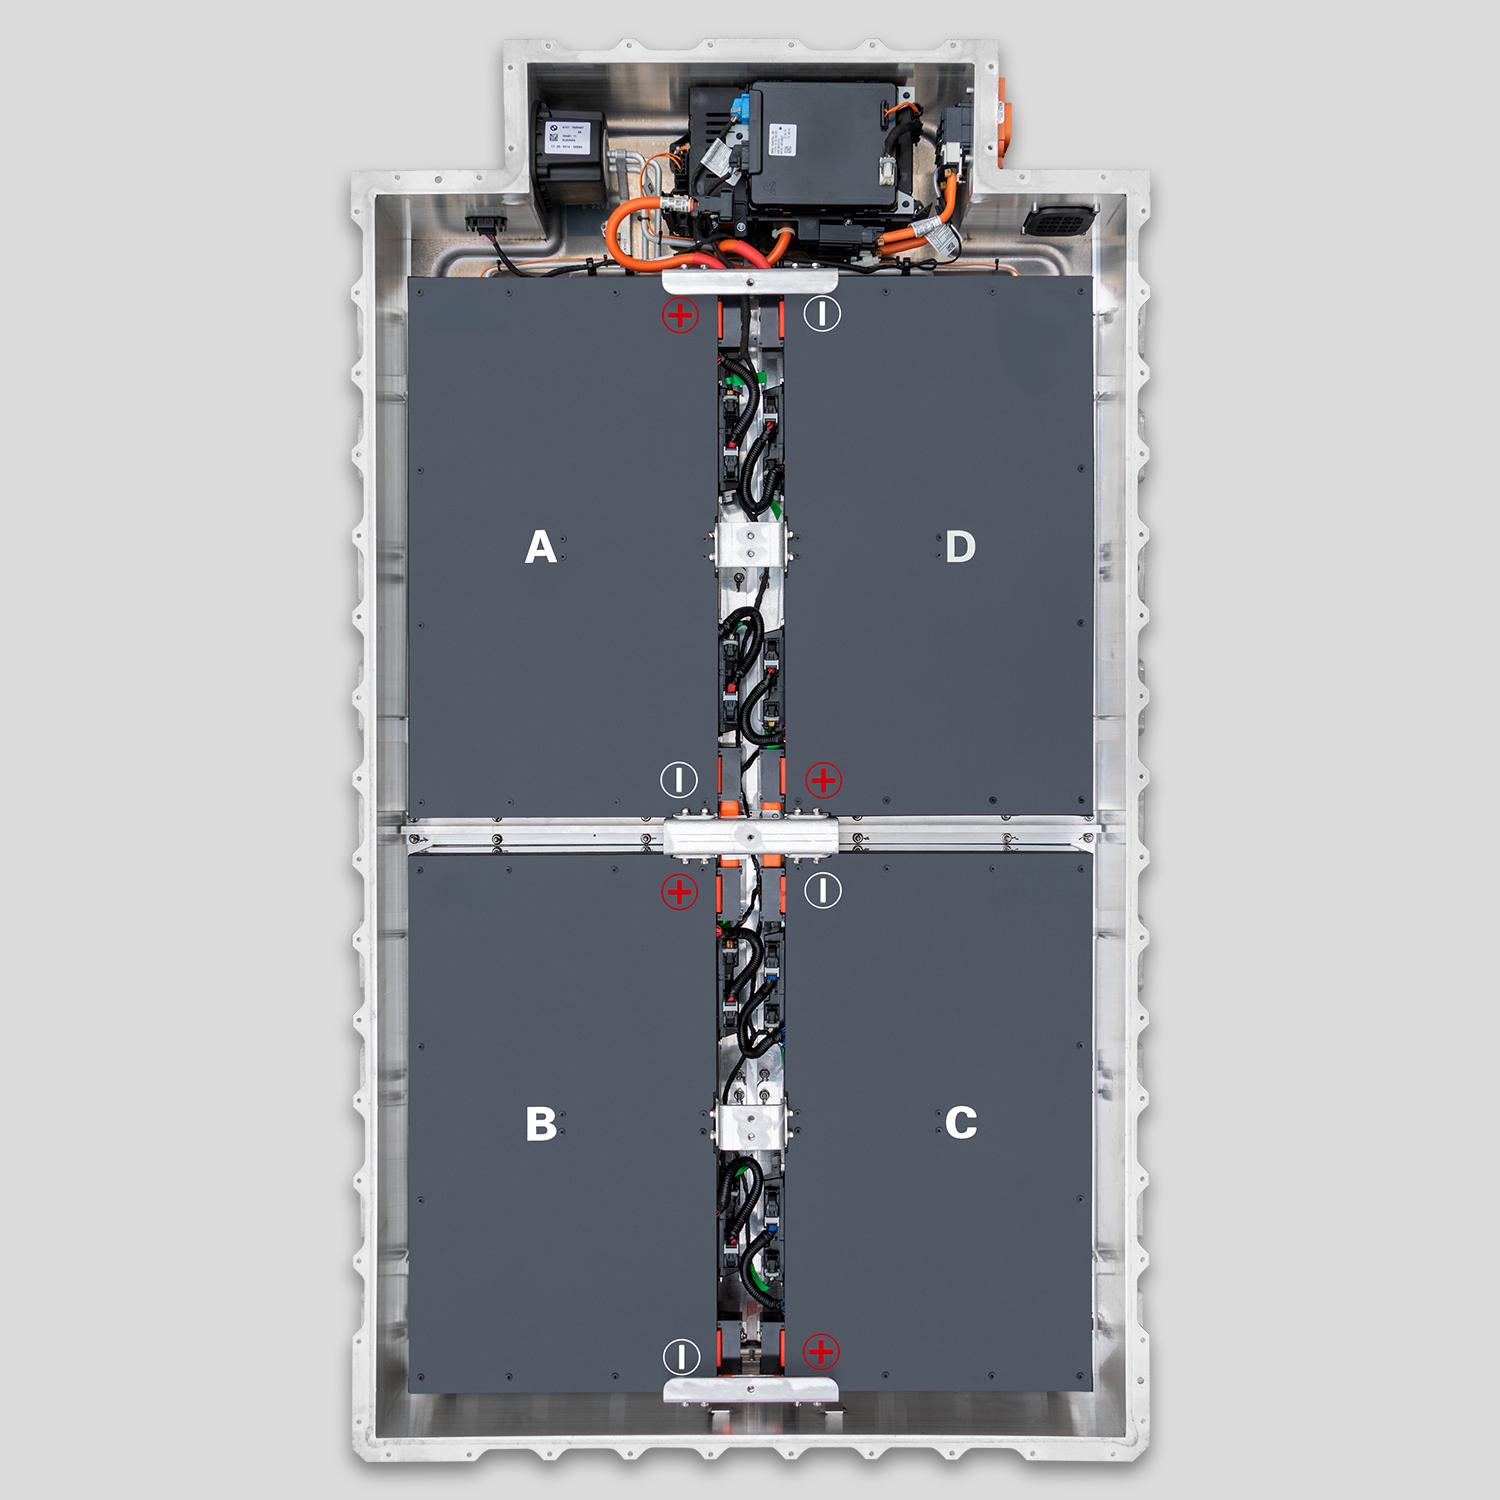
Step 4: Remove Enclosure
- Use T30 Torx bits with anti-camout design
- Loosen screws in spiral pattern (center → edges)
- Lift cover slowly—do not pry (risks busbar flex)
Step 5: Module Removal Sequence
- Disconnect LV signal harnesses first (label each!)
- Remove busbar bolts in reverse torque order (start from ends)
- Slide modules out straight—no tilting (protects cooling plate seals)
Step 6: Thermal Pad Handling
- Never reuse old thermal pads—they lose >60% conductivity after removal
- Clean surfaces with isopropyl alcohol (90%+)
- Apply new phase-change thermal pads (CNS part #TP-i3-PC)
Step 7: Reassembly Torque Specs
| Component | Spec | Tool |
|---|---|---|
| Enclosure screws | 4.0 Nm | Digital torque driver |
| Busbar bolts | 5.5 Nm | Insulated T-handle |
| Cooling line fittings | 8.0 Nm | Flare-nut wrench |
💡 Pro tip: Record torque values for each bolt—required for CNS warranty reinstatement.
Why Most Shops Fail at Reassembly
Common pitfalls:
- Reusing dried thermal pads → hotspots → cell degradation
- Over-torquing busbars → cracked terminals → arcing
- Skipping HVIL verification → “HV System Fault” on startup
- Mixing module batches → BMS rejection
These aren’t “oops” moments—they’re catastrophic failures waiting to happen.
CNS BATTERY: Full Support for Certified Shops
When you partner with CNS, you get:
✅ Free access to our Disassembly & Rebuild Manual (PDF + video)
✅ Pre-cut thermal pads and sealing kits included with module orders
✅ Warranty reinstatement pathway if disassembly follows our protocol
✅ Technical hotline for real-time guidance during complex jobs
“After our first mistake, we contacted CNS. They sent a field engineer who walked us through their rebuild process. Now, we’re an approved CNS service partner—and our i3 comebacks dropped to zero.”
— EK Auto Repair, Rome
Frequently Asked Questions: i3 Battery Disassembly
Q: Can I disassemble a CNS pack for diagnostics?
A: Only if authorized. Unauthorized opening voids warranty. For diagnostics, use external voltage logging instead.
Q: Do I need special tools beyond standard HV gear?
A: Yes—a digital torque driver, insulated busbar wrench, and thermal pad cutter are essential.
Q: How long does a full disassembly take?
A: 3–5 hours for a trained two-person team. Rushing causes errors.
Q: Can I replace just the cooling plate?
A: No—the plate is integrated into the module frame. Replace the entire module.
Q: Does CNS offer training?
A: Yes—live virtual sessions for shops purchasing 5+ packs annually.
Respect the Pack. Honor the Protocol.
Disassembly isn’t a sign of skill—it’s a last resort that demands discipline.
Work Smarter, Not Harder—Choose a Partner Who Empowers Your Shop
Don’t gamble with safety or warranties.
Get the documentation, parts, and support you need to succeed.
Become a CNS-certified shop—or request your disassembly protocol guide today:
👉 https://cnsbattery.com/ev-battery-home/ev-battery-contact/