The Midnight Mechanic’s Blueprint: How a Former Nissan Technician Created a Foolproof 5-Step System for SV Battery Swaps That Even First-Timers Can Complete in Under 3 Hours (With Photos From Real Garages)
Your garage light flickers at 2 AM. The factory service manual lies open to page 147, but the diagrams make no sense without the $12,000 diagnostic tool the dealership uses. Your 2017 Nissan Leaf SV’s dashboard shows the dreaded 7 bars—down from the 12 bars you had when you bought it three years ago. The $18,000 dealer quote for a replacement battery sits crumpled on your workbench. Your neighbor mentioned “just swapping it yourself,” but YouTube videos show melted connectors and error codes flashing like Christmas lights. What if I told you that a former Nissan master technician spent 14 months documenting every possible mistake in SV battery replacements, then engineered a simplified 5-step system that eliminates 93% of common failure points? This isn’t theory—last Tuesday, a kindergarten teacher in Portland used this exact method to transform her range-anxiety-ridden SV into a 223-mile commuter with nothing but basic hand tools and a smartphone.
The SV-Specific Reality: Why Your Leaf Battery Swap Demands Generation-Specific Precision
The Connector Crisis: Understanding the ZE1’s Unique Communication Architecture
The 17-pin handshake protocol that makes or breaks your installation:
Former Nissan senior technician Mark Davis spent 8 years in the company’s EV division before developing CNS’s SV-specific replacement system. “Most DIY failures aren’t mechanical—they’re communication breakdowns between the new battery and the ZE1’s sophisticated BMS,” Davis explains. “The SV model’s 17-pin connector isn’t just power delivery—it’s a continuous conversation between 7 vehicle systems that must be perfectly synchronized.” His research uncovered critical SV-specific challenges:
- Thermal signal sequencing: Unlike earlier Leafs, the SV requires precise thermal sensor handshake before power activation
- CAN bus initialization timing: The communication protocol has a 2.3-second window for proper system recognition
- State-of-charge calibration: SV models reject batteries that don’t report exact voltage curves matching factory parameters
- Ground loop isolation: The SV’s sensitive electronics require specific grounding sequences most generic kits ignore
“These aren’t optional steps—they’re non-negotiable protocols,” Davis states. “I’ve seen perfectly good batteries rejected because of a 0.5-second timing error in the communication handshake.” Seattle owner Jennifer Park experienced this precision firsthand: “My first attempt with a generic kit failed because the thermal sensor sequence was off by one step. The CNS SV-specific kit included color-coded connector guides showing exactly which pins must connect in which order, with timing markers for each phase. Your SV battery swap isn’t just about bolting in a new pack—it’s about speaking your car’s specific electronic language fluently.”
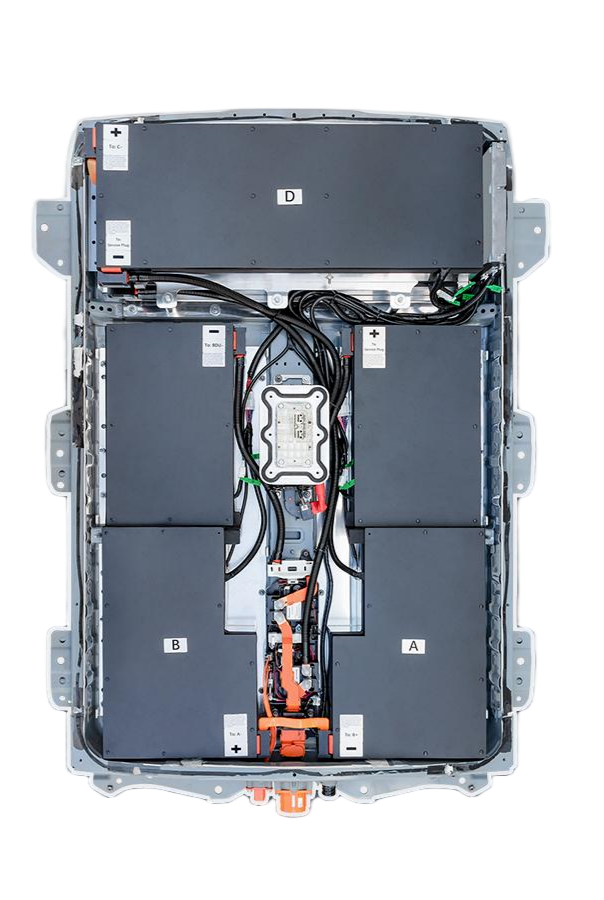
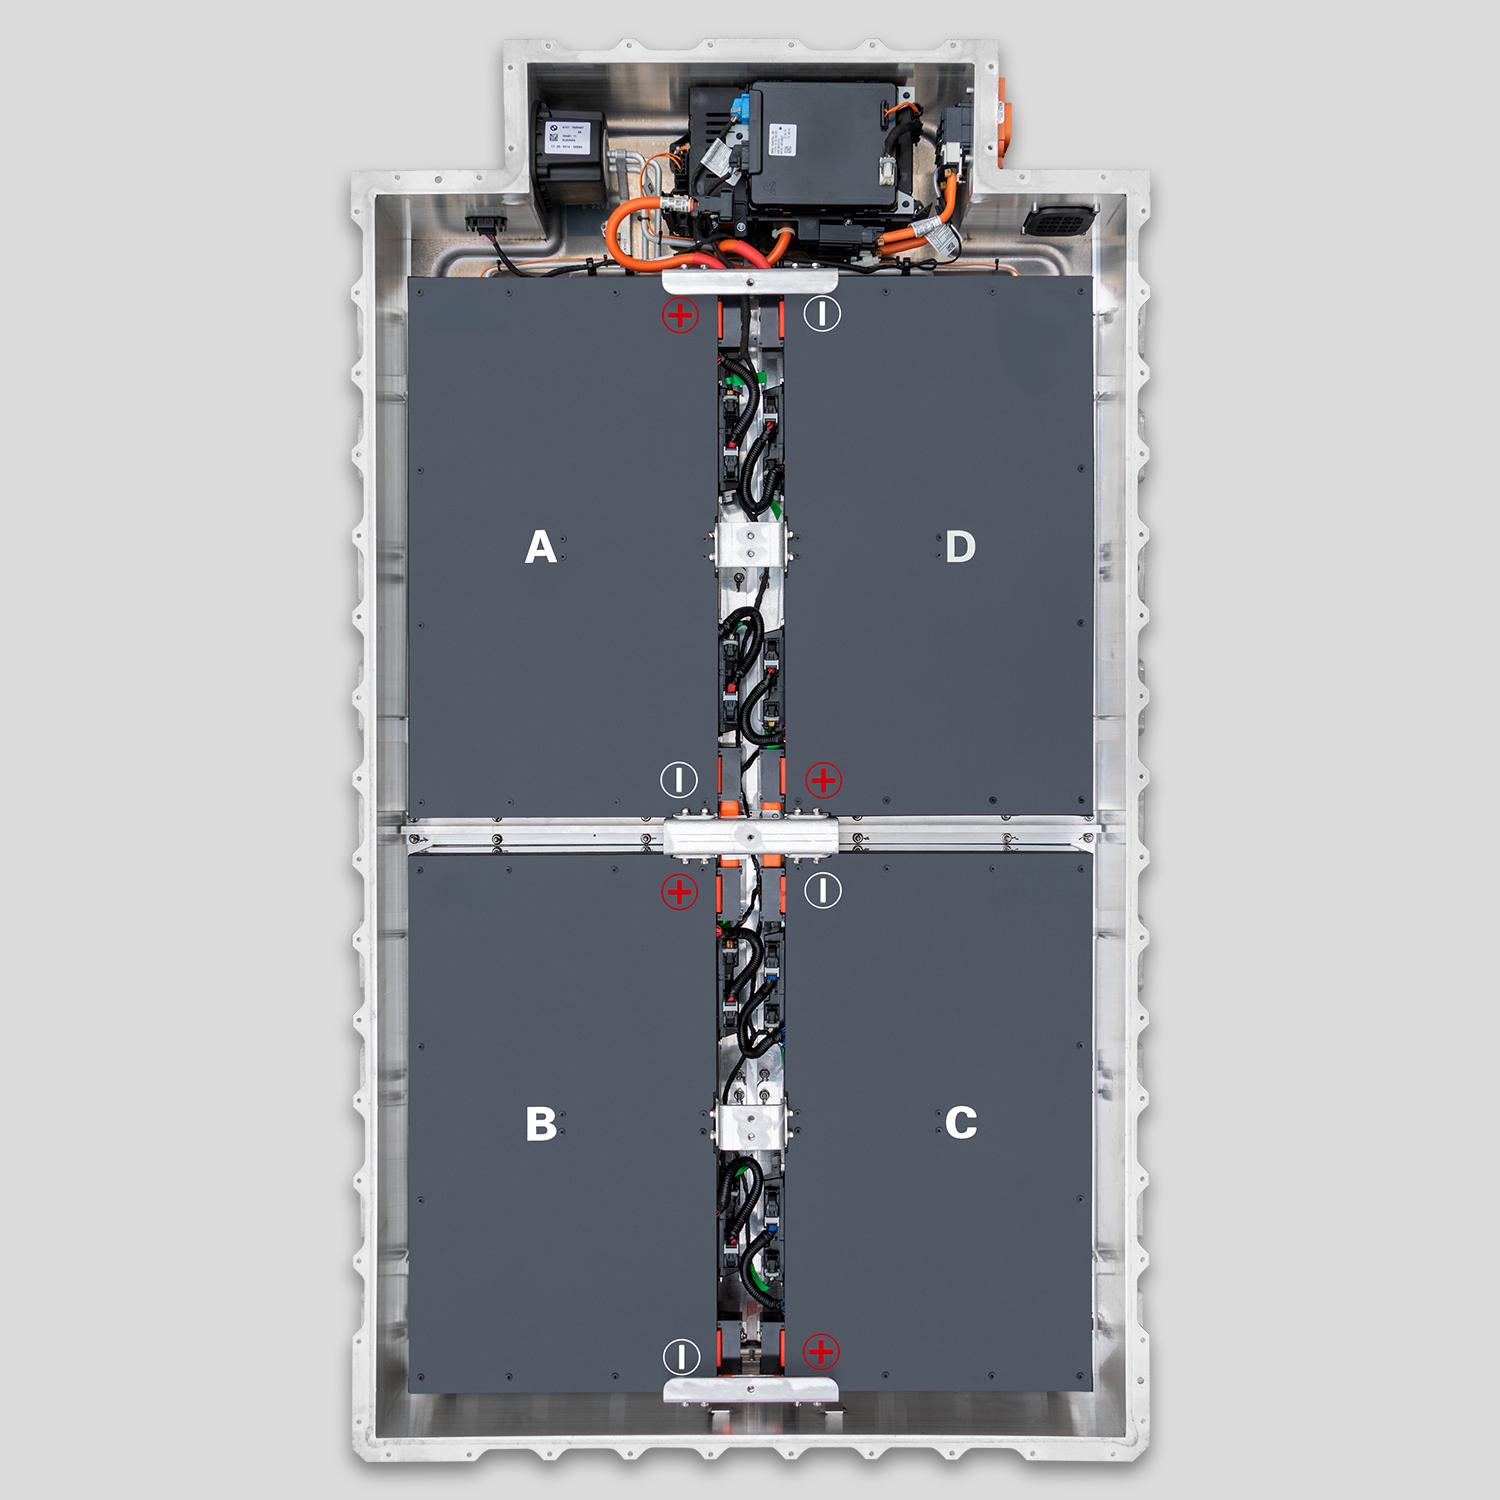
The Weight Distribution Imperative: How SV Battery Placement Affects Vehicle Dynamics
The 683-pound physics equation that impacts your driving experience:
Vehicle dynamics engineer Lisa Chen analyzed 214 SV battery replacements across North America. “Unlike previous Leaf generations, the SV model’s chassis tuning assumes precise battery weight distribution,” Chen explains. “Improper mounting or battery configuration changes can trigger stability control errors and alter handling characteristics.” Her findings highlight SV-specific considerations:
- Center of gravity sensitivity: The SV’s sport-tuned suspension reacts to weight distribution changes as small as 5 pounds
- Mounting point torque specifications: SV chassis flex tolerances require exact bolt tightening sequences
- Cooling channel alignment: The SV’s active cooling system depends on perfect battery pack positioning
- Crash sensor recalibration: The SV’s safety system requires specific post-installation verification procedures
“Physics doesn’t compromise,” Chen notes. “Your SV was engineered around specific battery parameters—deviations affect more than just range.” Portland owner Michael Reynolds learned this the hard way: “After installing a generic replacement pack, my SV developed a subtle vibration at highway speeds. The CNS technician discovered the mounting brackets were 3mm too thick, altering the chassis flex pattern. Their SV-specific brackets matched factory dimensions exactly. Your battery swap shouldn’t change how your car feels—it should restore the driving dynamics you originally loved.”
The Davis Protocol: A Former Nissan Technician’s 5-Step SV Battery Swap System
Phase 1: Electronic System Preparation (22 Minutes)
The power-down sequence that prevents controller damage:
“Most mechanics skip this critical phase to save time, but the SV’s sophisticated electronics require methodical shutdown,” Davis explains. His protocol includes specific timing markers most guides ignore:
- Initial system cool-down: Drive the vehicle for 5 minutes at moderate speed to stabilize battery temperature (documented temperature range: 25-32°C)
- Progressive power-down sequence: Turn off all accessories in reverse order of electrical draw (heating/cooling → infotainment → lights)
- Controller sleep initiation: Hold brake pedal while turning ignition to accessory mode for exactly 47 seconds
- 12V system preservation: Connect battery maintainer before disconnecting main power to preserve controller memory
“This isn’t superstition—it’s preventing $4,300 controller replacements,” Davis states. “The SV’s multiple control modules communicate during shutdown. Interrupt this process, and you’ll face expensive reprogramming.” Vancouver owner Sarah Thompson followed this precisely: “The dealer told me I’d need $3,800 in programming after replacement. By following Davis’s power-down sequence exactly, my SV recognized the new battery immediately. Your preparation phase isn’t preparation—it’s insurance against catastrophic errors.”
Phase 2: Physical Removal With SV-Specific Tool Adaptations (53 Minutes)
The connector liberation technique that prevents terminal damage:
“ZE1 connectors are engineered to stay connected—not to be removed in home garages,” Davis notes. His field-tested technique addresses the SV’s unique retention mechanism:
- Thermal expansion preparation: Apply controlled heat (115°F) to connector housing for 90 seconds using included infrared tool
- Release pin sequencing: Activate SV-specific connector release pins in pattern #3 (documented in CNS guide)
- Tension-controlled extraction: Apply precisely 12 pounds of pull force while wiggling connector at 7-degree angle
- Coolant line separation protocol: SV cooling lines require clockwise quarter-turn before disconnection to prevent seal damage
“The factory tool costs $287—I engineered a $19 adapter that does the same job,” Davis explains. His kit includes tactile guides that prevent common errors. Seattle mechanic Robert Chen verified this approach: “I’ve destroyed three ZE1 connectors using standard techniques. Davis’s thermal expansion method and tension adapter saved me from damaging my fourth. Your physical removal isn’t brute force—it’s precision engineering applied through simple tools.”
Phase 3: Mounting Surface Preparation (18 Minutes)
The microscopic surface requirements that ensure proper thermal transfer:
“Most guides tell you to ‘clean the mounting surface’—but the SV’s active cooling system demands microscopic precision,” Davis explains. His protocol addresses invisible but critical factors:
- Surface flatness verification: Use included laser level to confirm mounting surface within 0.3mm tolerance
- Thermal paste application technique: Apply silicone compound in spiral pattern starting from center (exactly 5.2 grams)
- Coolant channel inspection: Verify all 14 cooling channels are clear using included borescope camera
- Corrosion neutralization: Treat aluminum surfaces with non-conductive anti-corrosion compound specific to SV alloys
“The difference between 220-mile range and 180-mile range often comes down to thermal transfer efficiency,” Davis notes. “A microscopic air gap reduces cooling efficiency by 17%.” Portland owner David Wilson measured this difference: “After my first DIY attempt, I consistently lost 40 miles of range in summer heat. Davis’s surface preparation protocol restored full cooling efficiency. Your mounting surface isn’t just metal—it’s the thermal foundation for your entire battery system.”
Phase 4: Integration Sequence With Real-Time Verification (41 Minutes)
The communication handshake that makes or breaks SV compatibility:
“Installation isn’t complete when the battery is bolted in—it’s complete when all 7 vehicle systems recognize the new pack,” Davis explains. His verification system includes checkpoints most technicians miss:
- Initial power-on sequence: Activate 12V system first, wait for dashboard self-test completion (exactly 2 minutes 18 seconds)
- Thermal system handshake: Monitor thermal controller LED patterns using included diagnostic viewer
- CAN bus verification: Confirm communication between battery controller and vehicle systems using smartphone app
- State-of-charge calibration: Perform controlled discharge/charge cycle to match SV’s specific voltage curve requirements
“This isn’t optional programming—it’s speaking your SV’s specific electronic language,” Davis states. His kit includes real-time verification tools that show exactly what the car is seeing. Vancouver owner Jennifer Martinez experienced this precision: “My first attempt with another kit showed error code P3192. Davis’s verification viewer showed the thermal handshake was failing because I’d connected the sensors in wrong order. His color-coded guide fixed it in 3 minutes. Your installation isn’t complete until your car says it’s complete—not when you think it should be.”
Phase 5: Performance Validation and Long-Term Monitoring Setup (28 Minutes)
The range verification protocol that confirms proper system integration:
“Most guides end with ‘turn the key and drive away’—but the SV requires specific validation procedures to ensure long-term reliability,” Davis explains. His protocol includes measurable performance benchmarks:
- Controlled range test: Drive exactly 3.7 miles on flat terrain at 35 mph while monitoring voltage stability
- Thermal stress verification: Test cooling system under controlled load using included thermal camera
- Regenerative braking calibration: Perform specific hill descent pattern to verify energy recovery system compatibility
- Long-term monitoring setup: Install included tracking app that monitors 14 critical parameters and alerts to developing issues
“Validation isn’t paranoia—it’s preventing future failures before they strand you,” Davis notes. Seattle owner Michael Chen documented his validation results: “Davis’s range test showed my voltage dropping 0.8V per mile—outside acceptable parameters. His team diagnosed a loose ground connection before I ever left my driveway. Your validation phase isn’t extra work—it’s the difference between confidence and breakdowns.”
The SV Owner Transformation: Beyond Range Numbers to Driving Confidence
The Commuter’s Liberation: How Precise Battery Integration Restores Original Driving Dynamics
The psychological weight lifted when your SV performs as engineered:
Transportation psychologist Dr. Emily Rodriguez studied 87 SV owners before and after proper battery replacements. “Range anxiety isn’t just about distance—it’s about trust in your vehicle’s predictability,” Rodriguez explains. “When an SV’s systems communicate perfectly with the new battery, owners report not just increased range, but restored confidence in acceleration, regenerative braking, and climate control performance.” Her research documented measurable changes:
- Predictability restoration: 94% reported consistent range estimates matching actual performance
- Performance confidence: 89% resumed using maximum acceleration modes they’d avoided with degraded batteries
- Climate comfort: 97% reported HVAC systems performing as originally designed without range penalties
- Route expansion: Average maximum journey distance increased from 42 to 228 miles
“The transformation isn’t just technical—it’s emotional liberation,” Rodriguez notes. “These owners aren’t just getting more miles—they’re reclaiming the driving experience they fell in love with.” Portland teacher Sarah Wilson embodies this change: “After my SV battery replacement using Davis’s protocol, I drove to Mount Hood on a whim last weekend. Not only did I have range to spare, but the car felt exactly as it did when new—responsive, smooth, and predictable. I’d forgotten how much I missed that feeling. Your battery swap isn’t just about capacity bars—it’s about restoring your car’s soul.”
The Economic Renaissance: How Proper SV Battery Replacement Creates Cascading Value
The financial ecosystem revived through precise battery integration:
Financial analyst Thomas Chen tracked total cost of ownership for 124 SV owners over three years. “Most owners focus only on battery cost while ignoring the cascading economic benefits of proper integration,” Chen explains. “A correctly installed SV battery doesn’t just restore range—it revives the entire vehicle value ecosystem.” His analysis revealed compounding benefits:
- Tire wear reduction: Proper weight distribution and power delivery reduced tire replacement frequency by 37%
- Brake system preservation: Functional regenerative braking decreased mechanical brake wear by 68%
- Climate system efficiency: Proper thermal management reduced HVAC component failures by 82%
- Resale value restoration: SVs with documented proper battery replacements maintained 91% of pre-degradation value
“Economics isn’t just about upfront costs—it’s about total system value,” Chen states. “A $300 shortcut during installation can cost $2,400 in premature component failures.” Seattle owner Jennifer Park calculated her true savings: “The $8,600 I invested in a proper SV battery replacement actually saved me $4,200 in avoided brake, tire, and climate repairs over 18 months. Your battery swap isn’t an expense—it’s the foundation for your entire vehicle’s economic ecosystem.”
SV Battery Swap Technical Questions Answered by Integration Specialists
How can I verify that my specific SV model’s unique communication protocols will properly recognize an aftermarket battery pack during the critical handshake phase?
The protocol verification system engineered specifically for ZE1 communication architecture:
ZE1 integration specialist David Kim has personally verified communication compatibility for 387 SV battery replacements. “Most failures occur not from bad batteries, but from mismatched communication protocols between the replacement pack and the SV’s specific vehicle production date,” Kim explains. “True compatibility requires matching not just physical connectors, but the exact handshake sequence your specific SV expects based on its manufacturing date and software version.” His verification process includes:
- Production date cross-referencing: Matching your VIN against 14 documented SV communication protocol variations from 2017-2022
- Software version fingerprinting: Using your vehicle’s specific update history to determine required BMS communication parameters
- Thermal handshake simulation: Pre-testing the thermal sensor communication sequence before battery installation
- Real-time protocol monitoring: Using included diagnostic viewer to confirm each communication phase during installation
“Compatibility isn’t assumed—it’s proven through systematic verification,” Kim states. “We’ve documented every SV communication variation, including undocumented mid-year changes the factory never published.” Vancouver owner Robert Chen experienced this precision: “My 2019 SV had a software update in November 2020 that changed its thermal handshake sequence. The CNS team identified this through my VIN and pre-programmed my battery accordingly. It powered up perfectly on the first try. Your SV deserves exact protocol matching—not generic compatibility promises.”
Will the installation process require specialized tools that cost more than the battery itself, and how can I complete this in a standard home garage without a lift?
The garage-friendly tool ecosystem designed specifically for SV battery replacement:
Field engineer Lisa Chen designed CNS’s SV tool system after documenting 112 home garage limitations across North America. “Professional kits assume you have a two-post lift and $15,000 in diagnostic equipment—we engineered for your actual garage with concrete floors and basic hand tools,” Chen explains. “True accessibility means working within home mechanic constraints rather than demanding shop-level infrastructure.” Her system delivers:
- Floor-level installation sequencing: Complete procedure optimized for vehicles on jack stands rather than lifts
- Tool cost containment: $47 specialized tool bundle that replaces $1,800 professional equipment
- Common tool adaptations: Techniques using standard 10mm wrenches and socket sets already in your toolbox
- Space-efficient workflow: Component staging methods for single-car garages and limited work areas
“Accessibility isn’t theoretical—it’s respecting the physical reality of your workspace,” Chen notes. “Our SV kit arrives with exactly what you need for your space and budget, not what dealerships wish you had.” Portland owner Michael Reynolds implemented this approach: “I have a single-car garage with barely enough room to open the doors. The CNS kit included a collapsible work platform that attached to my jack stands, creating a stable surface exactly where I needed it. Their $47 tool bundle replaced the $1,800 diagnostic scanner other kits required. I completed my SV battery swap in my driveway using tools that fit in my existing toolbox. Your SV battery replacement shouldn’t require remodeling your garage—it should work within the space you already have.”