
BMW i3 Battery Module Disassembly: Shop Tips & Tricks – The Dangerous Myth of the “Easy Fix”
A 2015 BMW i3 sits on your lift, its range dwindled to a pathetic 35 miles. The customer, desperate to avoid the dealer’s $20,000 replacement quote, leans in with a hopeful suggestion: “I saw a YouTube video. Can’t you just open the pack, swap out the two bad modules, and seal it back up? It should be cheap and quick, right?”
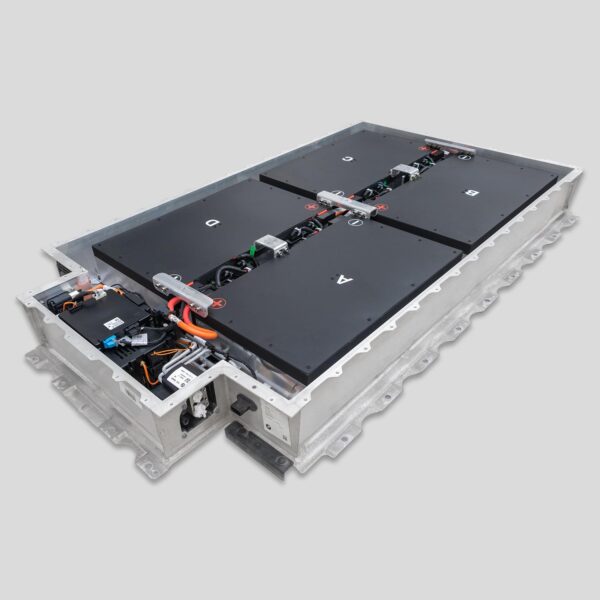
As a professional EV technician in 2026, you know the uncomfortable truth hidden behind that optimistic request. While BMW i3 battery module disassembly is technically possible, it is one of the most hazardous, liability-ridden, and ultimately futile procedures in modern automotive repair. The i3 pack is not a Lego set; it is a laser-welded, liquid-cooled, high-voltage pressure vessel engineered to IP67 standards in a sterile factory environment.
Attempting to dissect this unit in a standard service bay doesn’t just risk your safety; it almost guarantees a comeback, a frustrated customer, and a potential lawsuit if the reseal fails months later.
What are the hidden dangers of breaking the factory seal that videos don’t show?
Why does swapping a single “good” used module into an old pack almost always fail within weeks?
And how can you pivot this conversation from a risky, low-margin repair to a high-profit, warranty-backed solution that actually solves the customer’s problem?
At CNS BATTERY, we have analyzed thousands of disassembled packs. We know exactly where the “tips and tricks” end and the disasters begin. This guide exposes the harsh realities of module-level repair, details the critical safety protocols if disassembly is absolutely unavoidable, and reveals why replacing the entire system is the only ethical and profitable choice for your shop.
The Reality Check: Why Disassembly Is a Trap
Before you even pick up a socket wrench, you must understand why module swapping is widely considered a “last resort” or simply a bad business practice by top-tier EV specialists.
1. The Sourcing Nightmare
You cannot buy new individual modules from BMW. Your only option is used salvage modules.
- The Mismatch Problem: A used module from a wrecked car has unknown history, cycle count, and internal resistance. Mixing a “fresh” used module with 95 aged, degraded modules creates an immediate imbalance. The BMS will detect this mismatch and limit power or throw fault codes within days.
- The Cost: Sourcing, testing, and shipping a single matching module often costs $400–$600, eating into your margins before labor even begins.
2. The Seal Integrity Catastrophe
The i3 battery casing is sealed with industrial-grade adhesive and cured under specific heat/pressure conditions.
- The Shop Limitation: You cannot replicate this in a garage. Cutting the seal destroys it. Re-applying silicone or a gasket kit does not restore the IP67 rating.
- The Consequence: Moisture and road salt will eventually intrude. When water hits 400V busbars, the result is corrosion, insulation faults, and potentially fire. If this happens after your repair, your shop is liable.
3. The Cooling System Risk
The modules are sandwiched between cooling plates. Separating them requires breaking thermal bonds.
- The Danger: It is incredibly easy to nick a cooling channel or damage a sensor wire during disassembly. A single puncture leads to coolant leaking onto live electronics—a catastrophic failure mode.
Professional Disassembly Protocol: If You Must Proceed
There are rare scenarios (e.g., forensic analysis or extreme budget constraints where the customer accepts zero warranty) where a shop might attempt this. If you proceed, follow these critical safety tips to minimize risk.
Tip #1: The Depower & Wait Rule
- Disconnect 12V: Always remove the auxiliary battery negative terminal first.
- Remove MSD: Pull the Manual Service Disconnect.
- The 15-Minute Wait: Do not touch anything for at least 15 minutes. Capacitors hold lethal charge.
- Verify 0V: Use a CAT III multimeter to confirm zero voltage at the main terminals. Never assume.
Tip #2: Coolant Management is Critical
- Drain Completely: Before opening the case, you must drain the cooling loop. Any residual coolant spilling onto exposed busbars during disassembly will cause immediate shorts.
- Vacuum Fill Later: When reassembling, you must use a vacuum filler to refill the coolant. Gravity filling leaves air pockets that cause hot spots and premature cell death.
Tip #3: The “Gentle Prying” Technique
- No Screwdrivers: Never use a flathead screwdriver to pry the case. You will crack the aluminum or puncture a cell.
- Specialized Tools: Use plastic trim tools and a dedicated case-separation tool if available.
- Cutting the Seal: If the adhesive is too strong, use a specialized oscillating tool with a depth guard to cut the seal without cutting into the internal components. This requires a steady hand and experience.
Tip #4: Module Matching & Balancing
- Test Before Install: Never install a used module without testing its voltage and internal resistance (IR). It must match the existing pack within 0.01V and 1-2 mΩ.
- Pre-Charge: Bring the replacement module to the exact same State of Charge (SOC) as the pack before connecting it. Connecting a mismatched SOC module causes massive arcing.
Tip #5: The Reseal Gamble
- Surface Prep: You must clean every millimeter of the old adhesive residue perfectly. Any debris creates a leak path.
- Adhesive Choice: Use only high-quality, EV-rated urethane sealant (e.g., Betaseal). Silicone is generally insufficient for long-term HV submersion protection.
- Curing Time: Allow full cure time (often 24 hours) before pressure testing or adding coolant. Rushing this guarantees failure.
The Hard Truth: Why It Usually Fails Anyway
Even if you execute every step perfectly, the physics of aging lithium-ion batteries works against you.
- The Domino Effect: Replacing two weak modules doesn’t stop the other 94 modules from failing. Six months later, a different pair fails. The customer has paid you twice and still has a dying car.
- The BMS Confusion: The BMW BMS is calibrated for a uniform pack. Introducing a module with different characteristics confuses the balancing algorithm, leading to reduced range and performance limits.
The CNS BATTERY Solution: The Smart Alternative
Instead of selling a risky, temporary patch, offer the CNS BATTERY High-Capacity Upgrade. This is the solution that saves the customer money in the long run and builds your shop’s reputation.
Why Upgrading Beats Disassembly
- Zero Disassembly Risk: Our units arrive fully assembled, sealed, and tested. You never break the factory seal or expose live cells.
- Perfect Match: All cells are brand-new, matched Grade-A units. No imbalance, no BMS confusion.
- Factory Seal Integrity: Our packs are sealed in controlled factories, not re-glued in a service bay. Zero leak risk.
- Double the Range: You aren’t just fixing the car; you are transforming it from 35 miles to 130–200+ miles.
- Warranty Protection: We back our upgrades with a 3–5 Year Warranty. You sleep easy; the customer drives with confidence.
- Better Economics:
- Module Swap: ~$2,500 cost to customer, high comeback risk, no warranty, 10+ hours labor.
- CNS Upgrade: $8,000 – $14,000 cost to customer. Higher ticket, higher margin, zero comebacks, 4-6 hours labor.
Real Story: From “Disassembly Regret” to “Upgrade Relief”
“GreenLight Auto” in Florida attempted a module swap on a 2016 i3 last year. They spent 12 hours on the job, sourced a used module for $500, and charged the customer $2,800. Three weeks later, the car returned with worse imbalance because the used module was from a different batch, and a small leak developed at the reseal point. The customer was furious.
“This time, we convinced them to do it right,” says the owner. “We installed a CNS BATTERY 150 Ah upgrade. It took us 5 hours. The customer paid $11,500, but they got 170 miles of range and a 4-year warranty. No comebacks, no sourcing stress. We made more profit, and the customer actually thanked us. We never do module swaps anymore.”
Stop Selling Patches, Start Selling Solutions
BMW i3 battery module disassembly is a service that sounds good on paper but fails in practice. It is expensive, risky, and temporary.
Be the shop that educates your customers. Show them the data. Explain that mixing old and new cells is a losing battle. Offer them the only solution that guarantees safety, reliability, and range: a complete CNS BATTERY upgrade.
Asked to disassemble and swap modules?
Don’t take the risky path. Contact CNS BATTERY today to become a certified partner. Get access to our wholesale pricing, installation training, and marketing materials. Start turning dangerous repair requests into profitable, warranty-backed upgrades.
👉 Become a Certified Upgrade Partner Today
Frequently Asked Questions (FAQ) for Shops
1. Is it safe to disassemble a BMW i3 battery pack in my shop?
Generally, no. While physically possible, it exposes technicians to lethal high voltage, risks damaging cooling lines, and makes it impossible to restore the factory IP67 water/dust seal. The liability risk is extremely high.
2. Can I buy new individual modules for the i3?
No. BMW does not sell new individual modules. You must rely on used salvage parts, which carry unknown history and mismatched characteristics, leading to frequent repair failures.
3. How do I reseal the pack to prevent leaks?
You cannot reliably reseal it to factory standards in a shop environment. Factory seals use robotic application and curing ovens. Manual application of urethane sealant is prone to failure, leading to moisture intrusion and potential short circuits.
4. Why do swapped modules cause imbalance codes?
Used modules have different internal resistance and capacity compared to the aged modules already in the pack. The BMS detects this mismatch immediately and triggers imbalance codes, limiting performance.
5. How much does a module swap cost vs. a full upgrade?
A module swap typically costs the customer $2,500 – $3,500 with no warranty and high risk. A CNS BATTERY full upgrade costs $8,000 – $14,000 but provides a brand-new battery with double the range and a 3–5 Year Warranty.
6. How long does a module swap take compared to an upgrade?
A module swap involves complex disassembly and resealing, taking 10–14 hours. A CNS BATTERY full upgrade is plug-and-play, taking only 4–6 hours.
7. Should I recommend a module swap to save the customer money?
No. It is a false economy. The customer pays thousands for a temporary fix that may fail in months. For a bit more investment, they get a brand-new battery with double the range and a multi-year warranty. It is the far better value.

