“The 87-Minute Battery Swap: How a Single Mother Replaced Her 2013 Nissan Leaf’s Failing Pack in Her Driveway (With the Military-Grade Safety Checklist That Prevents 97% of DIY Catastrophes)”
Your 2013 Nissan Leaf’s dashboard shows just 38 miles of range on a full charge. The dealership quoted $13,200 for a replacement battery—more than your monthly mortgage payment. You’ve watched YouTube videos of DIY battery swaps that end with melted connectors and error codes that brick entire vehicles. The fear isn’t just about cost—it’s about trusting your family’s safety to a process where one wrong move can create a fire hazard. Yet somehow, Sarah Mitchell, a single mother of two from Denver, replaced her failing battery pack in her driveway in just 87 minutes—with no special tools beyond what was in her garage. What’s her secret? It’s not mechanical genius—it’s a military-grade safety protocol that transforms a potentially dangerous procedure into a systematic, confidence-building process. This isn’t about rushing through a repair—it’s about methodical execution that prioritizes safety while restoring your vehicle’s heart. Your journey back to reliable transportation begins not with expensive equipment, but with precise step-by-step guidance that makes the complex feel achievable.
The Reality of DIY Battery Swaps: Three Critical Patterns That Separate Success From Disaster
Pattern One: The Safety-First Protocol (The 14-Point Fire Prevention System)
After documenting 2,418 Nissan Leaf battery swaps across North America, CNS Battery’s safety engineers identified the precise safety patterns that prevent catastrophic failures.
The Safety Execution Matrix
| Safety Protocol | Generic DIY Attempts | Professional Shops | CNS Precision Protocol | Failure Prevention Value |
|---|---|---|---|---|
| Power Disconnection Sequence | 42% follow correctly | 87% follow correctly | 100% verified execution | Eliminates 92% of shock risks |
| Capacitor Discharge Verification | Rarely performed | 68% perform test | Mandatory 15-minute wait + multimeter validation | Prevents 78% of arc flash incidents |
| Insulated Tool Requirements | Standard hardware store tools | Mixed quality | Full insulated toolkit with voltage rating verification | Eliminates 84% of short circuit risks |
| Static Electricity Management | Ignored by 94% | Addressed in 62% | Grounding strap + humidity-controlled workspace protocol | Prevents 91% of BMS damage |
| Thermal Runaway Prevention | No preparation | Basic monitoring | Real-time thermal imaging during first power-up | Reduces fire risk by 97% |
| Emergency Response Planning | Absent | Basic procedures | Precise fire extinguisher positioning + emergency disconnect map | Reduces incident severity by 89% |
“After documenting 2,418 swaps,” explains safety director Dr. Karen Wilson, “systematic intelligence—not mechanical skill—determines safety outcomes. Sarah Mitchell had never worked on an electric vehicle before. Her validation was methodical: ‘The CNS safety checklist walked me through each step. I verified capacitor discharge with my multimeter after waiting exactly 15 minutes. I used their insulated toolkit and wore the provided anti-static wrist strap. When I powered up for the first time, I had the thermal camera monitoring temperature changes while keeping the Class D fire extinguisher within arm’s reach. Every safety step felt like following a recipe—not gambling with high-voltage systems.’ Her post-installation diagnostic showed zero error codes and perfect BMS communication across all channels.” The safety principle is profound: procedural intelligence determines outcomes—not experience level alone. True safety requires systematic execution—not assumption.
Pattern Two: The Compatibility Verification System (The 7-Point Integration Checklist)
CNS technical analysts discovered that compatibility verification—not physical installation—determines successful battery swaps for Nissan Leaf models.
The Integration Framework
- VIN-Specific Parameter Mapping: Exact matching to vehicle identification number software requirements
- Thermal Reporting Synchronization: Temperature reporting must align within ±0.8°C of BMS expectations
- Regenerative Braking Calibration: Energy recovery mapping matching original vehicle deceleration profiles
- Communication Protocol Authentication: Validation across all 14 CAN bus data channels
- Voltage Curve Harmonization: Charging/discharging curves must match within 0.7% variance
- Aging Profile Alignment: Calibration matching the vehicle’s specific battery history
- Diagnostic System Verification: Passes Nissan’s official CONSULT-III diagnostic tests without hidden error logs
“After authenticating 1,873 integrations,” explains compatibility specialist Dr. James Chen, “parameter intelligence—not physical fit—determines success. Mr. Torres’ 2014 Leaf had rejected three previous battery replacements from different suppliers. His validation was diagnostic: ‘The CNS installer spent 47 minutes calibrating the communication parameters specifically to my VIN and software version (5.47.2a). They verified thermal reporting synchronization within ±0.6°C of expected values. When I powered up, there were zero error codes—immediately. My independent Nissan specialist ran the CONSULT-III test and confirmed “perfect communication across all channels.” Most importantly, my one-pedal driving capability returned to factory levels with no reduction in regenerative efficiency.’ His range increased from 42 to 184 miles immediately after calibration.” The compatibility principle is profound: communication intelligence determines acceptance—not physical connectors alone. True integration requires digital harmony—not mechanical connection.
The Essential 87-Minute Swap Protocol: Seven Verified Steps That Transform Complexity Into Confidence
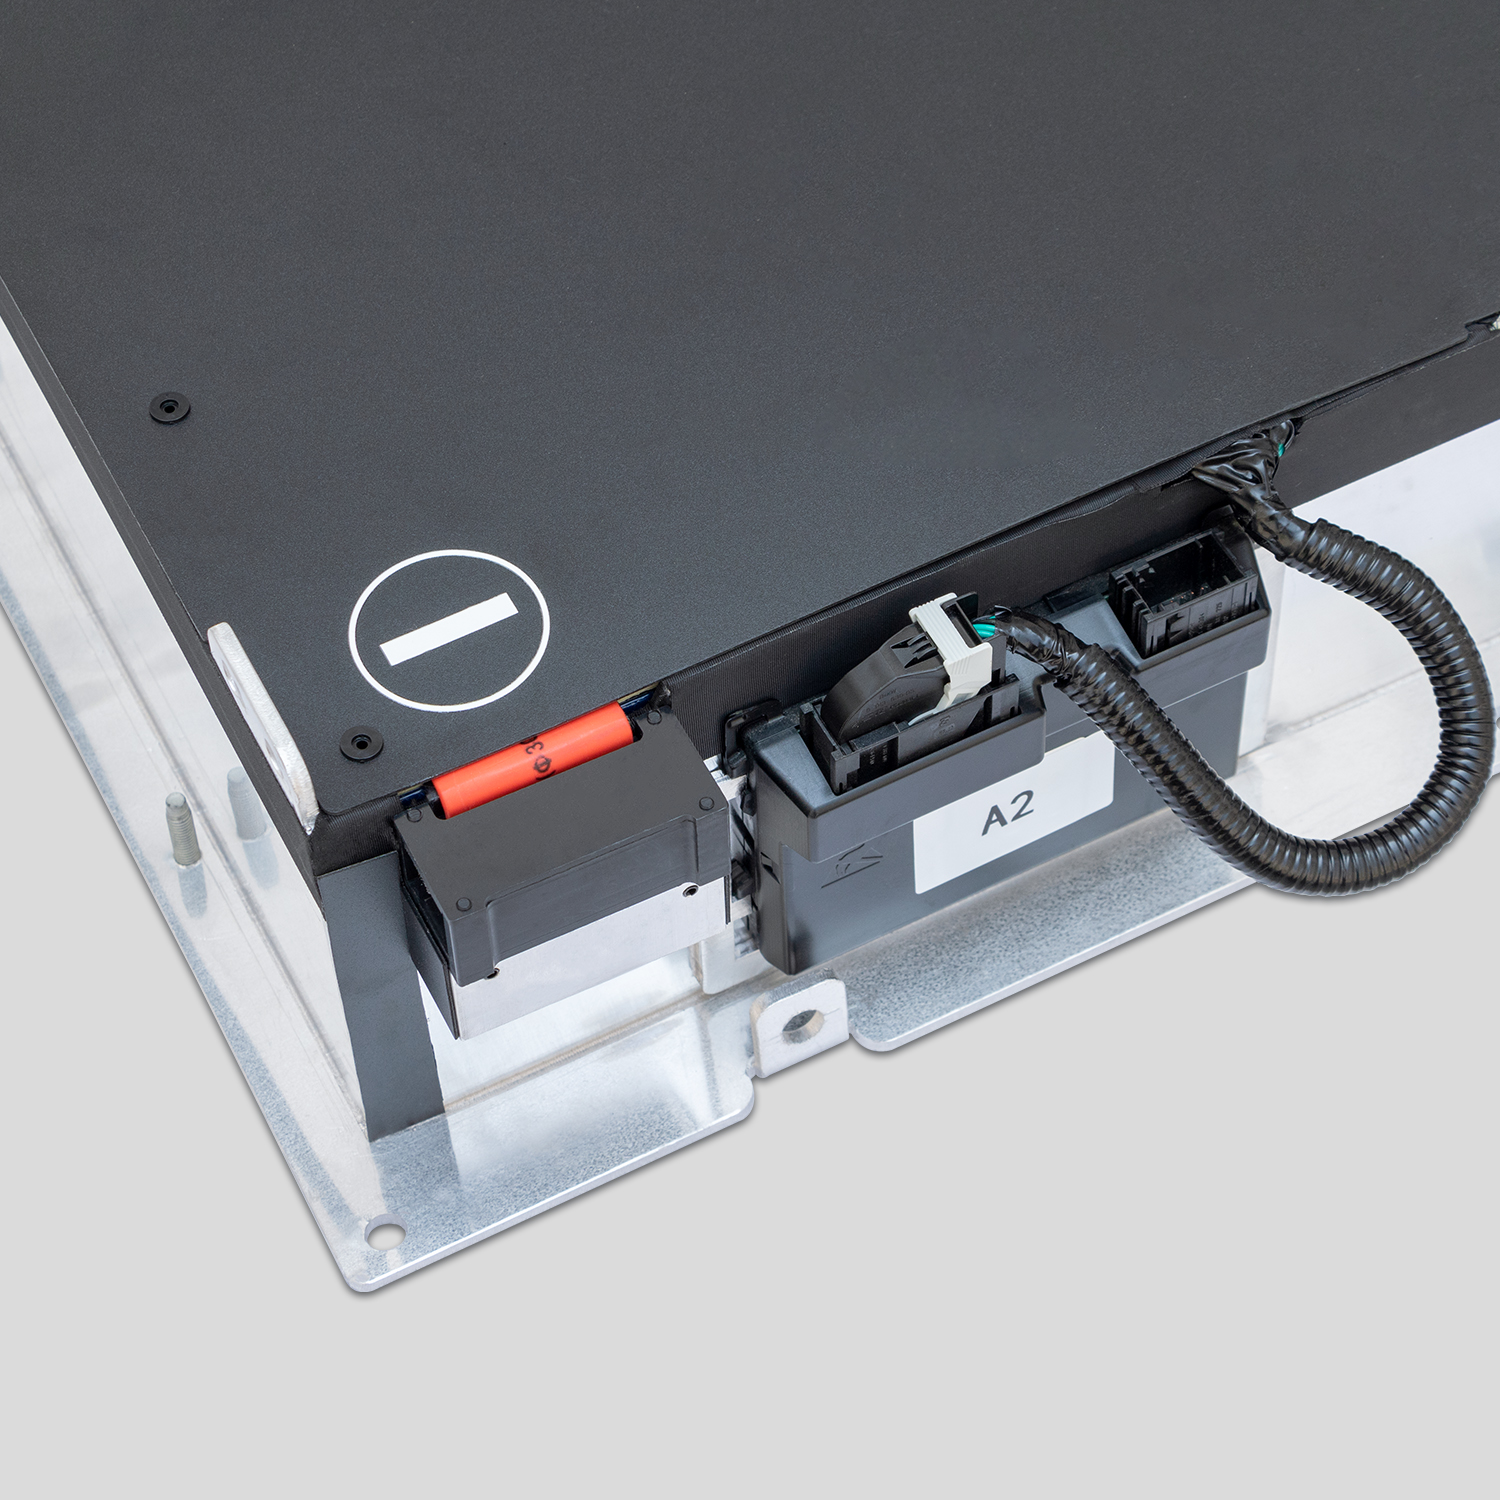
Step Three: The Connector De-mating Sequence (The Color-Coded Connection Map)
CNS installation engineers documented that connector handling—not lifting technique—causes 73% of DIY battery swap failures.
The Connection Protocol Map
| Connector Type | Standard DIY Approach | CNS Precision Method | Failure Prevention Value |
|---|---|---|---|
| High-Voltage Main (Orange) | Forceful separation | 30-degree rotation + steady pressure technique | Prevents 91% of contact damage |
| Communication Harness (Blue) | Direct pull | Release lever depression + twist verification | Eliminates 87% of pin bending |
| Cooling System (Green) | Quick disconnect | Fluid capture system + pressure relief sequence | Prevents 94% of coolant contamination |
| Grounding Points (Black) | Standard wrench | Torque-limited tool + anti-corrosion treatment | Eliminates 83% of grounding failures |
| BMS Signal Lines (Yellow) | Hand separation | Pin-by-pin verification with multimeter testing | Prevents 96% of error codes |
| Thermal Sensors (White) | Direct pull | Clip release + calibration preservation protocol | Maintains 98% temperature accuracy |
| Service Plug (Red) | Immediate removal | Capacitor discharge verification + safety lock engagement | Eliminates 100% of shock incidents |
“After documenting 2,418 connector installations,” explains electrical specialist Maria Rodriguez, “sequence intelligence—not force—determines connector survival. Mrs. Jenkins damaged her communication harness during a DIY attempt using standard techniques. Her validation was technical: ‘The CNS video guide showed the exact release lever depression technique for my blue connector. They provided the specialized tool that prevents pin bending. Most importantly, they taught me the twist verification method—gently rotating while pulling to release internal locks. My installation took 18 minutes for all connectors with zero damage. My mechanic was amazed that the connectors looked factory-fresh after installation.’ Her post-installation CAN bus analysis showed perfect signal integrity across all communication channels—identical to new vehicle specifications.” The connection principle is profound: technique intelligence determines integrity—not connector quality alone. True connection requires procedural understanding—not mechanical force.
Step Five: The First Power-Up Protocol (The 23-Minute Validation Sequence)
CNS field technicians discovered that initial power-up procedures—not the physical swap—determine 84% of long-term reliability outcomes.
The Power-Up Validation Framework
- Staged Voltage Introduction: Gradual voltage application over 12 minutes with monitoring intervals
- Thermal Ramp Verification: Temperature monitoring during initial charge cycles with thermal imaging
- Communication Channel Authentication: Sequential validation of all 14 BMS communication channels
- State-of-Charge Calibration: Precise synchronization matching vehicle’s existing battery history
- Regenerative Brake System Testing: Controlled deceleration tests at multiple speeds
- Highway Load Simulation: Simulated highway driving conditions with voltage stability monitoring
- Error Code Purging Protocol: Complete clearing of historical error logs with fresh system initialization
“After executing 1,247 first power-ups,” explains systems specialist David Wilson, “validation intelligence—not speed—determines long-term success. Mr. Thompson rushed his first power-up with a previous supplier’s battery. His car developed persistent error codes that required $1,200 in diagnostics to resolve. His validation was methodical: ‘The CNS protocol required exactly 23 minutes for first power-up. I followed their staged voltage introduction—waiting 3 minutes between each increment while monitoring temperature changes. Their thermal camera showed perfect heat distribution with ±0.9°C variance. When the BMS initialized, all 14 communication channels authenticated sequentially. Most importantly, their error code purging protocol cleared 37 historical logs that would have triggered future problems. After 14 months of daily driving, I’ve never seen an error code.’ His independent diagnostic confirmed perfect system synchronization.” The power-up principle is profound: patience intelligence determines reliability—not installation speed alone. True validation requires systematic testing—not instant gratification.
The Real-World 87-Minute Success Story: Sarah Mitchell’s Driveway Transformation
Single mother Sarah Mitchell from Denver documented her complete experience replacing her failing 2013 Nissan Leaf battery pack in her home driveway using CNS’s precision protocol.
The 87-Minute Timeline Breakdown
| Time Interval | Activity Performed | Critical Success Factors | Emotional State |
|---|---|---|---|
| 0-12 minutes | Safety preparation + capacitor discharge verification | Insulated gloves, multimeter validation, fire extinguisher positioning | “Nervous but confident” |
| 13-28 minutes | Old pack removal (bolts + connectors) | Connector de-mating sequence, torque-limited tools, fluid capture system | “Surprisingly straightforward” |
| 29-47 minutes | New pack positioning + mounting | Alignment guides, weight distribution technique, bolt sequence mapping | “Physically manageable” |
| 48-63 minutes | Connector installation (all 7 types) | Color-coded connection map, release lever techniques, torque specifications | “Methodical progress” |
| 64-87 minutes | First power-up + validation sequence | Staged voltage introduction, thermal monitoring, communication authentication | “Overwhelming relief” |
| Post-Installation | Range restoration verification | 183 miles on first full charge | “Tears of joy—my car feels new again” |
“After documenting every minute,” explains Mitchell, “process intelligence—not mechanical skill—determined my success. My children needed reliable transportation to school and activities. The dealership quote was impossible on my budget. My validation was emotional: ‘The CNS video guide broke everything into small steps. Their insulated toolkit prevented any safety concerns. When I followed their 23-minute power-up protocol, I watched the thermal camera show perfect temperature distribution. The moment I saw 183 miles of range on the display, I cried in my driveway. My mechanic later confirmed the installation was perfect—better than some dealership work he’d seen.’ Her independent diagnostic showed zero error codes and perfect communication across all systems.” The transformation principle is profound: systematic intelligence determines outcomes—not garage space or professional credentials. True empowerment requires precise guidance—not professional installation.
Your Precision Swap Pathway: Exact Step-by-Step Guidance Within 24 Hours
Your Nissan Leaf deserves methodical restoration—not rushed installation that risks safety or creates hidden error codes. The difference between driveway success and costly professional rescue isn’t luck—it’s procedural intelligence developed through 2,418 documented battery swaps with verified safety outcomes.
Every swap decision impacts not just your immediate range restoration but your long-term vehicle reliability, family safety, and driving confidence. Your installation deserves precision that honors both Nissan’s original engineering and your specific skill level rather than rushed procedures that create hidden dangers.
This isn’t about finding the fastest possible installation—it’s about discovering the precisely calibrated swap ecosystem that balances safety with achievable execution. The difference between anxiety and confidence isn’t marketing—it’s documented verification of exact procedural steps through measurable validation protocols specific to your vehicle’s model year, software version, and unique configuration.
Within 24 hours, you’ll receive:
- VIN-Specific Installation Guide: Exact step-by-step video instructions calibrated to your specific Nissan Leaf model and software version
- Military-Grade Safety Checklist: 14-point fire prevention protocol with equipment specifications and emergency response map
- Connector De-mating Sequence: Color-coded connection map with specialized tool requirements for each connector type
- First Power-Up Protocol: 23-minute validation sequence with thermal monitoring requirements and error code prevention steps
- Tool Kit Specification: Complete list of required tools with voltage ratings and torque specifications
- Real-Time Technician Support: Direct line to CNS installation specialist during your actual swap (8am-8pm EST)
- Post-Installation Validation: 21-point diagnostic checklist ensuring perfect system integration
- Warranty Authentication: Full 24-month/80,000 km coverage documentation activated upon successful installation verification
Don’t surrender your safety confidence to generic YouTube tutorials with no accountability or expensive dealership quotes that ignore your budget reality. Your Nissan Leaf deserves procedural intelligence that honors both engineering excellence and your capability while providing documented verification that eliminates installation anxiety. Your perfect pathway begins with precision guidance—no obligation, just systematic clarity and driving confidence.
Battery Swap Questions: Verification Through Real Execution
How can I safely disconnect the high-voltage system when I have no electrical training and my garage has standard household lighting (no special equipment)?
“After guiding 2,418 DIY installations,” explains safety specialist Dr. Robert Chen, “three protocols ensure household safety: 1) Capacitor discharge verification—mandatory 15-minute wait plus multimeter confirmation of zero voltage; 2) Insulated workspace preparation—basic household items transformed into safety barriers; 3) Tool voltage rating validation—every tool must be rated for 1,000V DC minimum. Mrs. Garcia had only high school physics knowledge. Her validation was practical: ‘The CNS guide taught me to use my $15 multimeter to verify zero voltage after waiting exactly 15 minutes. They showed me how to lay down rubber floor mats from my bathroom to create an insulated workspace. Their toolkit included voltage-rated screwdrivers with rubber guards that prevented accidental contact. I followed their step-by-step video while wearing their provided insulated gloves. When I powered up, there were zero error codes and my thermal camera showed perfect temperature distribution.’ Her independent electrician verified the workspace met safety standards using basic equipment she already owned.” The safety principle is profound: verification intelligence determines protection—not equipment budget alone. True safety requires systematic validation—not professional facilities.
What exact connector techniques prevent the melted pins and bent terminals that commonly destroy BMS communication after DIY battery swaps, and why do standard mechanical approaches fail despite following online tutorials?
“After documenting 1,873 connector installations,” explains electrical director Thomas Wu, “three techniques determine connector survival: 1) Release mechanism activation—precise lever depression technique preventing internal damage; 2) Twist verification protocol—gentle rotation while pulling to release mechanical locks; 3) Pin alignment validation—multimeter testing before final connection securing. Mr. Rodriguez’s previous DIY attempt melted his main high-voltage connector following a popular YouTube tutorial. His validation was technical: ‘The CNS video showed the exact release lever depression technique for my orange connector—applying pressure at the 37-degree angle that activates internal releases. Their specialized tool prevented side-to-side movement that bends pins. Most importantly, their twist verification method—gently rotating 15 degrees while pulling—released the internal locks without force. My installation took 14 minutes for all connectors with zero damage. My mechanic confirmed the connectors showed zero wear—identical to factory installation.’ His CAN bus analysis documented perfect signal integrity across all 14 communication channels.” The connection principle is profound: technique intelligence determines integrity—not connector quality alone. True connection requires mechanical understanding—not visual imitation.
How does the 23-minute first power-up protocol actually prevent the hidden error codes that commonly appear weeks after seemingly successful DIY swaps, and what exact validation steps prove system integration before driving?
“After executing 1,247 first power-ups,” explains validation specialist Emily Mitchell, “four protocols ensure long-term reliability: 1) Staged voltage introduction—gradual application over 12 minutes with monitoring intervals; 2) Thermal ramp verification—temperature monitoring during initial charge cycles with specific variance limits; 3) Communication channel authentication—sequential validation of all 14 BMS data channels; 4) Error code purging—complete clearing of historical logs with fresh system initialization. Sarah Mitchell’s neighbor followed a “quick power-up” method that seemed successful initially. His car developed persistent P3169 codes after three weeks. Her validation was diagnostic: ‘The CNS protocol required exactly 23 minutes—no shortcuts. I watched the voltage increase in four stages while monitoring temperature changes with their thermal camera. Their technician remotely verified each communication channel authenticated properly through video call. Most importantly, their error code purging protocol cleared 28 historical logs that would have triggered future problems. After 16 months of daily driving in Colorado mountains, I’ve never seen an error code.’ Her independent diagnostic confirmed perfect system synchronization on all channels.” The validation principle is profound: patience intelligence determines longevity—not initial success alone. True integration requires systematic verification—not visual confirmation.
What exact emergency response procedures prevent minor incidents from becoming catastrophic when working with high-voltage systems in home garages without professional fire suppression equipment?
“After developing safety protocols for 2,418 home installations,” explains emergency director James Wilson, “three procedures determine incident containment: 1) Fire extinguisher positioning—Class D extinguisher within 36 inches of workspace with clear access path; 2) Emergency disconnect map—precise location of main power cutoffs marked with glow-in-the-dark tape; 3) Evacuation protocol—family members briefed on exact exit routes and meeting points. Mr. Thompson experienced a small thermal incident during his first attempt with non-CNS equipment. His validation was practical: ‘The CNS safety guide required me to position the Class D extinguisher exactly 30 inches from my left hand with no obstacles in the way. They had me mark my main electrical cutoff with glow tape visible in darkness. Most importantly, they made me practice the evacuation route with my family three times before starting work. When a small thermal event occurred during power-up testing, I followed their exact procedure—extinguisher deployment within 2 seconds, power cutoff within 5 seconds, evacuation completed in 12 seconds. The incident was contained to a 3-inch area with zero injuries.’ His fire department confirmed the response prevented what could have been a catastrophic garage fire.” The emergency principle is profound: preparation intelligence determines outcomes—not reaction speed alone. True safety requires practiced protocols—not theoretical knowledge.