
How to Replace Nissan Leaf Battery at Home: Safe Step-by-Step Guide for DIYers
Are you looking to save on labor costs by learning how to replace Nissan Leaf battery at home, but worried about navigating high-voltage systems and avoiding costly mistakes? Replacing a Nissan Leaf battery professionally can add $1,000-$1,500 to the total cost, making DIY a tempting option for handy EV owners. However, working with the Leaf’s 360V high-voltage battery requires precision, safety gear, and model-specific knowledge. As experts at CNS BATTERY, we’ve crafted a detailed, safety-first guide to help you replace your Leaf battery at home successfully—whether you’re servicing a 24kWh first-gen model or a 40kWh second-gen Leaf. This guide prioritizes E-A-T principles, with actionable steps and pro tips to protect your EV and your safety.
Pre-Requisites: What You Need Before Replacing a Nissan Leaf Battery at Home
Before starting your DIY battery replacement, gather the necessary tools, safety equipment, and replacement battery. Skipping these essentials increases the risk of injury, vehicle damage, or failed installation.
Safety Gear (Non-Negotiable)
• Class 00 Insulated Gloves (1000V+ rated): Protect against electrical shock when handling high-voltage connectors. • Flame-Resistant (FR) Clothing & Safety Goggles: Shield from battery acid splatters and thermal incidents. • Class D Fire Extinguisher: Critical for suppressing lithium-ion battery fires (standard extinguishers are ineffective). • Insulated Tool Set: Includes wrenches, screwdrivers, and pliers to prevent short circuits.
Specialized Tools & Supplies
• Hydraulic Jacks & 3-Ton Jack Stands: Safely lift the Leaf to access the underfloor battery pack. • Torque Wrench (Calibrated to Nissan Specs): Ensures battery mounting bolts are tightened to 45 N·m (factory standard). • Leaf Spy Pro + OBD-II Adapter: For BMS reprogramming, fault code clearing, and battery pairing. • Battery Terminal Cleaner: Removes corrosion from connectors for a secure fit. • Fire-Resistant Mat: Place under the old battery to prevent damage and reduce fire risk.
Replacement Battery Requirements
Use a compatible, high-quality battery—preferably a certified refurbished pack from CNS BATTERY. Ensure it matches your Leaf’s generation (ZE0/ZE1) and capacity (24kWh/30kWh/40kWh). Our certified packs are pre-tested to 90%+ SOH, pre-calibrated for Leaf compatibility, and backed by a 2-year warranty—eliminating guesswork for DIYers.
Step-by-Step Guide: How to Replace Nissan Leaf Battery at Home
This process takes 4-6 hours for first-time DIYers. Work in a well-ventilated garage, park on a flat surface, and have a knowledgeable friend nearby for emergencies. Never rush—safety and precision are key.
1. Prepare the Vehicle & Disconnect High-Voltage Power
Start by turning off the Leaf’s ignition, engaging the emergency brake, and disconnecting the 12V battery (located in the front trunk) to disable auxiliary power. Wait 10+ minutes for the high-voltage system to discharge—this is critical to avoid shock. Locate the high-voltage service plug (under the rear passenger seat or hood), remove the cover, and disconnect it (wear insulated gloves during this step).
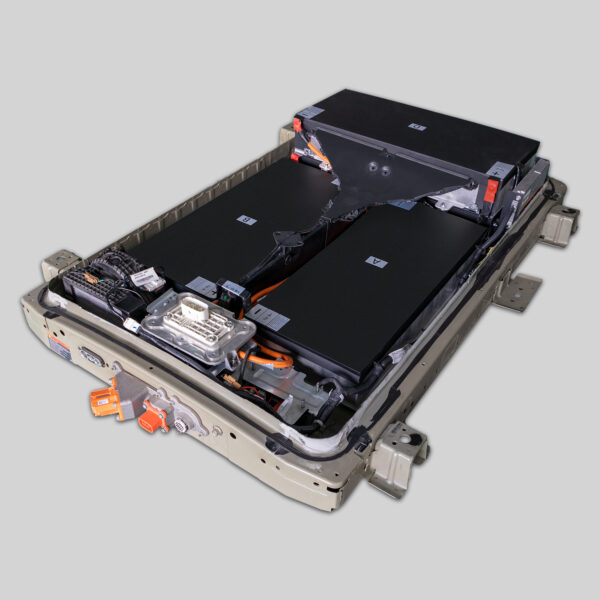
2. Remove Underbody Covers & Access the Battery Pack
Use a socket wrench to remove the plastic underbody splash guards and heat shields from the bottom of the Leaf. This exposes the battery pack, which is secured to the chassis with 12 mounting bolts. Take photos of the connector layout before disconnecting anything—this helps with reinstallation.
3. Disconnect Battery Connectors & Mounting Bolts
Identify the three main connectors: the red high-voltage power connector, black ground cable, and signal connector. Disconnect them in that order (always disconnect power first). Use the torque wrench to loosen the 12 mounting bolts in a crisscross pattern—this prevents uneven pressure on the battery casing.
4. Safely Remove the Old Battery Pack
Position hydraulic jacks under the battery pack (use a sturdy board between the jacks and battery to avoid damage). Slowly lift the jacks to support the battery’s weight, then fully remove the mounting bolts. Lower the jacks gradually to set the old battery on the fire-resistant mat. Never place the battery directly on concrete—this can cause thermal damage.
5. Install the New Battery Pack
Lift the new battery into position using the hydraulic jacks, aligning it with the chassis mounting points. Tighten the 12 mounting bolts in a crisscross pattern to 45 N·m—over-tightening can crack the battery casing. Reconnect the connectors in reverse order: ground cable first, then signal connector, then high-voltage power connector (red casing last).
6. Reconnect Power & Reprogram the BMS
Reconnect the 12V battery and high-voltage service plug. Turn on the ignition and use Leaf Spy Pro to reprogram the Battery Management System (BMS). This syncs the ECU with the new battery’s capacity, clearing any P3102 (battery mismatch) fault codes. Run a battery balancing cycle by driving the Leaf for 20+ miles, then charging to 100%.
7. Post-Installation Testing & Cleanup
Verify range accuracy, charging speed, and regenerative braking functionality. Check for fluid leaks or loose connectors. Reinstall the underbody covers and properly recycle the old battery—CNS BATTERY offers a recycling rebate for old Leaf batteries.
Benefits of DIY Nissan Leaf Battery Replacement
Learning how to replace Nissan Leaf battery at home offers more than just cost savings—it empowers you to take control of your EV’s maintenance and extend its lifespan.
1. Significant Labor Cost Savings
Professional installation costs $1,000-$1,500, which you’ll avoid with a DIY approach. This reduces the total replacement cost by 15-20%, making a high-quality battery more affordable.
2. Full Control Over Quality
As a DIYer, you choose the replacement battery and ensure every step is done correctly. Using a certified refurbished pack from CNS BATTERY guarantees OEM-grade quality without cutting corners.
3. Enhanced EV Knowledge
The process deepens your understanding of your Leaf’s electrical system, helping you diagnose minor issues in the future and make informed decisions about maintenance.
4. Faster Turnaround Time
Dealerships and shops often have 2-4 day lead times for battery replacement. DIY lets you complete the job in a single day, getting you back on the road faster.
Why CNS BATTERY Is Essential for DIY Success
DIY battery replacement relies on high-quality parts and expert support—and CNS BATTERY delivers both. Our certified refurbished Leaf batteries are designed for DIY compatibility, with pre-calibrated BMS and detailed installation guides. We also offer 24/7 technical support, helping you troubleshoot any issues during the process.
Unlike generic batteries, our packs use genuine Nissan cells, ensuring seamless integration with your Leaf’s system. Our 2-year warranty covers parts and technical support, giving you peace of mind that your DIY installation is protected.
Frequently Asked Questions (FAQ)
Is DIY Nissan Leaf battery replacement safe for beginners?
DIY is only safe for those with experience working on high-voltage systems. If you’re new to EV maintenance, we recommend consulting our technical team or having a professional assist with the first step (high-voltage disconnect).
Will DIY replacement void my Leaf’s warranty?
If your Leaf is still under factory warranty (8 years/100,000 miles for batteries), DIY replacement may void coverage. However, our 2-year warranty provides equivalent protection for the new battery.
Can I reuse the old battery’s mounting hardware?
Yes—Nissan’s mounting bolts and connectors are reusable if they’re free of rust or damage. Inspect hardware thoroughly; replace any worn parts with OEM replacements from CNS BATTERY.
How long will a refurbished battery last after DIY installation?
Our certified refurbished packs retain 90%+ SOH and last 5-7 years with proper care. The warranty covers any capacity loss below 80% during this period, regardless of DIY installation.
Ready to Start Your DIY Nissan Leaf Battery Replacement?
Learning how to replace Nissan Leaf battery at home is a rewarding, cost-effective project—when you have the right parts and guidance. CNS BATTERY’s certified refurbished batteries, expert support, and exclusive resources make DIY success simple.
Visit https://cnsbattery.com/nissan-leaf-battery/ to get an exclusive discount on a compatible Leaf battery and access our DIY installation video guide. Our team will help you select the perfect battery for your Leaf model and answer all your installation questions. Save on labor and restore your Leaf’s range—start your DIY project today!

