
DIY Leaf ZE1 Battery Installation: Everything You Need to Know
Last Updated: May 9, 2026 | Author: CNS BATTERY EV Expert
If you own a Nissan Leaf ZE1 (specifically the 2011-2013 models), you know that battery degradation is the inevitable hurdle. The good news? Replacing your old, depleted pack with a brand-new, high-capacity solution is no longer a myth reserved for dealerships. With the right knowledge and tools, a DIY Leaf ZE1 battery installation is a viable, cost-saving reality.
As an expert in EV powertrains, I’m here to guide you through the entire process. Whether you’re looking to restore your 24kWh to its former glory or upgrade to a massive 62kWh for long-range driving, this guide covers the “why,” the “how,” and the critical safety steps.
🚗 Why Choose a DIY Replacement for Your Leaf ZE1?
The Nissan Leaf ZE1 was a pioneer, but its original batteries often struggle to hold a charge after a decade of use. Instead of facing a $15,000+ dealership bill, thousands of owners are opting for a direct swap.
The Core Benefits:
- Massive Cost Reduction: By cutting out the labor markup, you save significantly. A professional replacement can cost double what a direct-to-consumer pack costs.
- Upgradability: Unlike the OEM, we aren’t limited to your original specs. You can often upgrade your Leaf ZE1 battery capacity (e.g., from 24kWh to 40kWh or 62kWh) during the installation, effectively turning your old car into a long-range EV.
- Control: You know your car best. Handling the install yourself ensures no corners are cut on safety or connection integrity.
⚙️ Pre-Installation: Tools & Preparation
Before you jack up the car, gather these essentials. Proper preparation is the key to a smooth Leaf ZE1 battery replacement.
1. Tools You Will Need
- Lifting Equipment: A car jack and sturdy axle stands (or a lift, if available).
- Socket Wrench Set: Specifically, you’ll need various sizes for bolts (usually 10mm, 14mm, 17mm, and 19mm).
- Torque Wrench: Crucial. Batteries are heavy; you must torque the mounting bolts to Nissan specifications to prevent rattling or chassis damage.
- Insulated Gloves: Safety first. Even though the Leaf uses lower voltage than Teslas, high-current DC is dangerous.
- Diagnostic Tool: An OBD2 scanner capable of resetting the Battery Management System (BMS) or reading codes (e.g., LeafSpy Pro).
2. Workspace Safety
- Location: Work in a dry, well-ventilated garage. Never work on the battery in the rain.
- Power Down: Ensure the car is completely off, and the key fob is far away from the vehicle to prevent accidental activation.
🛠️ Step-by-Step: The Removal Process
This section details how to remove the “dead weight” to make way for your new power source.
Step 1: Lift and Secure
Jack up the rear of the car and place it securely on axle stands. Remove the rear underbody covers.
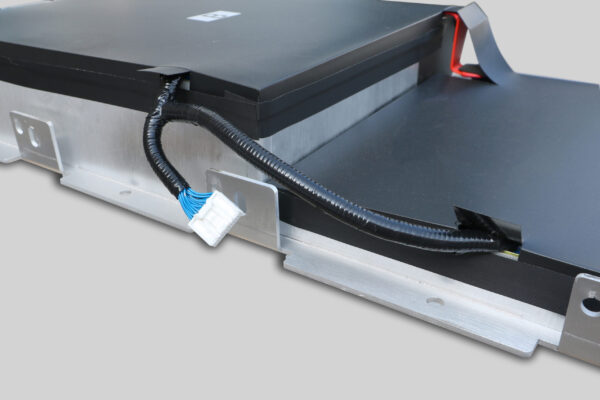
Step 2: Disconnect the HV Connector
Locate the large orange High Voltage (HV) connector on the side of the battery. This is the most critical safety step. Open the locking mechanism and disconnect it. Note: Always insulate the disconnected plug with tape to prevent accidental contact.
Step 3: Disconnect the Cooling Lines
The ZE1 battery has coolant lines running to the heat exchanger.
- Place a catch pan underneath.
- Carefully disconnect the quick-connect hoses.
- Tip: Have some spare coolant ready for topping up later.
Step 4: Remove the Mounting Bolts
There are typically 4-6 large bolts securing the battery to the chassis. Remove these carefully. The battery is heavy (approx. 300kg for a full pack), so ensure you have help or a lifting sling to lower it out safely.
🔋 Installing Your New Battery Pack
Now comes the exciting part—installing your new CNS BATTERY pack.
1. Physical Installation
- Alignment: Carefully lift the new pack into place. The mounting points on a Nissan Leaf ZE1 battery are designed to be OEM-standard, so it should slide in perfectly.
- Torque: Reinstall the mounting bolts. Do not overtighten. Refer to the service manual torque specs (usually around 80-100 Nm for the main bolts).
2. Reconnecting the Systems
- Cooling System: Reconnect the coolant lines. Double-check for leaks.
- HV Cable: Reconnect the orange high-voltage cable. Ensure the locking clip clicks audibly.
3. The “Magic” Step: BMS Programming
This is where many DIYers get stuck. A brand-new battery pack needs to be “introduced” to your car’s brain.
Expert Insight: Unlike refurbished packs that might retain old data, a brand-new lithium battery pack from a reputable manufacturer like CNS comes with a blank or updated BMS. You will likely need to perform a BMS reset or update via a diagnostic tool.
- Connect your OBD2 tool.
- Follow the manufacturer’s specific protocol (provided in the manual or via support) to sync the BMS.
- Once synced, turn the car on.
📈 Upgrading Your Leaf ZE1 Battery Capacity
One of the biggest advantages of working with a specialized manufacturer is the ability to upgrade.
| Original Pack | Upgrade Option | Resulting Range (Est.) |
|---|---|---|
| 24 kWh | 40 kWh | ~170 km |
| 24 kWh | 50 kWh | ~220 km |
| 24 kWh | 62 kWh | ~270 km |
Note: Upgrading requires ensuring your car’s software and charger module are compatible with the higher voltage/capacity. Consult with our technical team before ordering.
🛡️ Safety and Warranty: Don’t Skip This
While DIY Leaf battery replacement saves money, it can void your warranty if not done correctly.
- Physical Integrity: Ensure no wires are pinched during reassembly.
- Coolant Levels: Top up the coolant and bleed the system to avoid overheating errors.
- Warranty Registration: After a successful install, register your product. A reputable supplier (like us) offers a 2-year / 80,000 km warranty on new packs, but this usually requires proof of correct installation procedures.
💡 Frequently Asked Questions (FAQ)
Q1: Can I really install a Nissan Leaf ZE1 battery myself?
A: Absolutely. The process is largely mechanical (bolts and bolts). However, the BMS programming is the technical hurdle. If you are not comfortable with electronics, we offer video call support to guide you through the software side, or you can take it to a local mechanic for the final programming step.
Q2: How long does the installation take?
A: For a seasoned DIYer, expect 2 to 3 hours. This includes draining the coolant, lifting the pack, and refilling. If you are doing it for the first time, allocate half a day to avoid rushing.
Q3: What is the difference between a new pack and a refurbished one for the ZE1?
A: This is vital. Refurbished packs are old batteries with new cells inserted. They often have weak casings and degraded connectors. A brand-new lithium battery pack (like those from CNS) is built from the ground up with new enclosures, new hardware, and new cells (often CATL), guaranteeing structural integrity and a full lifespan ahead.
Q4: Will my car recognize the new battery immediately?
A: Not usually. The car needs to “learn” the new battery’s characteristics. This involves a reset procedure or a software update for the BMS. We provide detailed manuals and video tutorials specific to the ZE1 model to walk you through this.
Ready to Revive Your Leaf?
Don’t let a dead battery sideline your Nissan Leaf ZE1. With the right preparation and a high-quality replacement pack, you can add another 10 years of life to your vehicle.
Get Your Free Custom Quote Today
Whether you need a direct 24kWh replacement or want to upgrade to a 62kWh monster pack, our experts are ready to help.


