
Here is the SEO-optimized article tailored for the Nissan Leaf AZE0/AZE1 battery upgrade market.
Nissan Leaf AZE0/AZE1 New Battery Upgrade: Step-by-Step Guide
Is your Nissan Leaf AZE0 or AZE1 struggling to keep up with your daily commute? You’re not alone. As the miles add up, the original 40kWh or 62kWh lithium battery packs in these models often face significant degradation. The good news is that a full battery replacement or capacity upgrade doesn’t have to cost a fortune.
At CNS BATTERY, we specialize in providing high-performance, OEM-compatible battery solutions for Nissan Leafs. Whether you drive the older AZE0 generation or the updated AZE1 model, upgrading your battery pack is the most cost-effective way to revive your EV’s “second life.”
This comprehensive guide will walk you through the benefits of upgrading and provide a detailed step-by-step installation process to ensure a smooth transition back to the open road.
Why Upgrade Your AZE0/AZE1 Battery?
Before diving into the technical steps, let’s address the “why.” The Nissan Leaf AZE0 (2013-2017) and AZE1 (2018-2023) were pioneers in the EV market, but their batteries have a finite lifespan.
- Restore Range: Degraded batteries often drop below 150km (93 miles) of range. Upgrading to a new 40kWh, 50kWh, or even a 62kWh pack can restore your range to over 270km (168 miles).
- Cost Efficiency: Replacing the entire car is expensive. A direct-fit battery swap saves you thousands compared to buying a new EV or an OEM factory battery.
- Safety & Reliability: Old batteries can suffer from cell imbalance and thermal issues. A brand-new pack from a reputable manufacturer ensures ultimate safety and zero-failure reliability.
Step 1: Pre-Installation Preparation
Safety is paramount. Before touching any tools, ensure you have the following:
- The Right Kit: Ensure you have selected the correct voltage and capacity (e.g., 40kWh or 62kWh) specifically designed for the Nissan Leaf AZE0/AZE1 chassis. Our packs are built using brand-new CATL (Contemporary Amperex Technology) cells, ensuring top-tier performance.
- Tools: You will need insulated wrenches, torque wrenches, anti-static gloves, and safety glasses.
- Environment: Work in a dry, well-ventilated area. Disconnect the vehicle from any charging source at least 10 minutes prior.
Step 2: Vehicle Positioning and Access
- Lift the Vehicle: Use a hydraulic lift or jack stands to safely raise the vehicle. The battery pack is located under the cabin floor.
- Remove Undertray: Remove the plastic undertray shields to expose the battery casing bolts. Be mindful of the clips; having spares on hand is recommended.
Step 3: Disconnecting the Old Battery
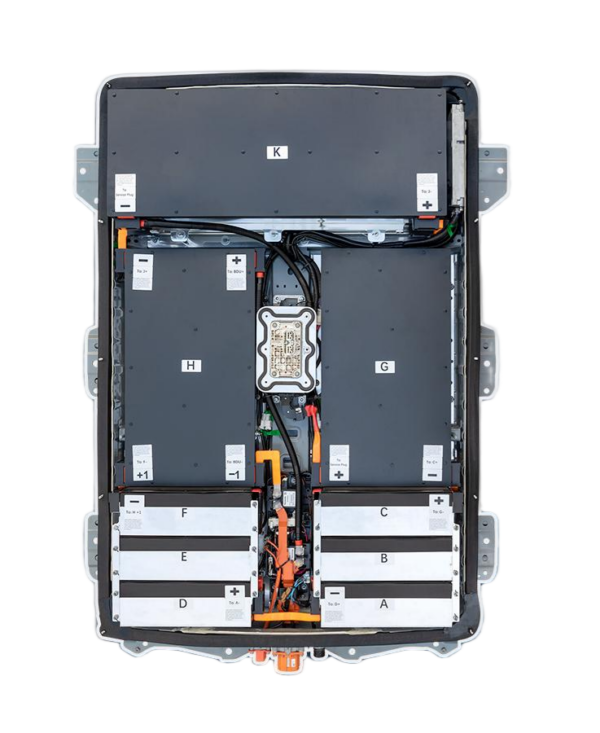
- High Voltage Disconnect: Locate the Maintenance Plug (Service Disconnect) inside the battery pack compartment (usually accessed from the rear seat or trunk side panel). Remove this to cut off high voltage.
- Unbolt the Pack: There are typically 32 bolts securing the battery to the chassis. Remove these methodically, starting from one side to avoid warping.
- Disconnect Cables: Carefully disconnect the high-voltage (HV) cables and the low-voltage communication harness. Tip: Take photos at this stage to remember the exact routing for the new pack.
Step 4: Installing the New CNS Battery Pack
This is where the “Plug-and-Play” design of our batteries makes a difference.
- Positioning: Carefully lift the new battery pack into place. Our packs are designed for OEM-standard precise adaptation, meaning the mounting points, brackets, and connector positions match the original factory specifications exactly.
- Reconnect Harnesses: Reattach the low-voltage communication harness and the HV cables. Ensure the connectors are fully seated and locked.
- Secure the Bolts: Reinstall the chassis bolts. We recommend torquing them to the manufacturer’s specification (usually around 80-100 Nm) to ensure a secure fit without damaging the threads.
Step 5: System Integration and Testing
- Reinstall Maintenance Plug: Carefully reinsert the service disconnect.
- Power On: Turn the vehicle ignition on. The dashboard should initialize without any battery fault codes.
- BMS Programming: This is a critical step. Our batteries come with advanced Battery Management Systems (BMS). In most cases, the car will automatically recognize the new battery. However, for a full handshake, you may need to reset the BMS via the OBD2 port. Note: Our customer service provides remote video guidance for this step if needed.
- Test Drive: Take a short drive to verify regenerative braking and acceleration functions are normal.
Frequently Asked Questions (FAQ)
1. Is the installation process the same for AZE0 and AZE1 models?
Yes, the mechanical installation process (bolts, brackets, and physical dimensions) is nearly identical between the AZE0 and AZE1 generations. However, the internal electronics and BMS software might differ based on the year. Always confirm compatibility with our team before ordering.
2. Do I need special tools to upgrade the battery?
No specialized Nissan-specific diagnostic tools are required for the physical swap. Basic automotive tools (wrenches, jacks) are sufficient. However, a laptop or diagnostic scanner can be helpful for clearing any residual error codes after the swap, though our plug-and-play design usually prevents this.
3. What kind of warranty comes with the new battery?
We stand by our quality. All CNS Automotive Batteries come with a minimum 2-year or 80,000km warranty (whichever comes first). This covers defects in materials and workmanship, as well as performance degradation (ensuring the battery maintains at least 70% capacity).
4. Can I upgrade from a 40kWh to a 62kWh pack?
Absolutely. One of the biggest advantages of using an aftermarket specialist like CNS is the ability to upgrade capacity. Our 62kWh packs are engineered to fit the AZE0/AZE1 chassis perfectly, offering a significant range boost over the stock option.
5. How long does the entire process take?
For a professional technician, the physical swap usually takes 1-2 hours. If you are a DIY enthusiast following our video tutorials, it may take up to 3 hours the first time.
Ready to Revive Your Nissan Leaf?
Don’t let a worn-out battery limit your adventures. Whether you drive an AZE0 or AZE1, upgrading to a high-quality, cost-effective solution is the smartest financial decision for your EV.
At CNS BATTERY, we are committed to reliable innovation, helping you extend your range and improve safety without breaking the bank.


