
🛠️ The Ultimate Guide to DIY Nissan EV Lithium Battery Installation on a Budget
Are you facing the dreaded “EV Battery Replacement Cost Shock”?
If you own a Nissan Leaf (ZE0, AZE0, or ZE1) or a Nissan e-NV200, you know the feeling. Your battery has degraded, the range is suffering, and the dealership quote is astronomical. Often, replacing the battery with an OEM part can cost upwards of $16,000.
But there is a smarter, more affordable path: DIY Nissan EV Lithium Battery Installation.
As a leading manufacturer in the EV aftermarket, we understand the hesitation many drivers have about tackling such a major project themselves. However, with the right budget-friendly battery solution and the proper guidance, this is a project that can save you thousands while extending the life of your beloved EV.
This guide will walk you through why a DIY approach is viable, how to select the right battery for your budget, and the step-by-step process to get you back on the road with maximum range.
💰 Why DIY Nissan EV Battery Installation Makes Financial Sense
The primary driver for most EV owners considering a DIY swap is simple: Cost Savings.
Let’s break down the math for a typical Nissan Leaf owner looking to upgrade from a degraded 40kWh pack to a brand new 62kWh lithium battery pack:
| Cost Factor | Dealership (OEM) | DIY (Aftermarket Solution) | Savings |
|---|---|---|---|
| Battery Cost | ~$16,000 | ~$7,800 | 50%+ Less |
| Labor Cost | ~$1,500 (Professional Mechanic) | $0 (Your Time) | 100% Saved |
| Total Cost | ~$17,500 | ~$7,800 | ~$10,000 Saved |
By choosing a high-quality aftermarket solution and doing the work yourself, you are not just saving money—you are taking control of your vehicle’s maintenance. This isn’t about buying a cheap, risky product; it is about buying a brand-new, premium-grade battery without the dealership markup.
🔋 Selecting the Right Budget Battery: Quality vs. Risk
When searching for a “budget-friendly” battery, the market is flooded with options. It is crucial to distinguish between a true value buy and a dangerous gamble.
🚫 The Risk: Refurbished or Used Batteries
Many low-cost options are simply old batteries pulled from salvage cars, cleaned up, and resold. These come with severely degraded cells. You might save money upfront, but you risk swelling, sudden power failure, and having to replace it again in 6 months.
✅ The Solution: New Cells, Direct from the Factory
At CNS, we specialize in providing brand new, premium lithium battery packs specifically designed for Nissan models. We utilize brand-new CATL cells—the same high-tier quality found in many original factory batteries.
- For Nissan Leaf (ZE0/AZE0/ZE1): We offer 40kWh, 50kWh, 62kWh, and even 68kWh upgrades.
- For Nissan e-NV200: We provide 40kWh and 50kWh lithium battery packs.
These are not refurbished; they are engineered from the ground up to match OEM standards, ensuring your DIY investment lasts for years, not months.
📋 Pre-Installation Checklist: Is Your Nissan Ready?
Before you dive under the hood, you need to ensure compatibility. A DIY installation only works if the battery fits perfectly.
- Identify Your Model: Determine if you have a Leaf ZE0 (2011-2017), AZE0 (2018-2022), or ZE1 (2023+). The e-NV200 also has specific requirements.
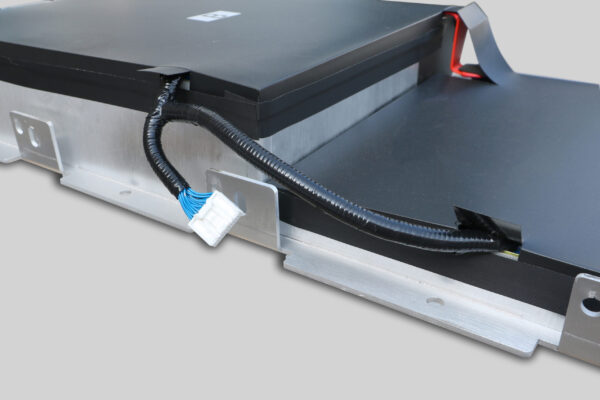
- Check Physical Dimensions: Our batteries are designed to fit the factory footprint. You should not need to modify the chassis or cut wires.
- Verify BMS Compatibility: The Battery Management System (BMS) must communicate with your car. Our packs come pre-programmed, but it is always wise to confirm the software version with our team before ordering.
Pro-Tip: If you are unsure, use our free VIN compatibility check service. Just provide your Vehicle Identification Number, and we will confirm the exact pack you need.
🛠️ The DIY Process: How Hard is it to Install?
Many drivers assume replacing a high-voltage battery requires a degree in electrical engineering. While safety is paramount, the physical installation is surprisingly straightforward for the average DIYer with basic tools.
Estimated Time: 1 – 2 hours
Difficulty Level: Intermediate (Similar to a complex brake job)
Step 1: Safety First
- Disconnect the 12V Battery: Always start by disconnecting the negative terminal of your car’s auxiliary battery to cut all power.
- Gear Selection: Ensure the car is in “Park” and the keys are far away from the vehicle.
Step 2: Access the Pack
- Remove the rear seats and the floor cover to access the high-voltage connector cover.
- Disconnect the high-voltage cable from the old battery.
Step 3: Removal and Installation
- Remove the bolts securing the old battery to the chassis.
- Slide out the old pack and slide in the new CNS battery.
- Reconnect the high-voltage cable and secure the bolts.
Step 4: Programming (The “Magic” Step)
This is where many DIYers get stuck, but we make it easy. Our batteries often require BMS programming to sync with the car’s computer.
- Video Call Support: If you encounter issues, our customer service offers real-time video call guidance. An expert will walk you through the programming tool usage step-by-step.
🌟 Real Stories: Nissan Owners Who Saved Thousands
Don’t just take our word for it. Here are real Nissan owners who took the DIY plunge with our budget-friendly packs:
“I saved nearly $10,000 compared to the dealer price.”
— David L., London, UK
David replaced his Leaf ZE1 battery himself. He noted that the connectors were a perfect match for the original factory parts, requiring no modifications. The full charge range is now a consistent 440km.
“The installation was a bit tiring, but I saved a lot of money.”
— Tom H., Texas, USA
Tom, who admitted he usually struggles with car repairs, followed our video tutorial. With the help of a friend, he completed the swap in 2 hours. The color-coded connectors made the wiring simple.
“Plug-and-play… without any additional steps.”
— Thomas B., Amsterdam, Netherlands
Thomas installed a 50kWh pack in his e-NV200. He praised the robust packaging and the fact that the battery automatically matched the system after connecting the plug.
📝 Final Thoughts: Is DIY Right for You?
If you are looking to maximize your range and minimize your costs, DIY Nissan EV Lithium Battery Installation is the definitive answer.
By choosing a budget-friendly, brand-new battery from a reputable manufacturer like CNS, you avoid the pitfalls of used junkyard batteries while skipping the exorbitant labor fees charged by dealerships.
You don’t need to be a master mechanic. With our detailed installation videos, color-coded wiring, and responsive customer support, you have all the tools you need to revive your Nissan EV.
Ready to take back control of your EV’s future?
Don’t let the high cost of replacements force you into buying a new car. Get a quote today and see how much you can save with a DIY upgrade.
Get Your Free Custom Quote Now
❓ Frequently Asked Questions (FAQ)
1. Is it safe to install an EV battery myself?
Yes, as long as you follow proper safety protocols. The most critical step is disconnecting the 12V auxiliary battery before touching any high-voltage components. The physical swap is low-risk, but if you are uncomfortable with the BMS programming step, we offer video call support to guide you.
2. Will a DIY battery void my car’s warranty?
Our batteries are designed to OEM standards. If installed correctly without damaging other components, they should not void unrelated warranties. However, it is always best to check your specific vehicle’s warranty terms. We recommend getting a VIN compatibility check to ensure a perfect fit that won’t cause electrical issues.
3. How much range can I expect from a budget-friendly Nissan Leaf battery?
With our 62kWh pack, you can expect a full charge range of approximately 430km – 440km. This is a massive improvement over the degraded range of older batteries and is comparable to a brand new Leaf.
4. What kind of warranty do these DIY batteries come with?
We stand by our quality. All CNS Automotive Batteries come with a minimum 2-year / 80,000km warranty. This covers manufacturing defects and ensures your peace of mind long after the installation is complete.
5. What if I get stuck during the installation?
We don’t leave you hanging. Our customer service team includes technical experts who can assist via phone, email, or free video call guidance. Most technical issues, like programming hiccups, can be resolved in under 5 minutes with our help.


